Payday filing is the Inland Revenue's latest compliance regulation that requires employers to send employee payroll information including new or departing employee details, salary, wages, PAYE and superannuation to the IR within two working days after the payday.
Exception: Employer who file their own PAYE to IRD as an IR56 taxpayer, they'll have 10 working days after the payday to file this information. Click here to read more information about Payday filing from IRD's website.
You will have to file electronically if your annual PAYE and ESCT deductions are $50,000 or more
You can file by paper if your annual PAYE and ESCT deductions are less than $50,000
For User Guide and more information on Payday filing, click here.
Turning Payroll On
After you upgrade or create your company file in Reckon Accounts Plus and above, the first thing that you need to do is turn Payroll on.
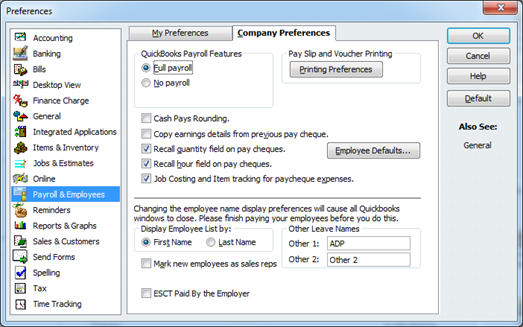
To turn on payroll in Reckon Accounts:
Go to the Edit menu > Preferences
Click Payroll & Employees
Click the Company Preferences tab
Click Full Payroll.
Please note that this can only be done in Single-user mode and you must be logged in as Administrator.
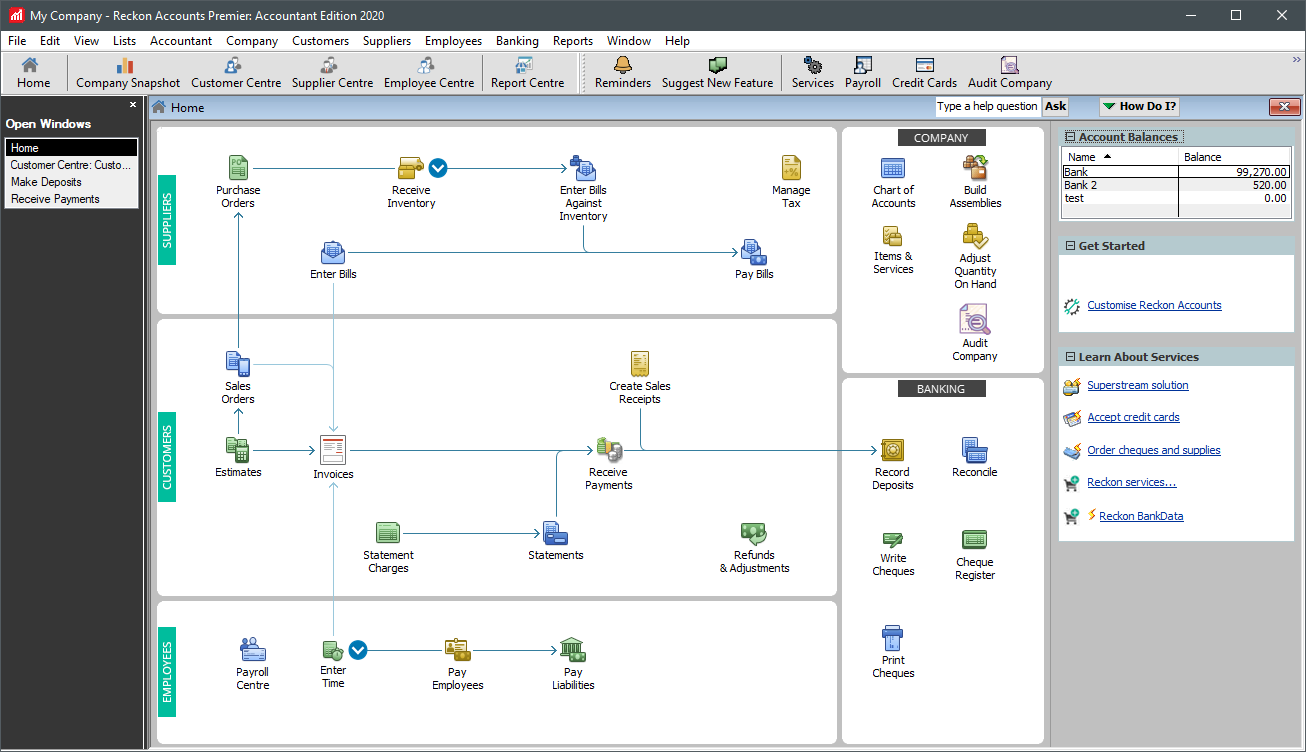
Once payroll is enabled when you go to your Home Page you will see the Payroll centre in the Employee section and you will also notice the system has added an Employee Centre icon on the icon bar.
Setting up Payroll Items
The following section shows you how to setup some payroll items that you might want to use when running payroll in Reckon Accounts.
ACC Levy exempt payroll item
The ACC Levy is calculated automatically as part of the tax tables but there may be times where you have a contractor or employee who is not supposed to be paying the ACC Levy.
To pay an employee without the ACC Levy being calculated you will need to setup a new payroll item.
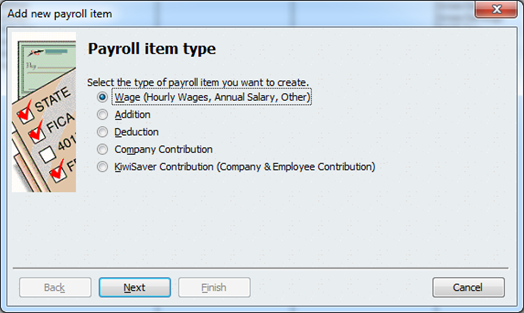
Go to the Lists menu and then click Payroll Item List. This will open the listing of your current payroll items.
Click the Payroll Item button at the bottom of the window and then click New.
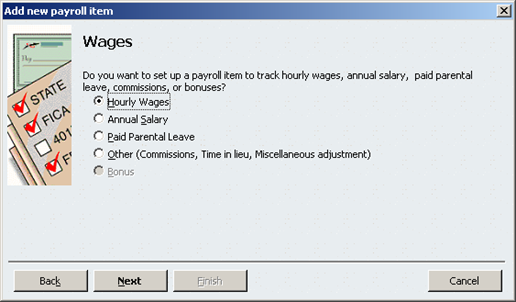
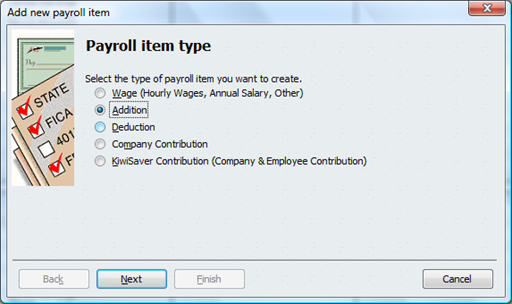
Click Wage and then click Next.
Select Hourly Wages if it is an hourly rate or Annual Salary if it is for someone on a salary and then click Next.
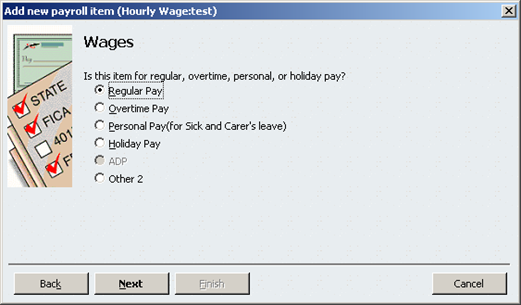
Select the pay type and click Next.
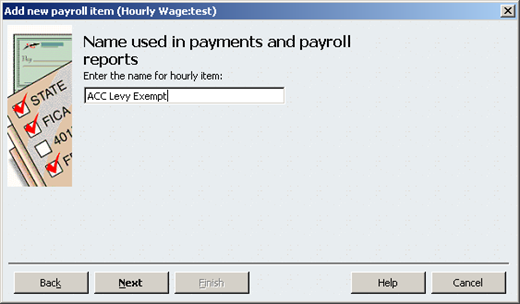
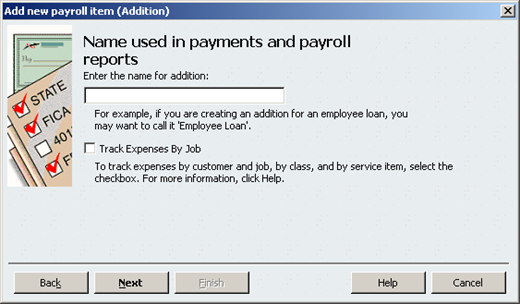
Name the Payroll Item (this is what will appear on the employees payslip so be careful) and click Next.
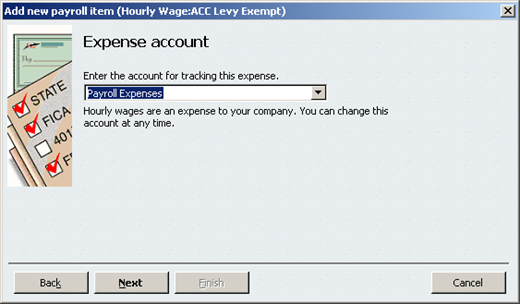
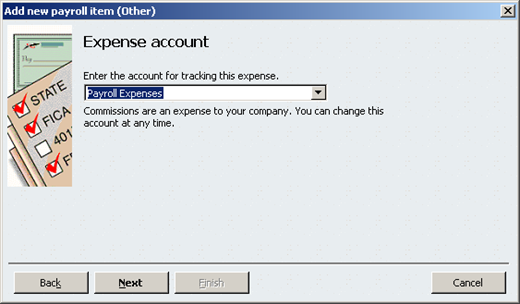
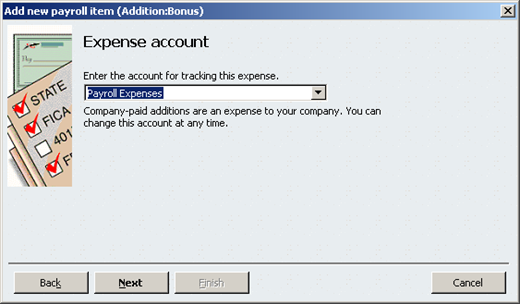
Select the expense account from the chart of accounts that will be used to track costs associated with this item (i.e. the wages) and click Next.
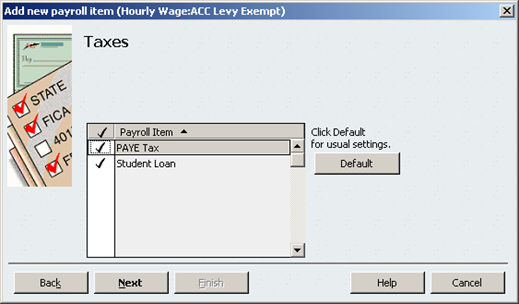
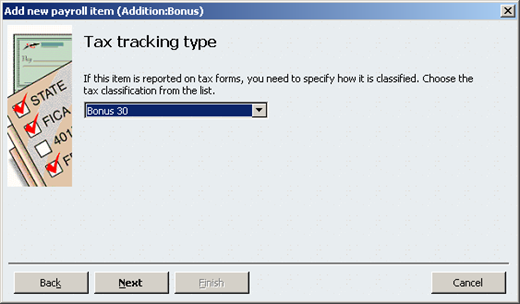
Select the Tax Tracking Type as ACC Levy Exempt and click Next.
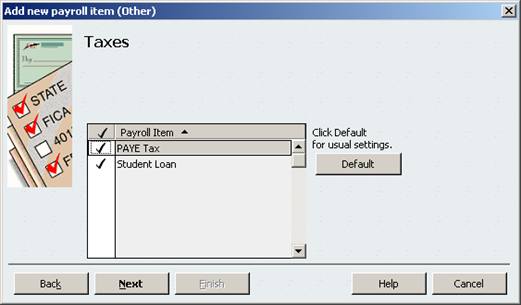
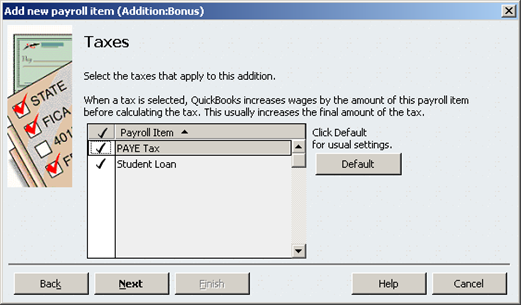
Select whether the item should attract PAYE Tax and Student Loan calculations. If you are unsure please discuss this with either your accountant or the IRD. Click Next.
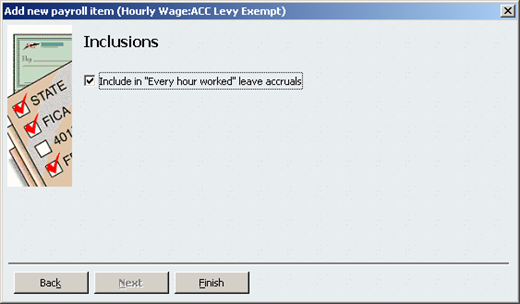
Select whether this item should accrue leave when the employee is set to Every hour worked accruals in their profile. Please note that employee must be on WT tax code.
Click Finish to complete the Payroll Item. You can now use this item on a regular pay and the ACC levy will not be included in the tax calculations.
ACC Levy First Week payroll item
Note: This is a default payroll item in Reckon Accounts .
Go to the Lists menu and then click Payroll Item List. This will open the listing of your current payroll items.
Click the Payroll Item button at the bottom of the window and then click New.
Select Wage. Click Next.
Select Hourly Wages. Click Next.
Select Regular Pay. Click Next.
Enter a name for the Payroll Item. Click Next.
Enter the account which will be used to track these payments. Click Next.
Select Gross Payments for Tax Tracking type. Click Next.
Select whether the payments affect PAYE Tax and Student Loan payments. Click Next.
Select Calculate this item based on hours and click Next.
Select Include in every hour worked and click Finish.
Paying the Employee
To pay the employee the first week ACC wages:
Enter the employee salary/hourly rate item to show what 100% of the wage would be.
Enter ACC First week in the Paycheque details.
Enter the full amount of the weekly wage, and enter 0.80 in the hour’s field.
Then, remove the salary/hourly rate payroll item.
Retirement / Redundancy payroll items
Similar to the ACC Levy Exempt situation, you will need to setup new Payroll Items to handle retirement and redundancy situations. Depending on whether this is the employees primary or secondary job, also determines what options you should select.
To setup the new item:
Go to the Lists menu and then click Payroll Item List.
Click the Payroll Item button at the bottom of the window and select New.
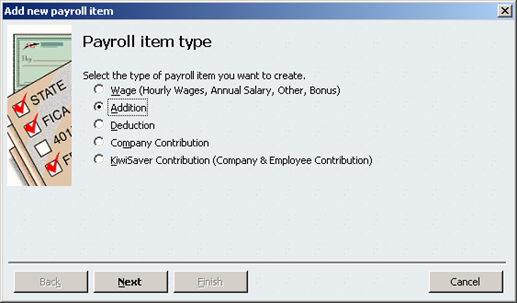
Select the item type Addition and click Next.
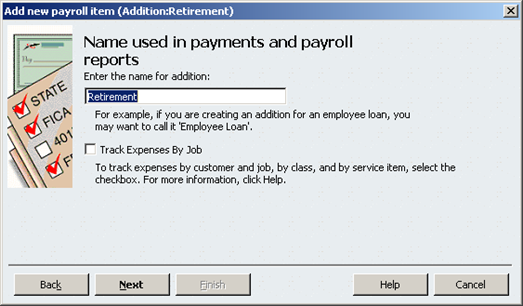
Name the item. This is the name that will appear on the employee’s payslip and click Next.
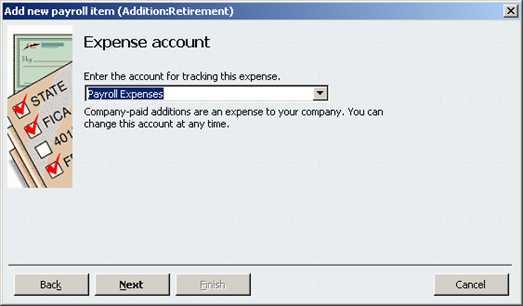
Select the account from the chart of accounts that will track the expenses for this payroll item. Click Next.The tax tracking type determines a number of things, these include:
The tax rate that will be applied on the payroll item, so if you select Retiring 30 (Secondary tax tracking type), the tax rate will be 30%.
Whether this is the employees primary or secondary job. If this is a secondary job, ensure to choose the tax tracking types which list (secondary).
Whether this is a retirement or redundancy payment. To figure out which item you need to use, some calculations will need to be performed to find out the relevant tax rate for the employee. For information about retirement and redundancy payments please consult the Department of Labour in New Zealand or look at this IRD Website: http://www.ird.govt.nz/payroll-employers/make-deductions/staff-benefits/bonuses/emp-ded-bonus-lump-sum.html
Once you have determined which option to select, click Next.
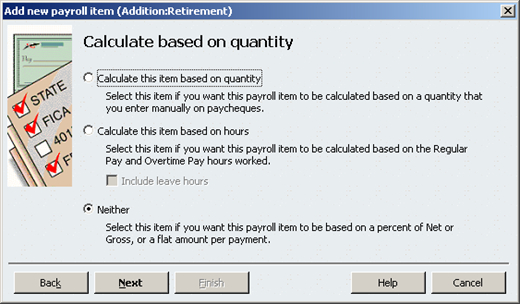
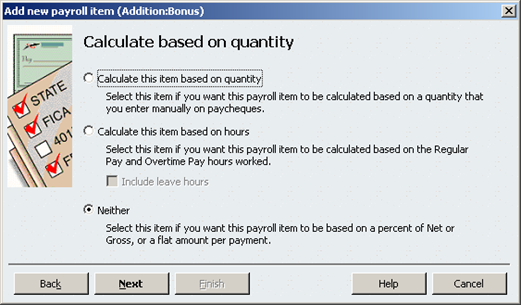
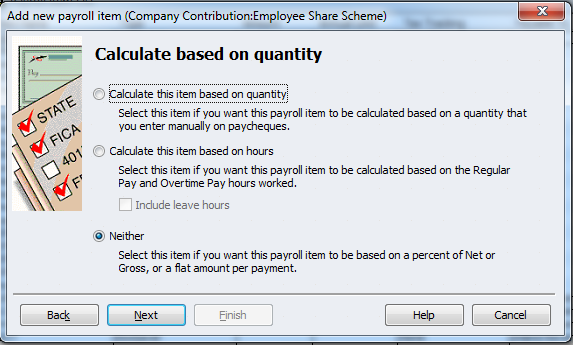
Select whether PAYE Tax and Student Loan repayments should apply to this item. Click Next.With additions you are able to calculate the amounts based on a quantity. You can either calculate it on hours worked, or a quantity you enter (for example, if they build tables and are paid by the table you would do this by quantity). In this example it is likely you would select neither as it is a retirement/redundancy pay. Please consult with your accountant/consultant if you are unsure.
Click Next.
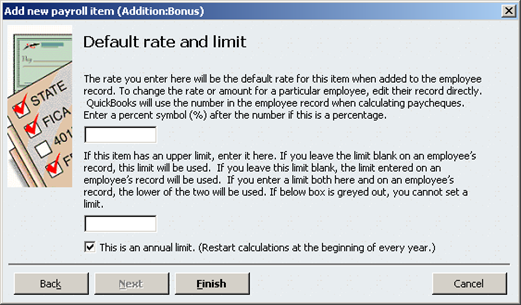
On additions you can also select what the default rate is in either an amount or a percentage. You can also set a limit which is either per pay or annual. If you select This is an annual limit checkbox, this limit is enforced annually. Once the limit is reached, no more additional pay will be added. For retirement and redundancy it is likely these should be left blank. Click Finish.
You can now pay the employee with a regular pay run and the calculations will be made accordingly.
Bonus payroll items
To setup a bonus payroll item:
Go to Lists menu and then click Payroll Item List.
Click the Payroll Items button at the bottom of the window and then click New.
For Bonuses, click Addition and click Next.
Name the Payroll Item. This name will be seen on the employee’s payslip. Click Next.
Select the account that will be used to track expenses related to this item. Click Next.
Select whether PAYE Tax and Student Loans should be included in these calculations for this payroll item. Click Next.With additions you are able to calculate the amounts based on a quantity. You can either calculate it on hours worked, or a quantity you enter (for example if they build tables and are paid by the table you would do this by quantity). In this example it is likely you would select neither as it is a Bonus payment. Please consult with your accountant/consultant if you are unsure.
Click Next.On additions you can also select what the default rate is in either an amount or a percentage. You can also set a limit which is either per pay or annual. If you select This is an annual limit checkbox, this limit is enforced annually. Once the limit is reached, no more additional pay will be added.
Enter your data and click Finish to finish the payroll item.
You can now use this item on regular pays to pay employees bonuses.
Please note if you don’t want Bonuses to contribute to annual leave gross earnings, you need to go to that specific annual leave payroll item, right-click it and select Edit and then make sure that in the Include Payments window that the Bonuses payroll item is not ticked. (If you want to include Bonuses, make sure it is ticked in the Include Payments window.)
KiwiSaver Employee Deduction payroll item
Due to the different configurations possible, Reckon Accounts does not have a default payroll item for KiwiSaver Employee Deductions. Below you will find instructions as to how to setup an Employee Deduction for KiwiSaver purposes.
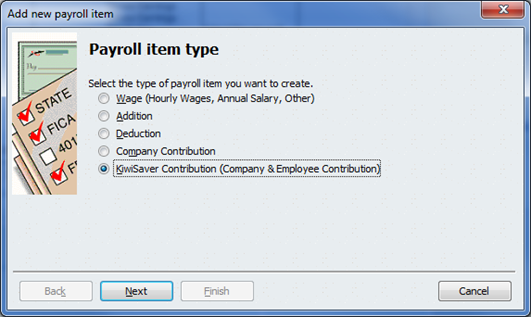
Go to the Lists menu and click Payroll Item List.
Click the Payroll Item button and then click New.
Select KiwiSaver Contribution (Company and Employee Contribution). Click Next.
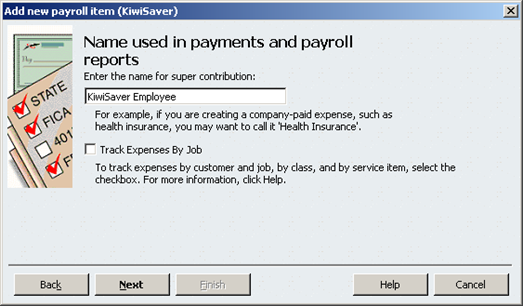
Enter the name you would like to use for the item for example KiwiSaver Employee and select Next.
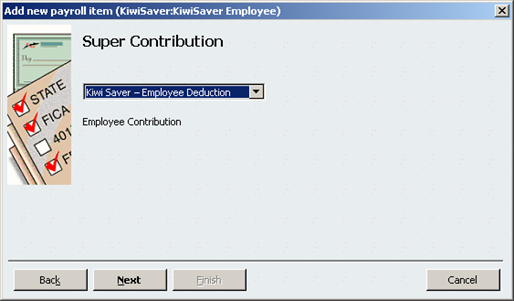
Select KiwiSaver – Employee Deduction from the dropdown list and click Next.
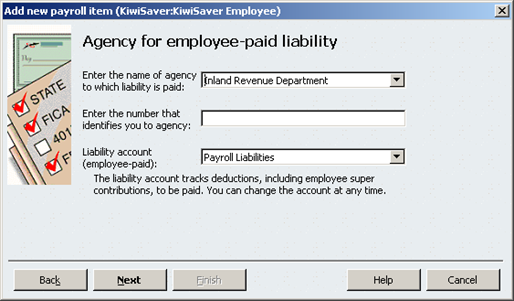
Select the agency you pay KiwiSaver to (for example the Inland Revenue Department) and enter the number which identifies you to the agency (for example your companies IRD Number).Select the account you want to track this liability and click Next.
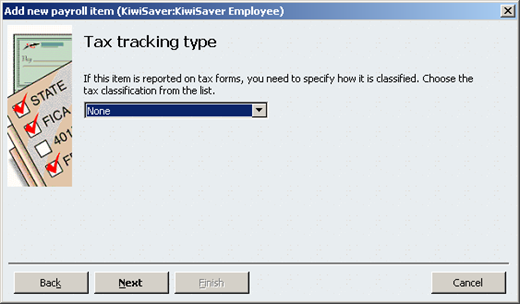
As no tax is payable on KiwiSaver deductions (aside from ESCT), select None from the Tax Tracking Type list. Click Next.
Select whether PAYE Tax and/or Student Loans should be applied to these deductions. Usually you should leave this unticked. Click Next.
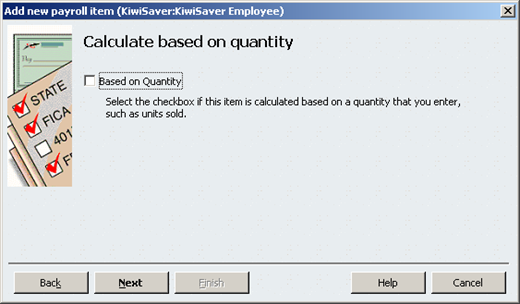
Leave Based on Quantity unchecked. Click Next.
Select whether to calculate the KiwiSaver percentage deduction on Gross Pay or Net Pay. Generally this should be Gross Pay. Click Next.
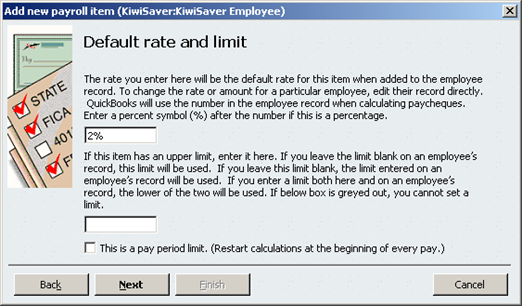
This is where you set the KiwiSaver rate. In the top box enter the rate the employee has requested you to deduct. By default this is 3%. It is extremely important you enter the percentage symbol otherwise this is seen as a dollar figure and would for example only deduct $2. You can set an annual limit if applicable in the bottom box. Click Next.
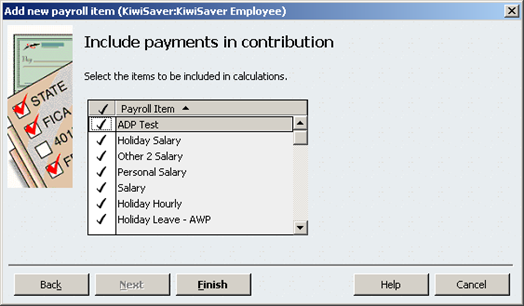
Select which payroll items are included in the calculation of KiwiSaver. If you have any exempt items (for example possibly a Bonus) you would leave it unticked. Check the selections and click Finish.
This item can now be added on pay runs and employee profiles to be automatically calculated when paying your employees.
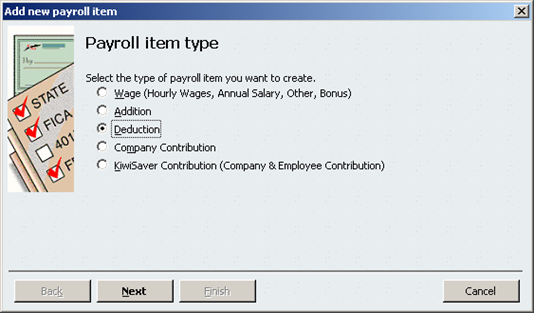
Child Support Deduction payroll item
To deduct Child Support payments from the employees pay, you first need to setup a payroll item to calculate and deal with Child Support.
Go Lists menu and then click Payroll Item List.
Click the Payroll Item button and then click New.
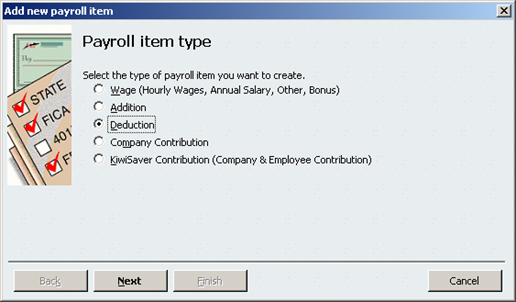
Select Deduction and click Next.
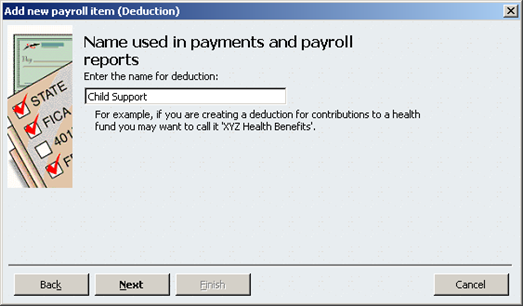
Name the Payroll Item, for example Child Support and click Next.
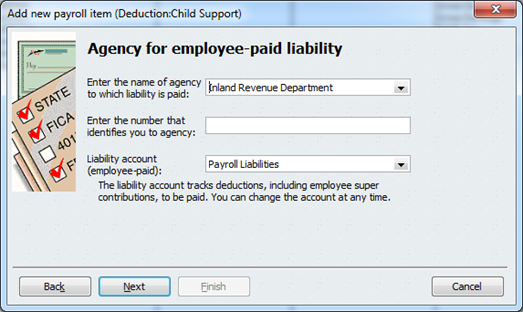
Select the Agency to whom the money is paid to and the number which identifies your business to that agency. Then select which liability account you want to track this liability under. Click Next.
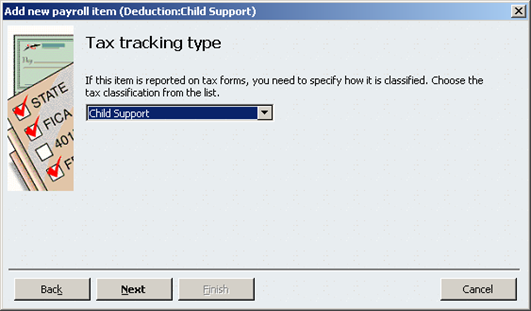
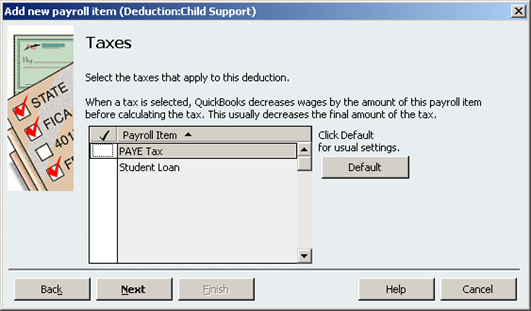
Select Child Support as the Tax tracking type. This ensures the information appears correctly in the IR348 electronic submission. Click Next.
As Child Support does not reduce PAYE Tax or Student Loan requirements, leave these options unticked. Click Next.
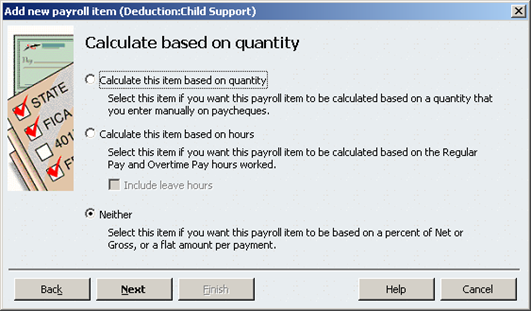
Select Neither. The calculation is performed on the Gross payment to the employee. Click Next.
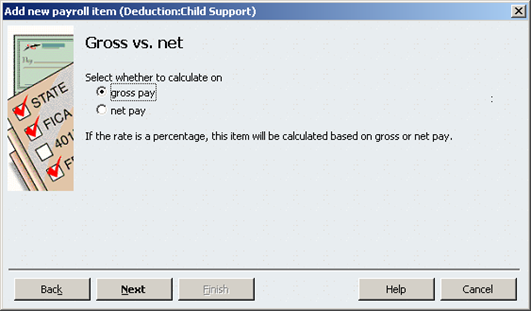
Click gross pay. Click Next.
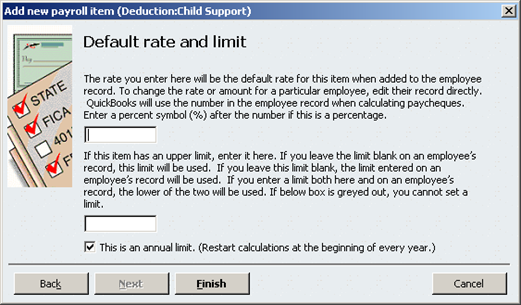
Enter the rate the Government Agency has advised you to take out of the employees pay and then click Finish.
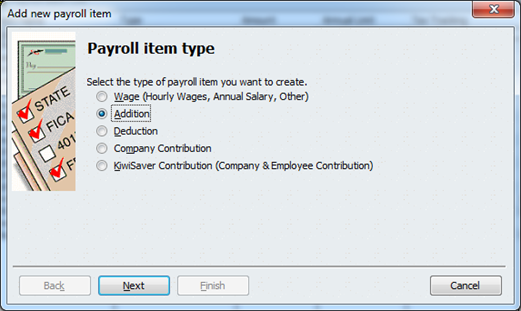
Casual Holiday payroll item
Note: This is a default payroll item in Reckon Accounts .
To setup an item for Casual workers who attract holiday pay every payment do the following:
Go to Lists menu and then click Payroll Item List.
Click the Payroll Item button and then click New.
Select Addition. Click Next.
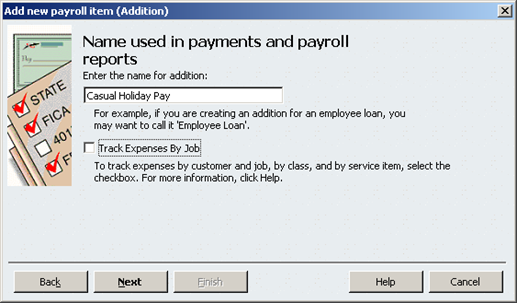
Name the Payroll Item. Click Next.
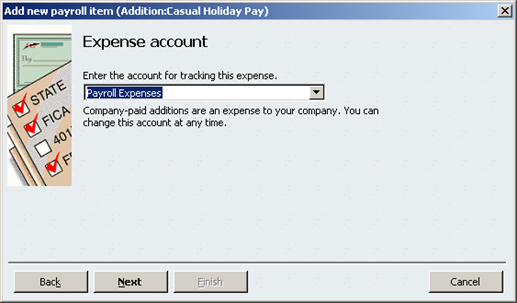
Select the account you want to track these payments with. Click Next.
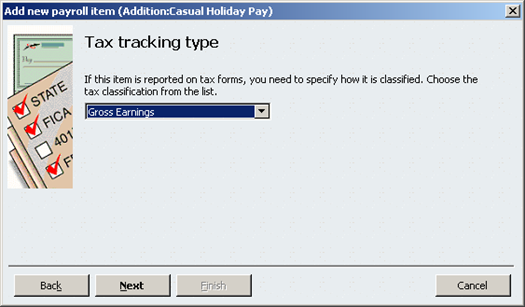
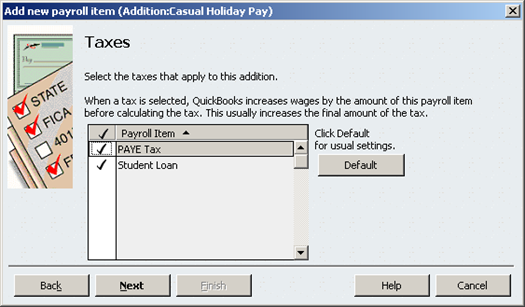
Select Gross Earnings as the Tax Tracking type. Click Next.
Select whether Student Loan Payments and PAYE Tax should be affected by this calculation. Click Next.
As you want the amount to be calculated on the total the employee has worked, select Neither. Click Next.
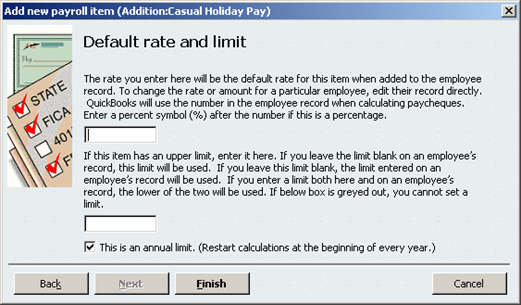
Enter the rate of 8% in the top field. Click Finish to save the item.
This item can now be added to the employees’ pay.
Payroll Giving payroll item
Note: This is a default payroll item in Reckon Accounts .
Go Lists menu and then click Payroll Item List.
Click the Payroll Item button and then click New.
Select Deduction. Click Next.
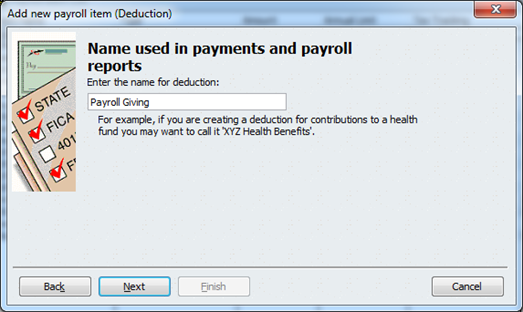
Name the Payroll Item. Click Next.
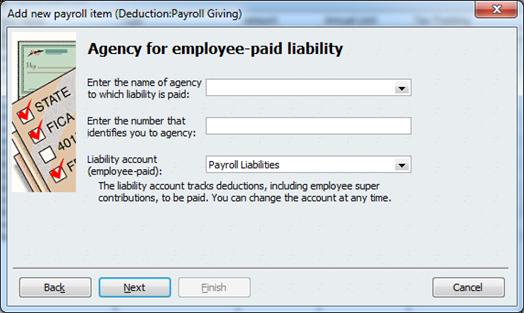
In the Liability account drop-down, select the account you want to track these payments with. Click Next.
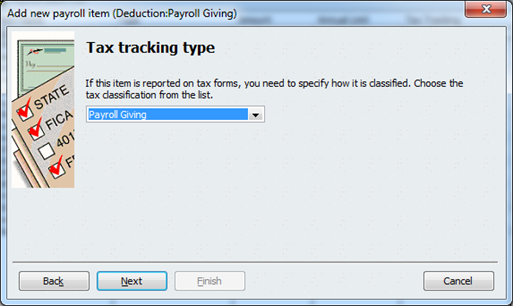
Select Payroll Giving as the Tax Tracking type. Click Next.
Make sure that PAYE Tax is unticked and select whether Student Loan should be affected by this calculation. Please note that even though you have unticked PAYE Tax, 33.33c per dollar will still be taxed using the Payroll Giving payroll item. Click Next.
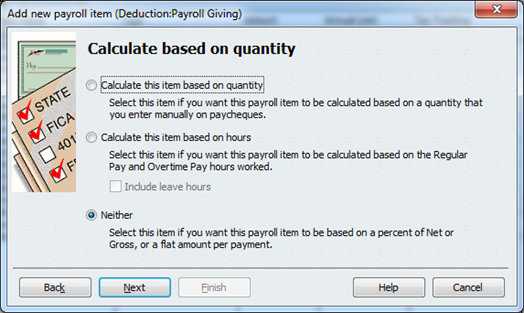
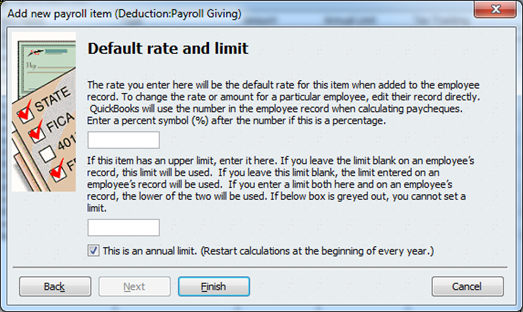
Click Neither and then click Next.
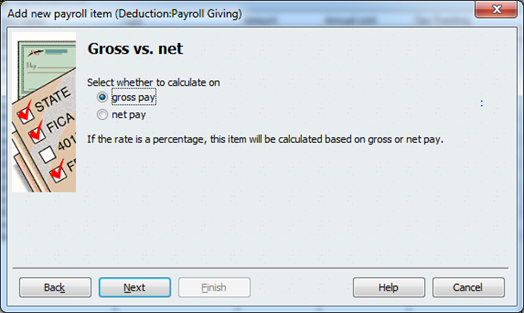
Select gross pay and then click Next.
Leave this window blank and then click Finish to save the item.
This item can now be added to the employees’ pay.
SLBOR payroll item
Note: This is a default payroll item in Reckon Accounts .
The following payroll item can be used for SLBOR:
Go Lists menu and then click Payroll Item List.
Click the Payroll Item button and then click New.
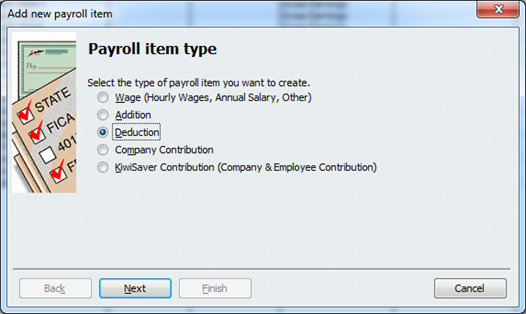
Click Deduction and then click Next.
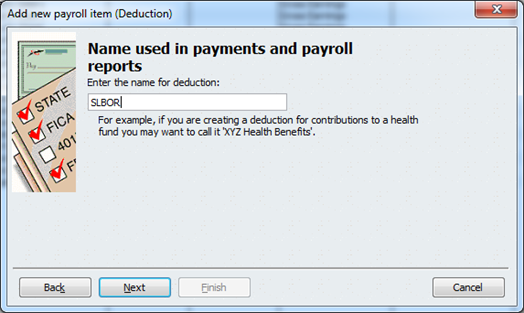
Enter the name for the payroll item and then click Next.
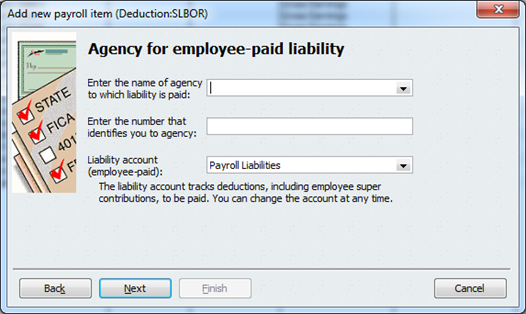
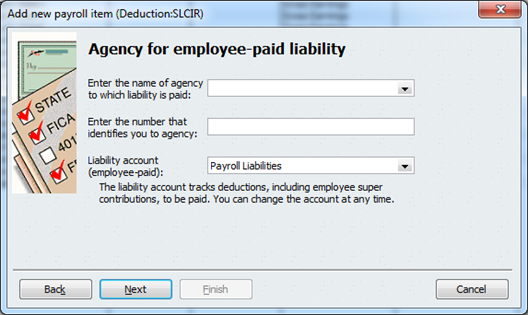
You can select the IRD as the name for the agency to which the liability is paid and then click Next.
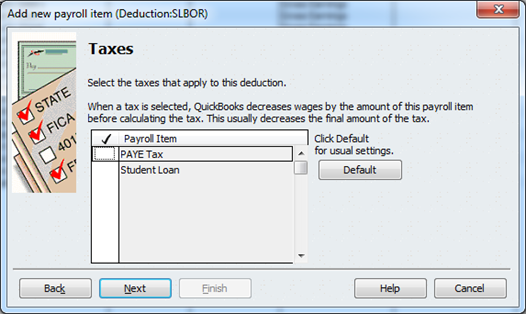
Select Student Loan (SLBOR) as the Tax Tracking type. This is important because you want it to appear on the IR348. Click Next.
Leave both PAYE Tax and Student Loan unticked and then click Next.
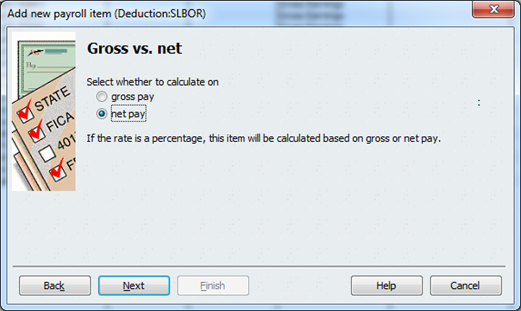
Select Neither and then click Next.
Select net pay and then click Next.
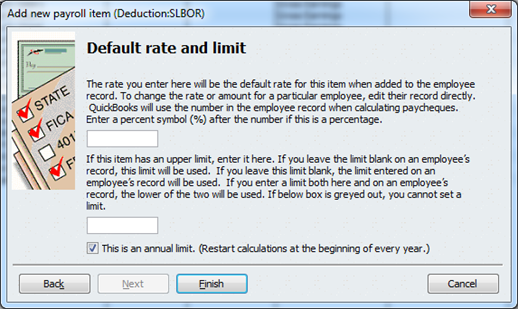
You can enter a dollar ($) or a percentage (%) amount in the top field and then click Finish.
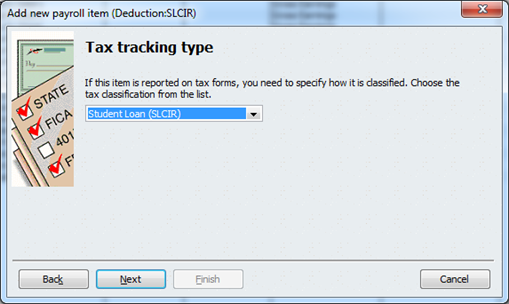
SLCIR payroll item
Note: This is a default payroll item in Reckon Accounts .
The following payroll item can be used for SLBOR:
Go Lists menu and then click Payroll Item List.
Click the Payroll Item button and then click New.
Select Deduction and then click Next.
Enter the name of the payroll item and then click Next.
You can select the IRD as the agency to which this liability is paid and then click Next.
Select Student Loan (SLCIR) as the Tax tracking type. This is important because you want it to appear on the IR348. Click Next.
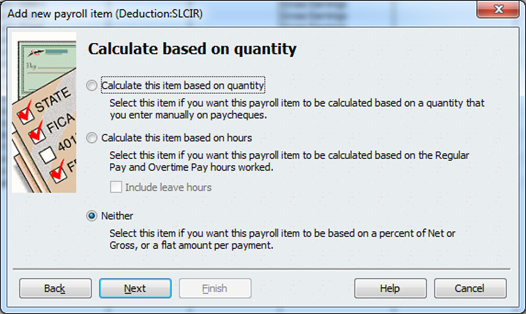
Leave both PAYE Tax and Student Loan unticked and then click Next.
Select Neither and then click Next.
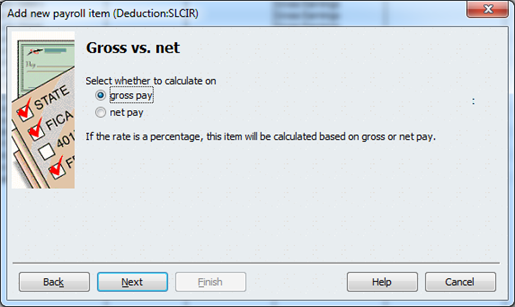
Select gross pay and then click Next.
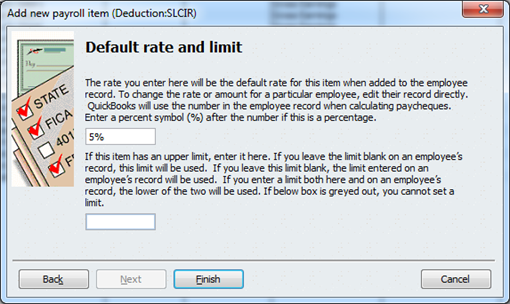
Enter the percentage rate and then click Finish.
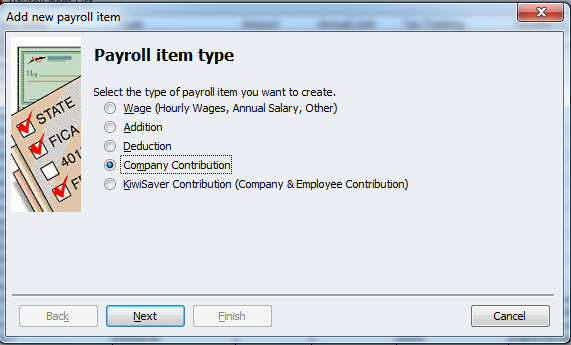
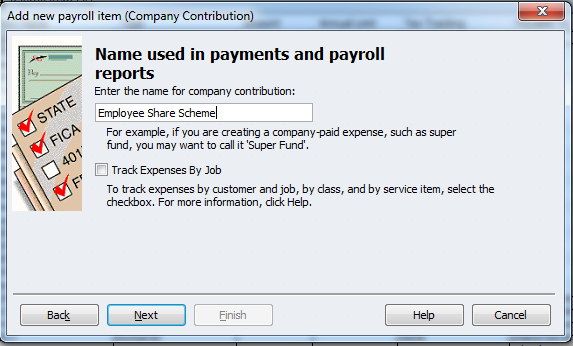
Employee Share Scheme (ESS) benefits
From April 2017 employers are able to withhold PAYE on benefits provided to an Employee under an employee share scheme by taxing them as an 'extra pay'
If Employers choose to do this, they must include the information on the EMS as Gross Earnings and 'Earning Not Liable for ACC Earners Levy'
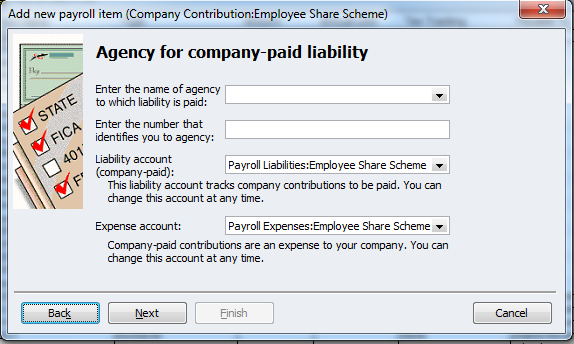
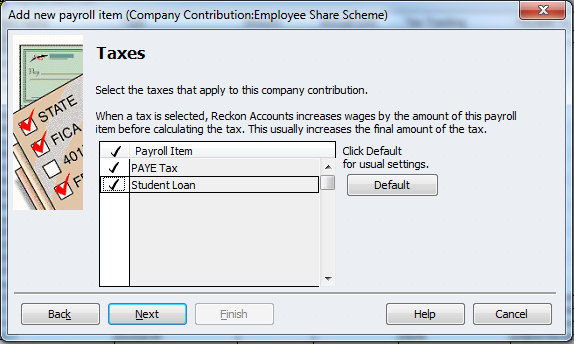
Select the Liability & Expense accounts to will use to track these items, then click Next
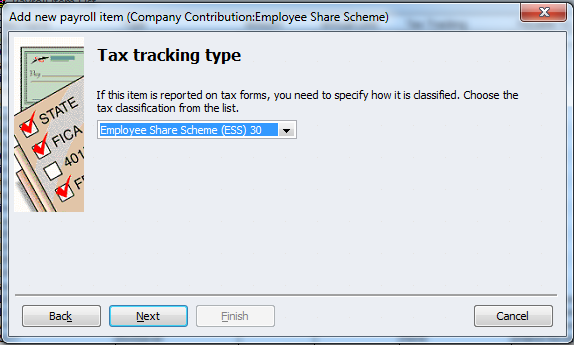
Select one of the Employee Share Scheme (ESS) Tax tracking types. The Tax Tracking type that you select will be applied on the payroll item, so if you select Employee Share Scheme 30, the tax rate will be 30%. Click Next
Nearly every business in the world has a set time frame they do payrolls. Whether it be weekly, fortnightly, monthly or four weekly you can handle this in Reckon Accounts. If your Payroll is generally the same each time you can use a feature called Scheduled Payrolls.
Setting up the Schedule for the Payroll
The following section details how to create a scheduled pay.
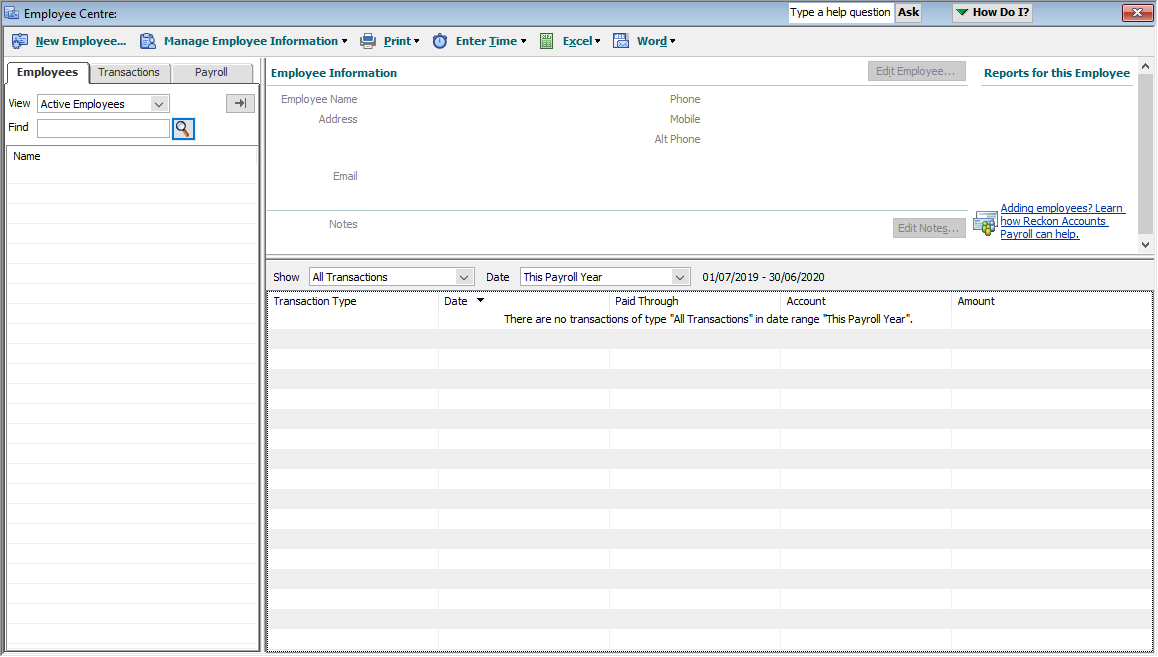
Open the Employee Centre.
Click the Payroll tab.
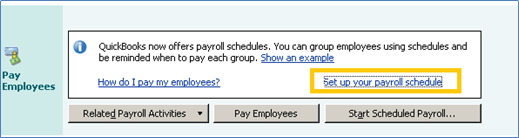
Click Setup your payroll schedule.The New Payroll Schedule window opens.
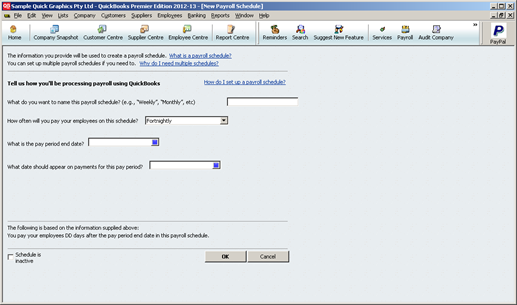
Firstly enter the name of the payroll schedule. You can have multiple payroll schedules in the one Reckon Accounts file. You may pay contractors weekly, but regular employees monthly.
Using the dropdown box, set the pay frequency. By default this is set to fortnightly but you can have it as weekly, fortnightly, monthly or four weekly.
Set the pay period end date and the date that should appear on payments for this pay period. For example if you pay someone in arrears, the pay period end date will always be BEFORE the date that appears on the payroll. Quite often the date will be the same but not always.
Assigning an employee to a payroll schedule
Open the Payroll and Compensation info window of the employee’s profile.
Click the Payroll Schedule drop-down and select the schedule you want to assign to this employee. This list is made up of those schedules you have previously setup in Reckon Accounts. If you have not setup a schedule, you will need to do that before you can set this option.
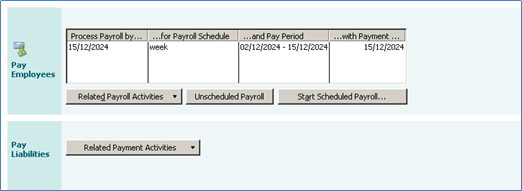
Starting a scheduled payroll
Go to the Employee Centre and click the Payroll tab. You will then see a list of payroll schedules which have been setup as per below.
Click the payroll schedule that you want to use and then click Start Scheduled Payroll.
Once past this screen, the flow follows that of the unscheduled pay.
When should you use a Scheduled Pay?
Scheduled Payroll is good for those that have minimal changes with their payroll. For example if you have 20 employees all on a salary that don’t have allowances, a scheduled payroll would be good however if you have 30 or so casual employees with varying rates and hours, then the normal payroll is likely to serve you better. Either way you can switch between the two options so you are never ‘locked in’ to one choice.
Setting up Employees
The following section describes how to set up your employees in Reckon Accounts. For more information refer to the in-product Help.
Create new employee
To add an employee, do the following:
Open the Employee Centre.
Click New Employee.
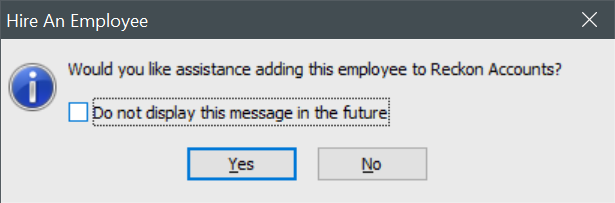
If you see a message asking if you want assistance adding this employee, click No.
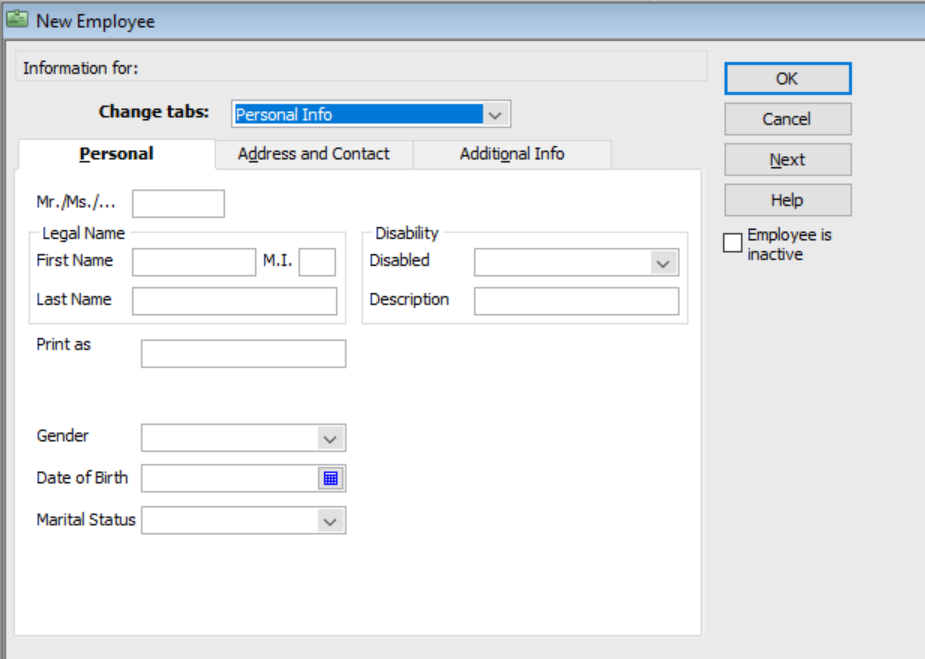
The New Employee window opens.
On the Personal tab, you enter the employee’s personal information, such as First Name, Last Name and Date of Birth.
On the Address and Contact tab, you enter the employee’s address and emergency contact details. This is also where you enter the employee’s email address – if you want to email them pay slips. It is also where you select their preferred send method. So if they want to receive payslips by email, select Email in the Preferred Send From Method drop-down.
On the Additional tab, you can add any custom fields for your employee’s. (See your Accredited Trainer for further advice on this option.)
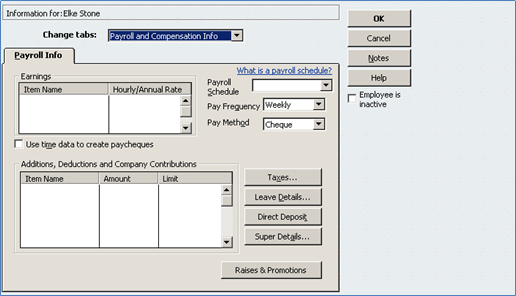
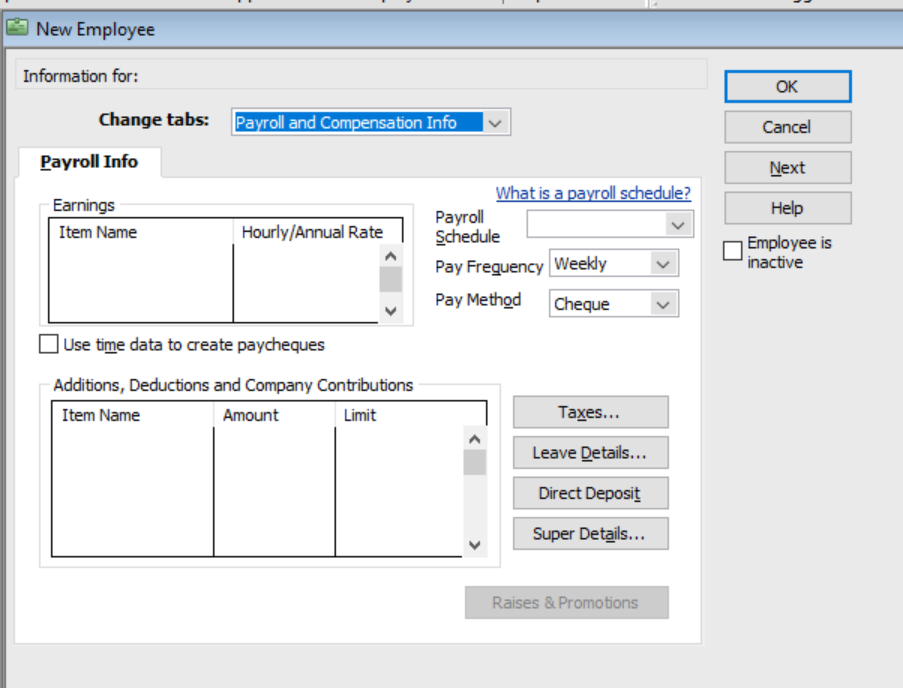
Payroll and Compensation Information
Click the Change tabs drop-down list and select Payroll and Compensation Info.
This window is where the employee’s payroll information is entered.
The Earnings box is used to enter an employee’s usual earnings for time worked such as a salary or an hourly wage.
The Additions, Deductions and Company Contributions box is used to enter information about additions and deductions as well as KiwiSaver.
Once you have setup your additional Payroll Items you can use the drop-down list to select the earnings, additions and deductions for the available options.
Please note that if you are entering a Salary that the amount entered in the Earnings field is the annual amount so if someone is paid $90,000 per annum, enter $90,000 not the weekly/monthly wage. The hourly rate is the per hour rate so if someone earns $40 an hour, enter 40.
Taxes
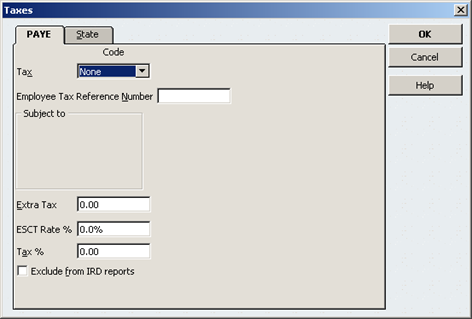
To enter the taxes for the employee, click the Taxes button.
The Taxes window opens.
This is where you enter information about an employee’s taxation data.
The Tax drop-down includes Tax Codes for both primary and secondary jobs as well as those for student loans. If a student loan exists, you should select a tax code which includes SL as part of the name. Refer to an employee’s completed IR330 for their tax code.
The Employee Tax Reference Number is where you enter the employees IRD number. If the employee has not provided a number, select ND and enter 000000000. Please note that there is validation on this number against an IRD provided algorithm. If the number is invalid when entered, you need to refer this back to the employee and use the ND tax code until a valid number is provided by the employee. When entering an employee’s IRD number in this field do not use dashes (-), please use the format, 012345678.
Please note that the Subject to section is not applicable to New Zealand.
The Extra Tax field is where you enter any amount of extra tax; Reckon Accounts will take out an additional amount of tax on top of the usual PAYE deduction.
The ESCT Rate % is used to determine what rate the employees ESCT rate should be for their ESCT deductions on KiwiSaver. If you do not understand what to enter here, please contact the IRD.
The Tax % field is only used for the STC, STC, SL and WT tax code. This is used when the IRD has provided a certificate to determine a tax rate for the employee. Enter the rate with a % here and that is what will be used for PAYE deductions on that employee.
If you select the Exclude from IRD reports checkbox, the employee will not be included in any IR348 submissions you make with files generated from Reckon Accounts.
The State tab is not relevant for New Zealand.
When you have finished entering the tax details, click OK.
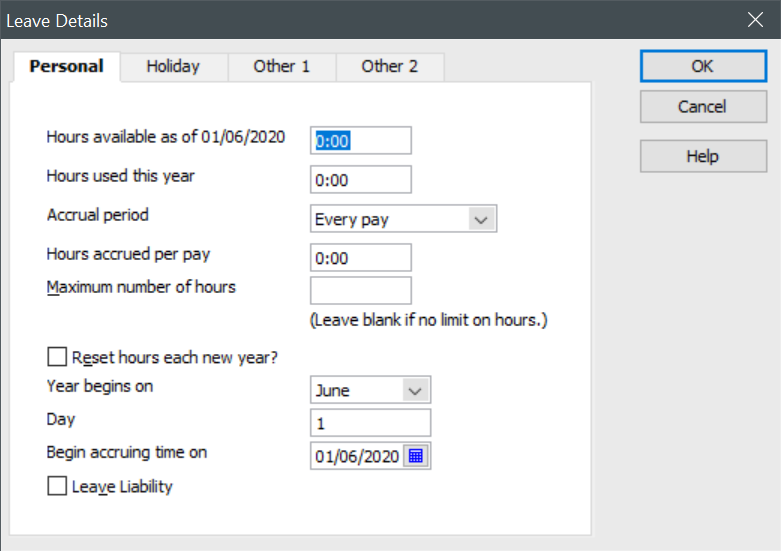
Leave Details
To enter the leave details for the employee, click Leave Details.
The Leave Details window opens.
This window is used to enter the leave accrual rates for each employee.
The Hours available as of <current date> field allows you to enter an amount as of the current date. If you are starting Reckon Accounts having moved from another product and someone has 200 hours available, enter 200 here.
The Hours used this year field allows you to enter the amount of hours the employee has used in the current financial year.
The accrual period allows you to set how the leave is accrued by clicking the drop-down arrow:
Every Pay – When set to every pay, the employee will accrue leave at a set rate. For example, if you have a salaried worker who has an annual leave entitlement of 166.4 hrs, and you paid them weekly, then you might want to enter 3.2 hours to accrue each pay.
Every Hour – When set to every hour, the employee will accrue leave at set rate for each hour worked. It is extremely important when using this option to enter the hours worked on an employee’s payroll, otherwise they won’t accrue leave.
Beginning of year – When set to beginning of year, the employee will accrue a set rate at the start of each year. That year is set by the Year begins on and Day fields which are near the bottom of the window.
The Leave Liability checkbox determines whether this is a liability to the company and should appear on the leave liability report.
The Other 1 & 2 options can be used for Time in Lieu or other customised options. Please see an Accredited Trainer for advice on these settings.
When you have finished entering all the leave details, click OK.
Direct Deposit
To enter the banking direct deposit details for the employee, click Direct Deposit.
The Direct Deposit window opens.
This window is used to split up an employees pay which is electronically paid between up to three accounts. As you can see from the above window you enter the branch codes and account names for the different accounts. When you generate an electronic payment file from Reckon Accounts it will automatically split the money between the amounts that you set.
For example if you put $500 in the Deposit box of the first account, that account will receive $500 with the rest going to the other account. Many employees request these splits due to mortgage repayments. This will only occur if you generate an electronic payment file from your bank from Reckon Accounts.
When you have finished entering all the direct deposit details, click OK.
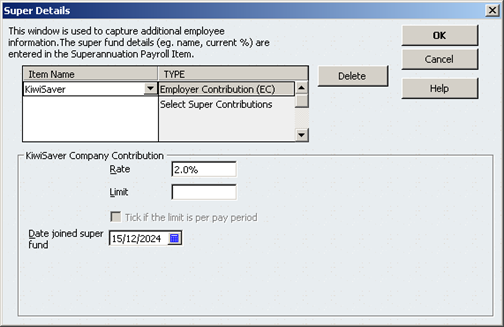
Super Details
To enter the employee’s superannuation details, click Super Details.
The Super Details window opens.
This window allows you to setup the KiwiSaver/Superannuation options for the employee. You can add multiple payroll items to the employee in the Item Name column and can set the rate for KiwiSaver as well in the Rate field.
When you have finished entering all the superannuation details, click OK.
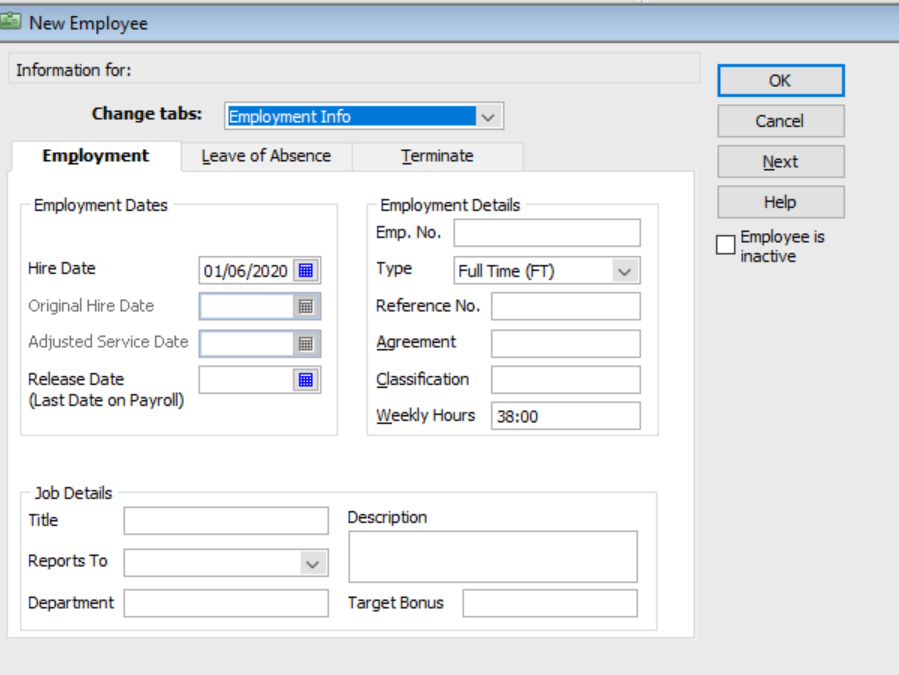
Employment Info
Click the Change tabs drop-down and click Employment Info.
The Employment Info tabs will open.
This is where you can enter information that may be important for an employee’s HR profile within the company. This information includes when they were hired, when they left, their job details as well as their job classification (Full time, part time etc).
Please note it is important that you enter the correct Hire Date for the employee as this might be used when calculating the AWP.
The Leave of Absence and Terminate tabs are directly linked into the Employee Manager. The Employee Manager is covered in the main Reckon Accounts user guide.
When you are finished entering the employee’s details, click OK.
If you want to enter another employee, you can click Next.
Entering 52 weeks data
The following are instructions for the best case scenario when entering 52 weeks of data into Reckon Accounts for the AWP calculation. You can use the Year to Date feature to enter the last financial year figures and then enter each pay from April 1st.
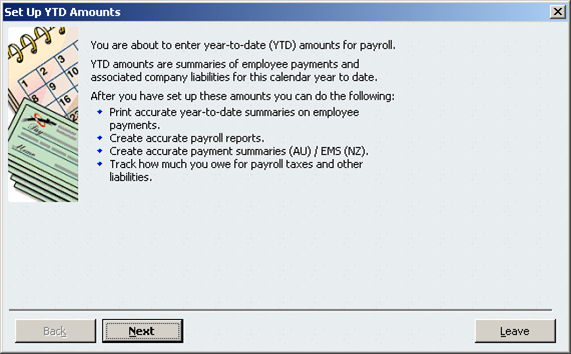
Go to the Employees menu and click Set Up YTD amounts.
Click Next to continue.
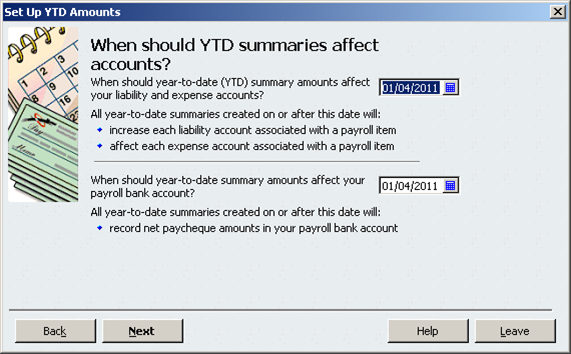
Because we aren’t affecting any Reckon Accounts accounts for the last financial year, these dates are irrelevant, therefore click Next to continue.
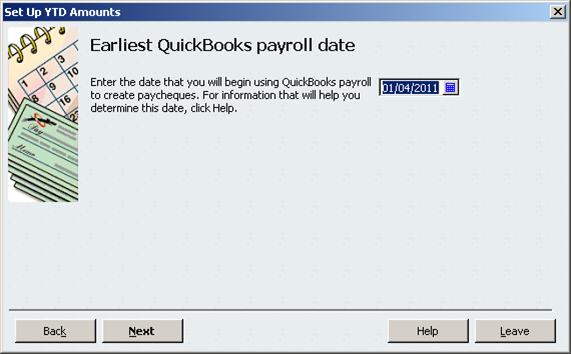
This date should be set to the date you plan to first run a pay within Reckon Accounts. So if you are paying your employees with Reckon Accounts for the first time on the 15/5/2012 enter 15/5/2012 on this window. Click Next to continue.
All your employees currently setup in Reckon Accounts are listed. You will notice Jodie does not have a Year to Date set up. Each employee can only have ONE year to date setup. If you enter a second year to date, it will overwrite the first one.
Click Enter Summary to begin entering data for each employee.
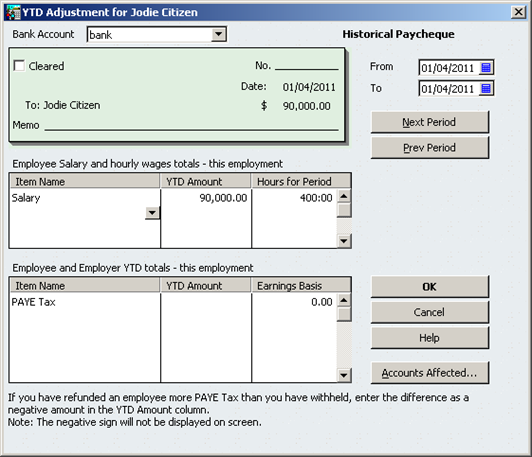
Enter the From and the To Date, for example from 01/04/2011 to 31/03/2012. Please note, if the employee was not employed for the entire financial year you need to enter their hire date in the From field.
Enter the Year to Date amounts for each payroll item. In the example above Jodie was paid $90,000 in the financial year and has worked 400 hours. This $90,000 dollars would be included in the Average Weekly Pays calculation for Jodie. The amount that you enter here is how much the employee has earned in the previous financial year.
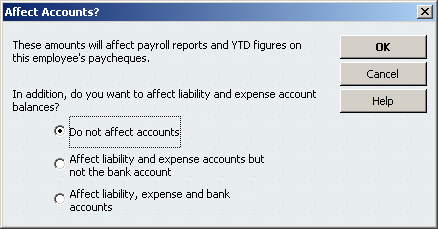
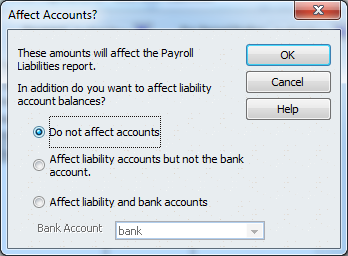
Click Accounts Affected.
IT IS VERY IMPORTANT THAT YOU SELECT DO NOT AFFECT ACCOUNTS ON THIS WINDOW. ELSE LIABILITY AND BANK ACCOUNTS WILL BE AFFECTED AND THUS AFFECT YOUR ACCOUNTS.
Click OK.
Click OK.
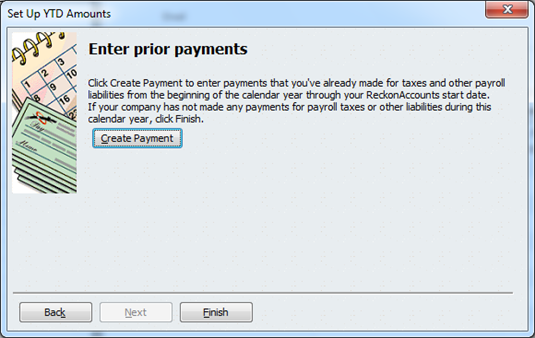
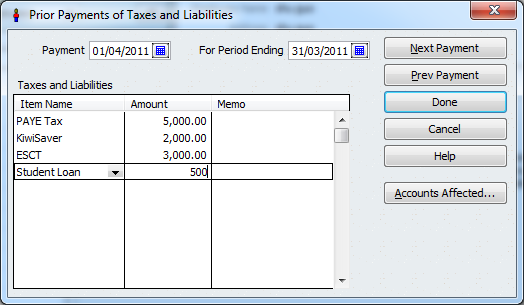
Click Create Payment button, if you have any Taxes or other Liabilities on the YTD that have been paid.
Enter the TOTAL amount of tax payments and payroll liabilities that your business has made to the government in this calendar year. Choose the applicable Item name and enter the amount in the Amount column.
Click Accounts Affected.
Click Do not affect accounts.
Click OK.
Click Finish when you return to the Enter prior payments window.
Now you can enter each pay for your employee’s from 1st April 2012.
Unscheduled Pays
Once you have setup your employees you can pay them!
There are two ways to pay your employees:
Unscheduled pays
Scheduled pays
The following section details how to create an unscheduled pay.
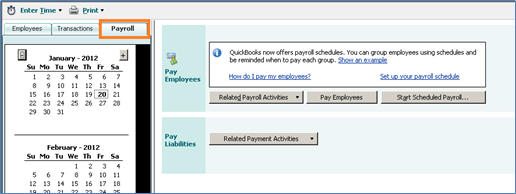
Open the Employee Centre.
Click the Payroll tab.
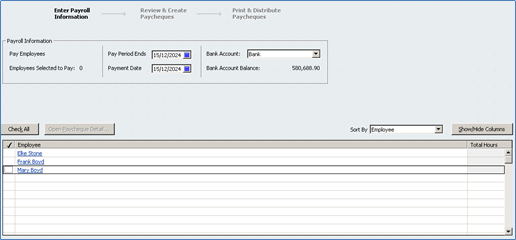
To start an unscheduled pay, click Pay Employees. The Enter Payroll Information window opens.
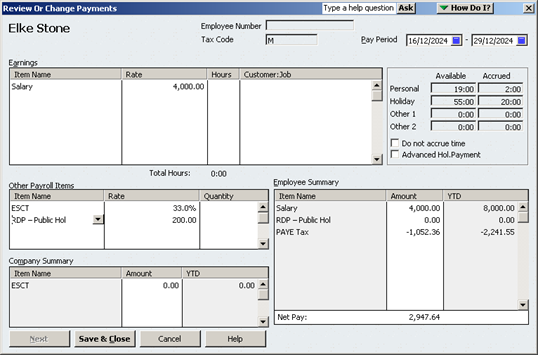
Click in the tick column to select an employee and then click an employee’s name to enter their pay data. The Review or Change Payments window opens.
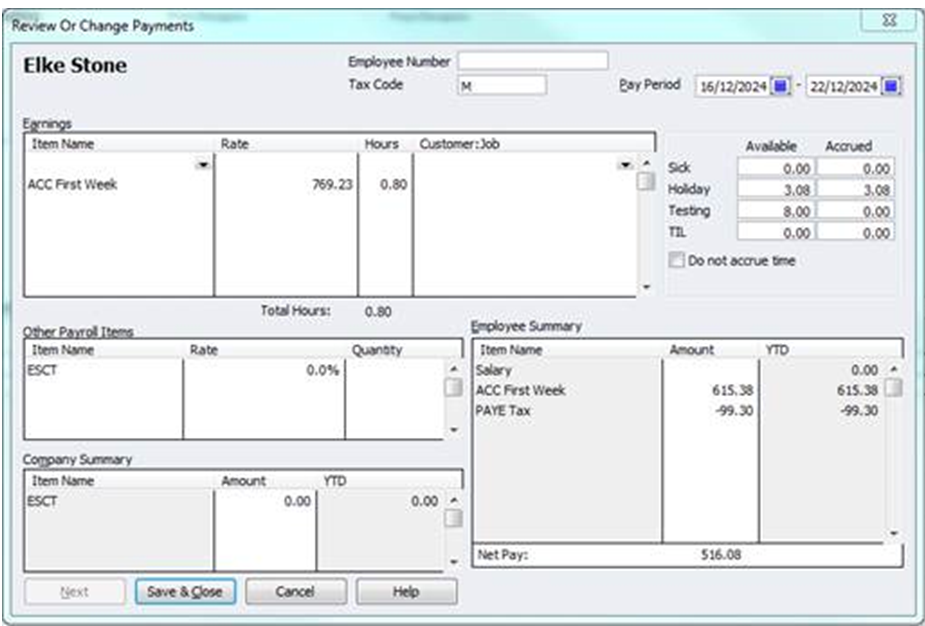
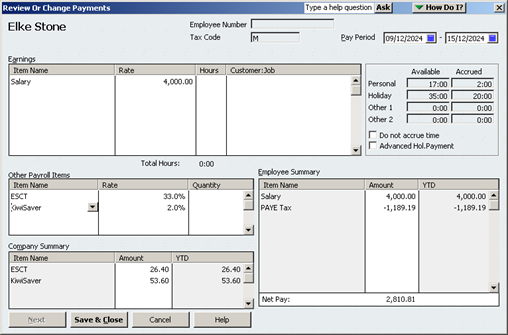
As you can see this are Elke Stone’s pay details. If you have added payroll information into the individual employees profile it will be displayed here, if not you can enter it as you go.
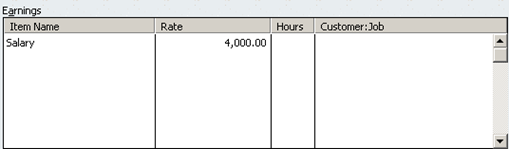
Earnings
The Earnings section is where you enter ordinary wage or salary for the employee. Unlike the employee’s profile, where you enter the employee’s annual salary, you only enter what they are being paid this pay.
Click in the Item Name column to select the payroll item. If you select an hourly based payroll item and do not enter the hours, no pay will calculate.
If applicable, in the Customer: Job column select a Customer:Job which will allow you to allocate an employees pay as a reimbursable expense to a customer.
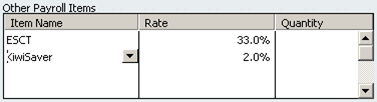
Other Payroll Items
The Other Payroll Items section is where you enter KiwiSaver rates and amounts and any allowances/deductions for the employee.
Please note the ESCT item shown above will always be displayed on an employee’s pay even if they have opted out of KiwiSaver. This is required for Reckon Accounts to perform the calculations required by KiwiSaver and ESCT.
Click in the Item Name column, and select the payroll item. Enter the Rate and Quantity in the corresponding columns.
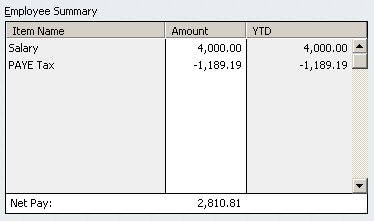
Employee Summary
The Employee Summary section gives a summary of the employees overall pay including PAYE, Salary/Wage, Child Support and Student Loan (if applicable) as well as their Net pay.
Leave Accrued
The Leave accrued section displays how much leave the employee has available and how much has been accrued this pay. If you click Do not accrue time checkbox, no leave time will be accrued.
Completing the Pay
Once you have finished entering all the pay details for this employee, you can click Next to move to the next employee or click Save & Close.
When you click Save & Close you are returned to the Enter Payroll Information window.
Click Continue.
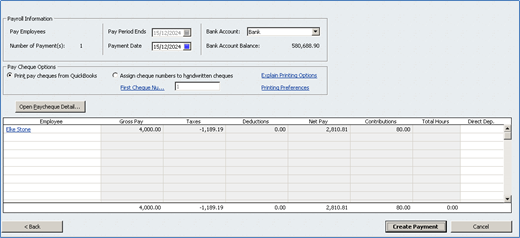
The Review and Create Payment window opens.
This is a summary of the unscheduled pay that is about to occur and will list every employee you have ticked to be paid as well as the pay period end date and pay date as well as which bank account to debit for the payroll expense. You can still review the employee’s pays by clicking their name to ensure everything is correct.
Once you have checked everything click Create Payment to process the pay.
Please note if you click Cancel and then click Yes to the warning that appears everything you have entered for the pay will be lost.
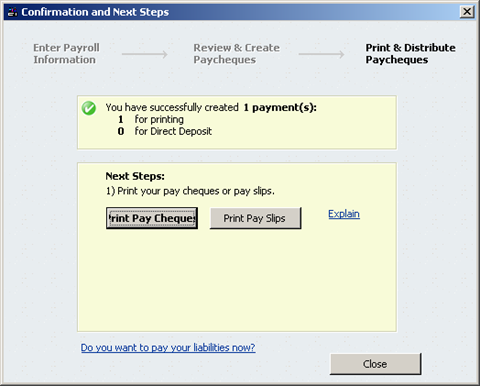
Once the pay has been finalised, the Confirmation and Next Steps window will appear.
This informs you how many employees were paid and allows you to print pay slips for your employees. You can also email pay slips. That is covered further into this document.
Click Close.
Emailing Pay Slips
If you don’t want to provide your employees with physical payslips, it is possible to email them.
To do this:
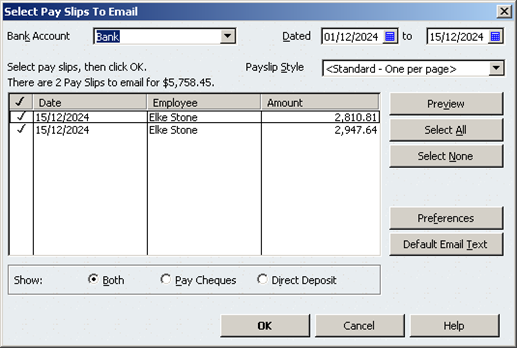
Go to the File menu and click Select Forms to Email and then click Pay Slips. Any employee that has had their profile set to email payslips will appear here if they were paid in the period stipulated in the top right hand corner of this window. The employee must have a valid email address set in their profile as well.
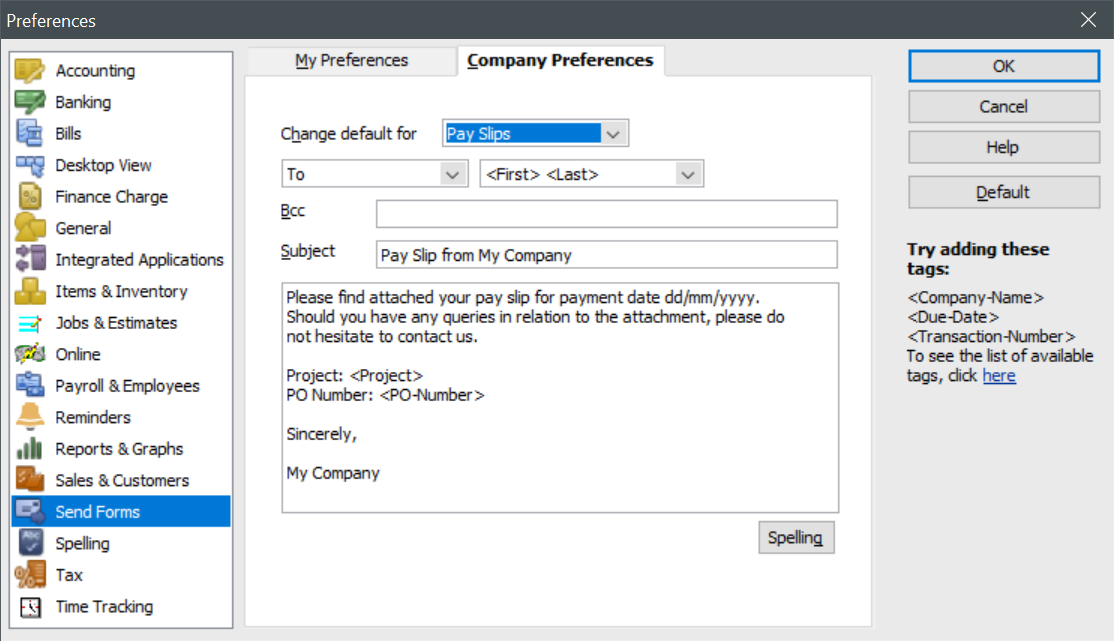
If you want to change the text the employees will see in the email, click Default Email Text. This will then open the company preferences where you can change the text.
Change the Change default for to Pay Slips, and edit the boxes.
Once completed, click OK to save the information.
Select the employee’s names in the tick column and click OK. The emails will then be sent to the employees.
Editing a Pay
There may be times when you need to edit a pay.
In the Employee Centre you can see a list of all the payroll transactions for each employee by highlighting an employee.
To edit a pay:
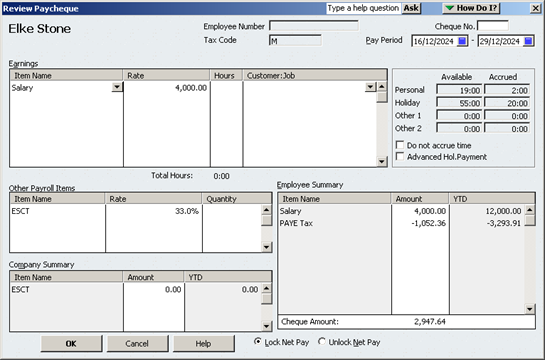
Right-click the relevant pay and select Edit Transaction.
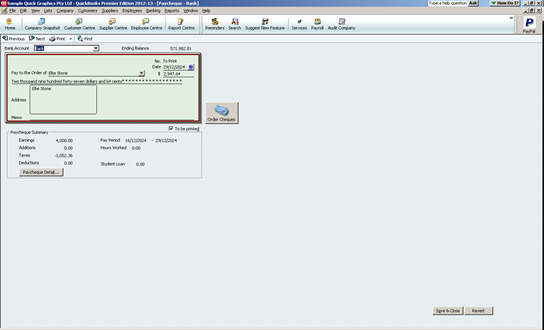
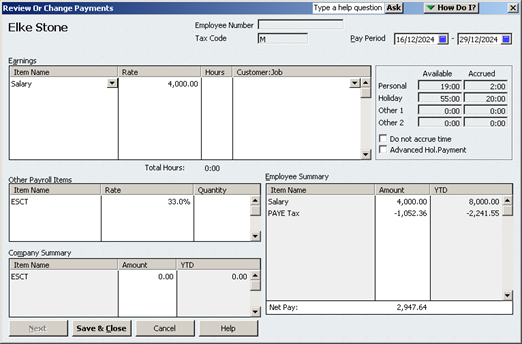
Click PayCheque Detail to open the information about the pay. The Review Paycheque window opens, which is similar to the window that you have already seen when processing pays. However, there is another option down the bottom with regards to Locking and Unlocking Net Pays. In general when editing a pay, you will probably not want the net amount, tax amounts to change. It might be that you entered incorrect hours. Whilst the Lock Net Pay radio button is selected any changes you make will not affect the Net amount paid to the employee. This is a security feature to ensure when you change numbers that affect the net pay, you are sure that you want that.
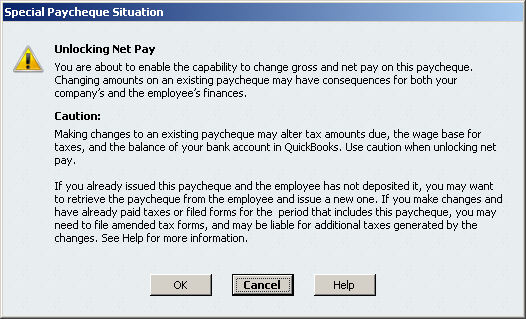
To unlock the Net Pay (that is to have an effect on the final payment amount) click the Unlock Net Pay radio button. These warnings are very important and please take note of it before editing any pay that affects the net amount. If you want to proceed click OK and the net amount of the pay will be affected by any changes you make on the pay run.
Once you have made your changes, click OK on the main pay run screen.
Relevant Daily Pay
Relevant Daily Pay is catered for in Reckon Accounts.
The first thing you will need to check is that you have the RDP items in your Payroll List. To do this:
RDP – Bereave – Relevant Daily Pay for Bereavement Leave
RDP – Sick – Relevant Daily Pay for Sick Leave
RDP - Public Hol – Relevant Daily Pay for Public Holidays
These are special payroll items and therefore cannot be deleted. All new files and upgraded files should have these payroll items.
To pay an employee with Relevant Daily Pay, do the following:
Go to the Employee Centre and click Pay Employees.
Select the employees you want to pay and then click the employee.
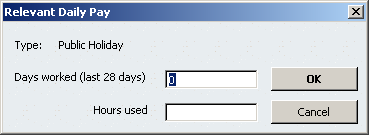
In the Other Payroll Items section, click in the Item Name column to select the RDP items that you want to use. When you select an RDP item, the following dialog will display.
In the first box, enter how many days the employee has worked in the previous 28 day calendar period.
In the second box, enter how many hours have been used by the employee for this. Even though you will not use hours as part of a Public Holiday, Alternate Daily Pay or Bereavement based pay, we need to know this number in case the employee has their leave type as Every hour worked in their leave profile.
Once you have completed this window, click OK and the calculation will be done and you are returned to the Review and Change Payments window. As you can see the RDP amount has been calculated but no money has been added to the Employees pay. This is because you need to set the Quantity for the RDP item. This is the amount of days the employee was away.
Enter the number of days the employee was away in the Quantity column, so if the employee was away 3 days put 3 in the Quantity column next to the item.
When you are finished with all employees, click Save & Close.
Click Continue and then click Create Payment.
Average Weekly Pay
Average Weekly Pay is handled in Reckon Accounts .
The first thing you will need to check is that you have the AWP item in your Payroll List. To do this:
Go to the Lists and then click Payroll Items.
You should have the following item:
Holiday Leave - AWP
This is a special payroll items and therefore cannot be deleted. All new files and upgraded files should have these payroll items.
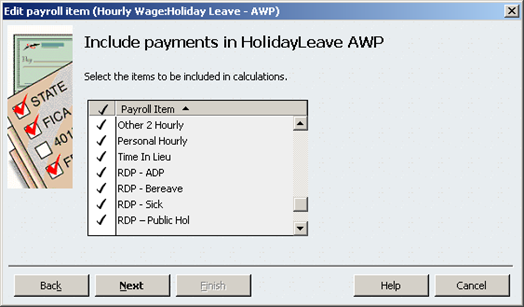
Next, you should check what payroll items are going to be affected by the AWP calculations.
Go to the Lists and then click Payroll Items.
Right click the Holiday Leave – AWP item and select Edit Payroll Item.
Click Next until you reach the Include payments in Holiday Leave AWP window.This window is used to determine what Payroll Items will be included in the AWP calculations. Remembering that the law stipulates not all payments are included (for example in some cases Bonuses should not be included in AWP calculations). If a tick appears next to a payroll item, it will be included in the calculation. By default when you make a new Payroll Item in Reckon Accounts, it will automatically be ticked in here for use with AWP.
Once you have checked the payroll items, click Next and then click Finish.
Paying Average Weekly Pays
To pay an employee with Average Weekly Pays, do the following:
Go to the Employee Centre and click Pay Employees.
Select the employees you want to pay and then click the employee.
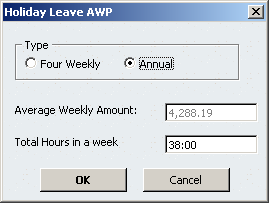
In the Earnings section, click in the Item Name column to select the Holiday Leave - AWP item. When you select an AWP item, the following dialog will display. This window is used to calculate the Average Weekly Pay rates for employees. There are two options, Four Weekly and Annual. When Annual is selected Reckon Accounts looks at the last 12 calendar months to see how much the employee was paid and divides that amount by 52 to reach an Average Weekly Pays amount. When Four Weekly is selected Reckon Accounts looks at the last 28 calendar days for how much the employee was paid and then divides that amount by four to reach a weekly amount. The Total Hours in a week field will automatically populate the hours from the employees profile but can be changed here as well. This number is used to divide the weekly amount to bring it back to an hourly rate to pay the employee. In the example above $4,288.19 would be divided by 38 to reach an hourly amount. If neither of these amounts is above the employee’s usual wage, the employee should be paid their usual wage. Therefore, click Cancel and choose the Normal holiday payroll item.
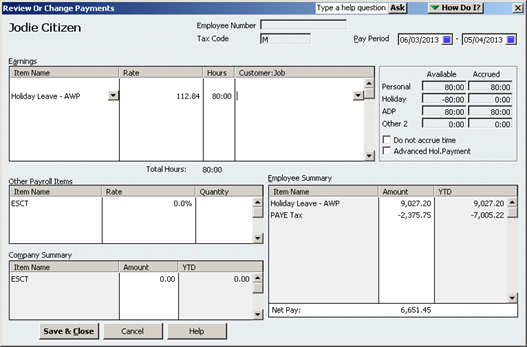
When you have entered the AWP information, click OK. The hourly rate will be displayed on the employees pay run as per below. You will notice that annual leave has been deducted from the Holiday available to the employee as well as they are going on leave. In the example above the employee is going on leave for eighty hours and their hourly rate has been calculated to be $112.84 average over the annual period.
When you are finished with all employees, click Save & Close.
Click Continue and then click Create Payment.
Generating an IR348 or IR345 form for the IRD
IR348/IR345 are being replaced by Payday filing from 1st April 2019. Payday filing is available from Reckon Accounts 2019 onwards. Please click here to read the User Guide.
Reckon Accounts allows you to electronically produce the IR348 or IR345 for the IRD to upload into their website.
To do this:
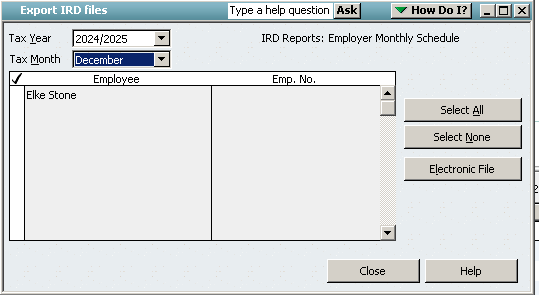
Go to the Employees menu and click Process IRD Reports.
Select the Tax Year and Tax Month that you would like to generate. Once you have done this, the employees you have paid during that period will display.
You can choose to either Select All, to choose all employees or individually tick them with the column next to their name.
Once you have selected the employees click Electronic File.
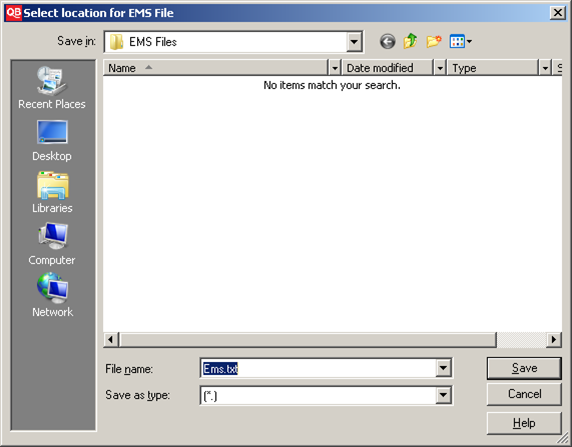
Select the location of where you want to save the IR348 or IR345 and click Save.
Your IR348 or IR345 is now generated and can be submitted to the IRD.
Reckon NZ Payroll E-file Checker
To assist with the requirements for Payday filing, you might need to use the E-File Checker to view and make changes to the exported files before you report it to the Inland Revenue. You can also use this application to view the exported data in an easy-to-read format before lodging.
You can install the Reckon NZ Payroll E-file Checker from the Reckon Accounts Installation or from the Reckon website. E-File Checker is also available with the Reckon Accounts Hosted application (from the Employees menu).
Go to the Start menu, click Reckon Accounts and then click Reckon NZ Payroll E-File Checker.
Click Open File. This first record is the header record. This record has information about the Employer details and summary of the exported file.
To view the employee records, click Next >>.When you are viewing an employee record you can see all the data that will be sent about that employee to the IRD.
You can change the Title by selecting the drop-down menu.
You will notice there is a dropdown box enabled on the Child Support Code field. That is because you can select variation codes in here if you need to indicate to the IRD that there is a difference in payment this month. Reasons include that the employee overpaid last month, or had reduced hours.
Once you have selected a Code for the Child Support Code, a new button appears Save Child Support Code. When you click that, the code is saved to the file and you can then submit the IR348 form to the IRD with that changed code.
No other fields can be edited. If the information is incorrect you will need to make changes in Reckon Accounts before generating the file again.
Need more help?
Ask the Reckon Community at: https://community.reckon.com/
Or Log a Support Ticket: https://www.reckon.com/au/support/