Table of Contents
RTL Utility User Guide
Overview
Online Banking is a feature fully available in Reckon Accounts. Online Banking allows the user to import their bank statements and send bill payments to their bank. This will save both time and increase accuracy. New Zealand banks that Reckon Accounts can be configured for include ANZ, ASB, BNZ, HSBC, National Bank, Trust Bank, Westpac.
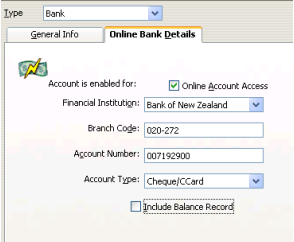
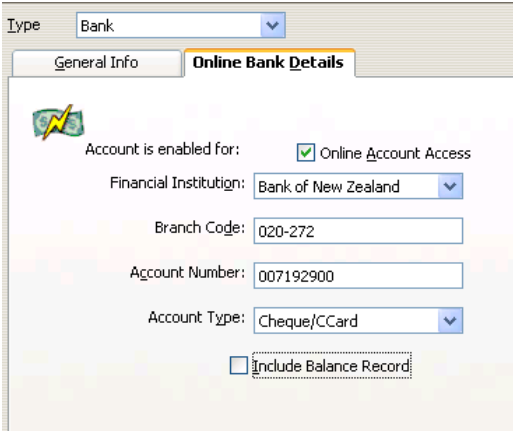
Before you can use online banking, you need to enter your bank details in the bank account in the Chart of Accounts and select Online Account Access. The Branch code includes your bank number and branch number and should be 6 digits (Reckon Accounts will put in the dash). Your Account Number is the full bank account number including suffix.
You will need to have arranged for online services with your financial institution for this account. Access your bank account through the bank website and log on for Internet Banking. A Customer Number logon and password will likely be required. Create a Statement for the desired date range and select to download the bank statement.
Select either Quicken or QIF File Format from the bank’s options.

You will be asked where you wish to save this file. Choose a prepared folder, such as Bank Downloads, or save to the desktop. The file is saved as a .QIF Document. The bank website will advise when the download is complete and where it is saved to.
You can now log out of the bank website and import the statement in to Reckon Accounts:
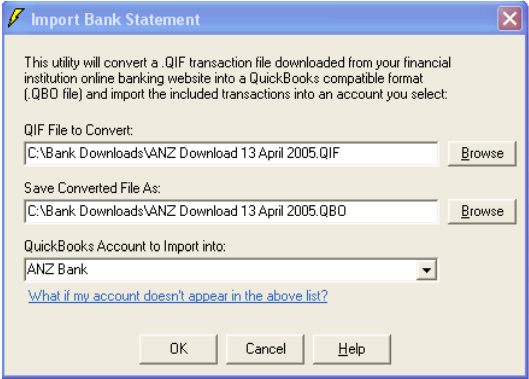
- Go to File > Import > Bank Statement File
- You will need to convert the .QIF transaction file downloaded to a Reckon Accounts compatible format.
- The transactions can be processed now or saved for later processing.
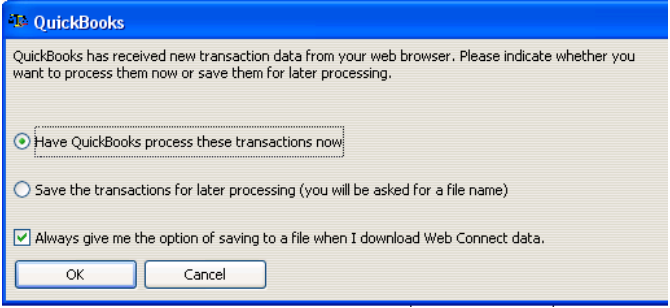
- If you process the transaction now, Reckon Accounts will confirm the import is successful.
- You are automatically taken to the Online Banking Centre.
- The Online Banking Centre lists the bank accounts that are configured for Online Banking, a list of downloaded Bank Statements and any transactions waiting to be sent to the Bank.
- Reckon Accounts will look at the Statement that’s been downloaded and determine which transactions already entered in to Reckon Accounts and automatically match them. Any transactions that it cannot recognise will remain unmatched. These unmatched items are transactions that are on your Bank download but have not yet been entered in to or are not recognised by your data file.If you cannot see your bank transactions (or QBO. File), you can manually import this into the online banking centre. Simply click on File - Utilities - Import - Web Connect Files. Select the QBO. file you have created, and this should pull the bank statement into Reckon Accounts.
- Any transactions unmatched will now need to be matched. The top half of the screen represents the Reckon Accounts Bank Register. The bottom half of the screen is the downloaded Bank Statement.
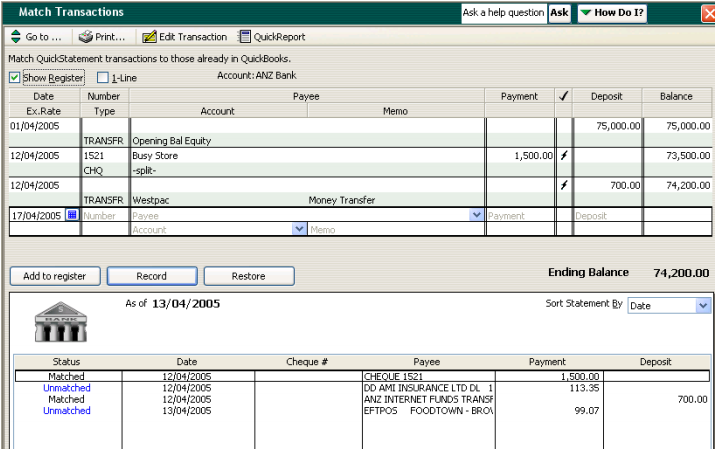
- Select the unmatched transaction and click ‘Add to register’. Choose the correct transaction type and the transaction will then become ‘matched’. Continue until all transactions are matched.
- The Banking download file can be deleted when no longer required. A Bank Reconciliation can be carried out in the normal manner with the added ability to match the transactions imported from the bank statement download.
Bill Payments
This feature is available in Reckon Accounts 2013 and gives you the opportunity to upload payment to suppliers from Reckon Accounts straight to the bank account, making payments quick, easy and accurate.
Before you can use online banking, you need to enter your bank details in the bank account in the Chart of Accounts and select Online Account Access. The Branch code includes your bank number and branch number and should be 6 digits (Reckon Accounts will put in the dash). Your Account Number is the full bank account number including suffix.
Enter the Suppliers bank account on the Bank Details tab in the Supplier record. Their Account Number is their bank account number including suffix but not including bank and branch. The bank and branch are entered in the Branch Code field as Bank plus Branch (the same as your bank account in the Chart).

Enter Bills in to Reckon Accounts in the usual way. When Paying Bills, choose the Payment Method ‘Bank (Online)’.
When paying suppliers through Write Cheques, select ‘Bank (Online)’ as the payment method. Enter details and Save in the usual way.
The Online Payments are sent to the Online Banking Centre.

Select the Payees you wish to pay then preview and print the ABA File. If you’re happy with the selected payments, click ‘Create ABA File’. The first time you do this you will be prompted to enter an APCA number, click ‘Yes’ and you are taken to the Banking Preference. Although this is a required field, it has no relevance to New Zealand, so enter any 6-digit number then click ‘OK’ to continue.
When saving an *.ABA file, be sure to take out the * and rename to a relevant file name.
The ABA file needs to be saved to a prepared folder, to the Desktop or to the default Program Files (x86 for 64-bit Windows) > Intuit > Reckon Accounts > Export Files > ABA Files. Reckon Accounts will confirm when the ABA File is successfully exported.
RTL Bill Payment Utility
RTL Bill Payment Utility can be downloaded separately from here.
If you have downloaded Reckon Accounts, you can also find the setup file from C:\Temp\Reckon_Accounts_20XX_R# > RTL folder (default location unless changed during the installation process).
Double click on the Setup.exe file and this will install the RTL Bill Payment Utility and it takes about 2 minutes. When questioned where to save it click default or choose your preferred location.
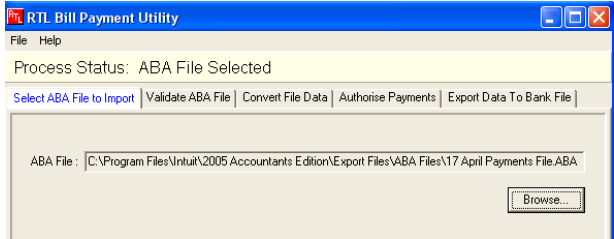
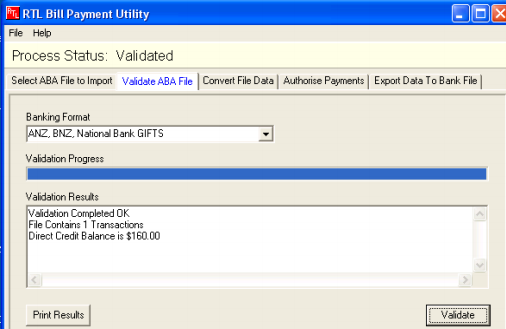
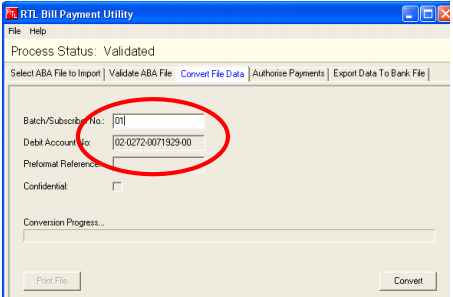
Once installed you can open the RTL Bill Payments Utility and convert the ABA file as follows:
- Select the ABA file to convert.
- Validate the file.
- Convert the File Data.
- Authorise the payment.
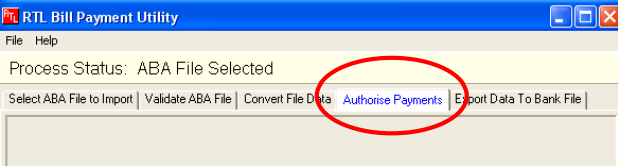
- Export the Data to your Bank File.
- The Bill Payment Utility will confirm that successful conversion from ABA file to a bank file.
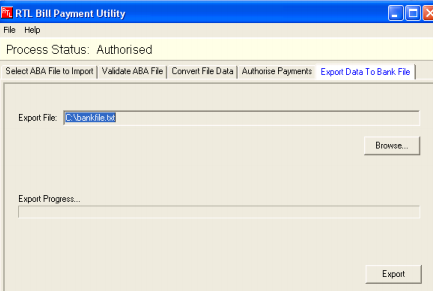
- This file can now be processed through your banking software. Some banks offer this service through internet banking, contact your bank to confirm this.
The following is a list of the New Zealand banks and related software:
- ANZ, BNZ, National Bank GIFTS
- ASB EPW CSV
- ASB Fastnet
- ASB Gateway
- BNZ PC Banking
- BNZ PC Diskette
- Citibank Cash Direct Credit
- Citibank CitiDirect
- Citibank Paylink Direct Credit
- Citibank Payroll
- HSBC Batch Payments
- HSBC Bulk Payments
- National Bank DirectLink
- National, ANZ PC Diskette(MT9)
- Trust Bank Payment Format
- Westpac DeskBank
- Westpac PC Diskette