How to: Upgrading a Reckon Accounts Hosted data file using a Single-User Reckon Accounts Enterprise desktop installation
With a valid Reckon Accounts Hosted subscription, you are eligible for a single-user licence of the Reckon Accounts Enterprise desktop product which is compatible with the Hosted application.
Based on the size of your data file, if it is very large, the upgrade process which includes a backup and file verification would most likely take a long time if performed directly on the Hosted platform.
It may be faster to go through the process of using a locally installed Reckon Accounts Enterprise 2023 R1 application to perform the upgrade of the data file.
The upload the upgraded file back to your Hosted account.
Requesting, downloading and installing a single user Reckon Accounts Enterprise desktop software
1. Request a “Reckon Accounts Enterprise Desktop Single-user” licence by contacting the Customer Service Team
Give the Customer Service Team a call to acquire your licence.
Contact details for the Customer Service Team
2. Once you have you IKC (Installation Key Code) go to the Reckon website's Support Hut section which has the Software downloads, updates & guides page.
https://www.reckon.com/au/support/downloads-guides/
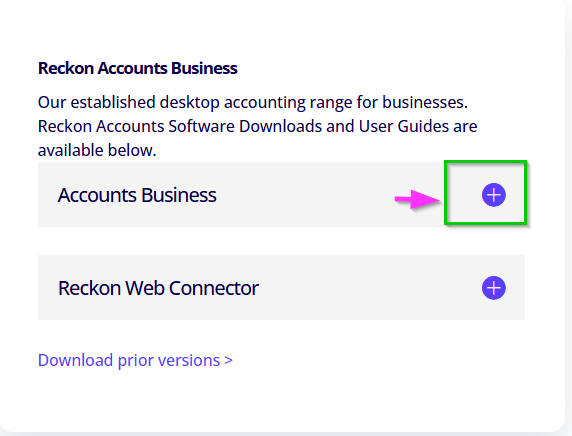
- Go to the Reckon Accounts Business product section

- Select the Accounts Business 2023 tab to expand it
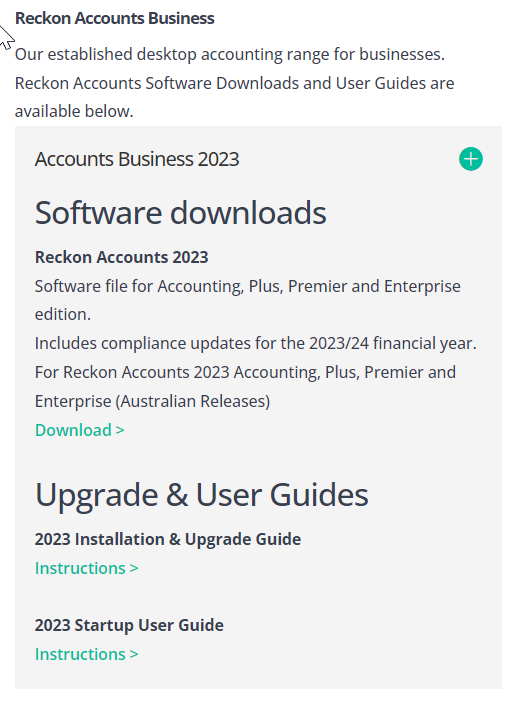
- Click the download link for the product
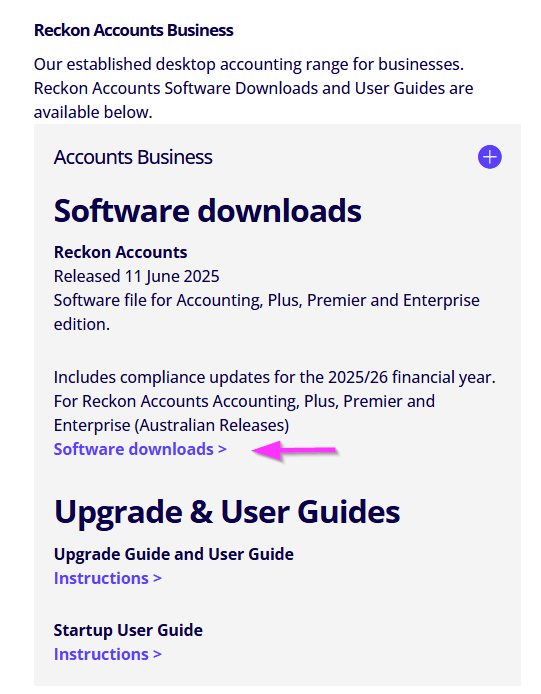
- If needed you can also download any relevant guides
3. Once you have downloaded the program installer:
- Restart your computer (recommended)
- Then install the software as the Enterprise version.
- After you have installed the Reckon Accounts Enterprise program, restart your computer.
4. Download your company data file onto your local computer.
DATA RECOVERY: How to download a company data file (*.QBW) from the Reckon Accounts Hosted platform
Download the company data file (*.QBW) you have on the Hosted Q: root folder or shared folder location.
You need to have the compatible “Reckon Accounts Enterprise” single-user desktop software installed in order to open the data file that came from the Hosted platform.
5. Open the company data file using the Reckon Accounts Enterprise desktop software.
If the version of the data file is older than the version of the installed software, it will undergo the upgrade process.
6. The upgrade process will prompt you to create a backup file.
7. If there are no errors detected, the upgrade process will continue.
8. If there are errors detected, you would need to put the file through the built-in file integrity checking process.
i. DATA RECOVERY: How to perform a data file rebuild (Rebuild Data) in Reckon Accounts Hosted
ii. DATA RECOVERY: How to perform a data file verification (Verify Data) in Reckon Accounts Hosted
9. Once upgraded and opened in the Reckon Accounts Enterprise desktop software, you can perform your usual tasks to confirm all is in order.
- Report generation
- File maintenance
IMPORTANT: Be aware that any changes to the local copy of the data file that opened with the desktop Enterprise software will not automatically be reflected in the data file that is on the Hosted platform.10. Once you are ready to return the constructed file back to your Hosted account, click on the File menu and select Close Company / Logoff.
Uploading or downloading the files to and from Reckon Accounts Hosted (Written instructions)
Uploading and Downloading Company Files to the new Reckon Accounts Hosted (Video instructions)
IMPORTANT: You need to replace the older version existing copy of the data file that is on the Hosted platform with the newer upgraded data file from your local computer.
You can either:
a) Directly send the modified company data file (*.QBW) back to the Hosted platform (recommended)
- You need to first rename the older existing older version copy of the data file that is on the Hosted platform.
- Then send the newer upgraded data file from your local computer to the Hosted Q:\Upload folder.
- Then move the data file from the Q:\Upload folder to the correct shared folder location.
DATA RECOVERY: How to rename a data file on the Reckon Accounts Hosted platform
Uploading files to Reckon Accounts Hosted
b) Create a backup file (*.QBB) on the desktop software and send that current backup to the Hosted platform.
- You need to first rename the older existing older version copy of the data file that is on the Hosted platform.
- Then send the newer upgraded backup file from your local computer to the Hosted Q:\Upload folder.
- Then you need to restore the backup file to transform it into a working company data file (*.QBW)
DATA RECOVERY: How to rename a data file on the Reckon Accounts Hosted platform
Uploading files to Reckon Accounts Hosted
How to restore a backup file (QBB) in Reckon Accounts Hosted
c) Create a portable file (*.QBM) on the desktop software and send that portable file to the Hosted platform
- You need to first rename the older existing older version copy of the data file that is on the Hosted platform.
- Then send the newer upgraded backup file from your local computer to the Hosted Q:\Upload folder.
- Then you need to restore the portable file to transform it into a working company data file (*.QBW)
DATA RECOVERY: How to rename a data file on the Reckon Accounts Hosted platform
Uploading files to Reckon Accounts Hosted
How to restore a portable file (QBM) in Reckon Accounts (Hosted)