Table of Contents
Reckon Accounts Hosted - Reckon Cloud POS
Reckon Cloud POS has an end to end integration with Reckon Accounts Hosted (RAH). Reckon Cloud POS retrieves Inventory items and Customers from the connected RAH data file and posts Receipts/Refunds to it once End of Day (Z) is completed from a Cash Register.
Pre-Integration tasks
Setup your Reckon Accounts Hosted Company File
Barcodes
By default, Reckon Cloud POS cannot get barcodes that are saved in the Barcode field of an item's card in Reckon Accounts Hosted company file. To import barcodes, you will need to create a Custom field in the item and copy over the barcodes to that field via Item List IIF.
Steps:
- Backup your data file in case anything goes wrong by going to File > Save Copy or Backup ...
- Go to Lists > Item List and open up any Item
- Click on Custom Fields
- If you already have a custom field called "Product Barcode", then you don't have to create a new field for this and you can proceed to step 4. Reckon Desktop POS uses this field to store Barcodes, so if you used have that product before then you already have this data.
- If you don't have this custom field, then you will have to create a new custom field- If there's no empty textbox available, you will have to replace an existing Label (it is highly recommended to replace the second textbox as the instructions are based on that, however you can choose any other fields but your CUSTFLD# on the exported IIF file will change based on the line number as explained in step 9)
Note: You have to enter has to be exactly this name "Product Barcode" otherwise Reckon Cloud POS will not be able to map this field. Replacing any existing Label will affect data that are linked to it - Click on Define Fields > type "Product Barcode" in the applicable textbox > OK > OK > OK
.png)
- If there's no empty textbox available, you will have to replace an existing Label (it is highly recommended to replace the second textbox as the instructions are based on that, however you can choose any other fields but your CUSTFLD# on the exported IIF file will change based on the line number as explained in step 9)
- Export your Items to IIF by going to File > Utilities > Export > Lists to IIF Files ... > tick Item List > OK
.png)
- Save it to a location (example: Q drive) and give it a name (example: Item List) and click Save
.png)
- Download this IIF file by clicking on My Files from the toolbar

- Open this downloaded IIF file in Microsoft Excel or similar application
- You will have to first find the Custom Field number that was linked to this Product Barcode field
- For this example, the column where the barcodes you will be copying to is "CUSTFLD2" because the second Label field was used for Product Barcode, hence the Custom field number that it's linked to is 2. If you added the Product Barcode as the last line, then you'll be using "CUSTFLD5" column.
- Note down this number as it will be used in later steps.

- Find the column that you noted in previous step (example: CUSTFLD2) and if you already have the barcodes then you don't have to go to the next steps and you can skip to step 18)
- If the column doesn't have any data, then type in the barcodes here or if you have been adding barcodes in "Barcode" field within an Item, then you can find the column called "Barcode" (in this example, it was in column AJ), and copy over all the data that are under the Barcode header column to your Custom field column (example: Column W for CUSTFLD2)
.png)
- Barcodes in Reckon Cloud POS are unique although Reckon Accounts lets you enter the same one multiple times. When Reckon Cloud POS finds duplicate barcodes while importing Items from Reckon Accounts Hosted, it will add "Copy -##" at the end of the barcode. We strongly recommend you to remove any duplications at this time and add the unique barcode number for each of your item in this IIF file. You can use Excel's built-in functions to identity duplicate values of a column. Click here to view an example article found in Google search.
- Once you've added or copied all the barcodes to the custom field column and fixed any duplicates, save the file by clicking the Save button and keep the current IIF format, if you get a message from Microsoft Excel about changing the file type, please don't change it to any other format or file type, otherwise you will not be able to import this file back to Reckon Accounts Hosted
- Upload this IIF file back to Reckon Accounts Hosted by clicking on My Files from the toolbar, select an upload location, click on Upload file(s) button, browse to where you saved the lIF file and select the file. It will be saved in your selected folder in Reckon Accounts Hosted

- Import this IIF file into your Reckon Accounts Hosted by going to File > Utilities > Import > IIF Files ... > browse to location where you saved the file (example: Q:\Upload) > Open
- Once the file is imported successfully, you can check to ensure all the barcodes are imported into the correct custom field by Customising the Item List Column:
- Go to Lists > Item List > click on "Item" button from the bottom of the window and click "Customise Columns..."
.png)
- Click on Barcode > Add >> and do the same for Product Barcode so that they both show up on the right section of the window and click OK
.png)
- You should be able to see barcodes in your Product Barcode and if you copied over barcodes from Barcode, they should match in Product Barcode (except the duplicates which you should have replaced with unique barcode number)
- Go to Lists > Item List > click on "Item" button from the bottom of the window and click "Customise Columns..."
- If you find everything to be correct, then your file is ready to pass barcodes to Reckon Cloud POS
Create a User
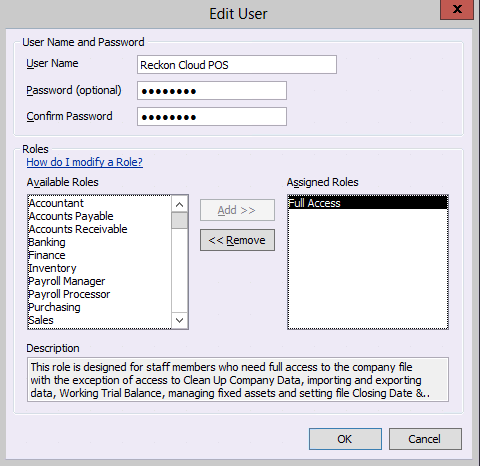
You will need to create a new user in your company file that will be used when Reckon Cloud POS posts/receives data from your Hosted data file and don't use that user account to login to your file within Hosted for your day to day life. We recommend it so that users don't need to log out (Admin user for example) so that Reckon Cloud POS can interact with your file without any issues.
- In Hosted, go to Company > Users > Setup Users and Roles

- Click "New" to add a User

- Give it a name (example: Reckon Cloud POS so that it's easy to identify) and add a password
- Make sure you give "Full Access" role to this user (from Available Roles section) and click OK to create the user
File Path
You will need to note down your file's path as you'll need it during your integration setup in Reckon Cloud POS.
- Log in to your company file in Reckon Accounts Hosted
- Press Ctrl 1 on your keyboard and Product Information window will show
- From File Information > Location, you will see your File path
- Click the Copy button and your file path will be copied to your computer's clipboard
- You might want to paste it to a notepad or a safe place
.png)
Integrate with Reckon Accounts Hosted
- In Reckon Accounts Hosted, switch to multi-user mode by going to File > Switch to multi-user mode (if not in this mode already)
- Log out of Reckon Accounts Hosted
- Login to Reckon Cloud POS's Management System > PREFERENCES > Accounting Software
- Next to Reckon Accounts Hosted logo, click Connect to Reckon Accounts Hosted button
- A dialog pops up where you have to enter your RAH account's UserID (example: 123456-1) and it's password (the credentials you use to login to Reckon Accounts Hosted)

- File path: You need to enter their company file's path over here that you noted previously. If you have just copied it from the Product Information page, you can just paste it in this text box
- Product Version: Choose the version of Reckon Accounts Hosted that you're using (example: ACCOUNTS 2019 R2)
- Company file User name: Enter the name of the User that will be used by Reckon Cloud POS during retrieving and posting data from your company data file. Please ensure that this user isn't logged into the file when you connect to your file from Reckon Cloud POS.
- Company file password: This is the user's password (username entered above) of the company file. This is required to authorise Reckon Cloud POS to access your Company file. This user's details will be used every time Reckon Cloud POS will contact your Reckon Accounts Hosted company file (POSTing End of Day data, Syncing your Customers/Inventory etc.)
- If you want to import barcodes, tick "Import item barcodes from custom field "Product Barcode".
- Once you accept the 2 statements and click Confirm, Reckon Cloud POS then gets authenticated with your RAH's data file and then retrieves Customers, Items and Tax Codes. A bank account called "Cloud POS Cash Register" is created in your Hosted data file in this process where End of Day (Z) transactions will be posted. When this process is completed, you will be redirected to the Accounting Software page

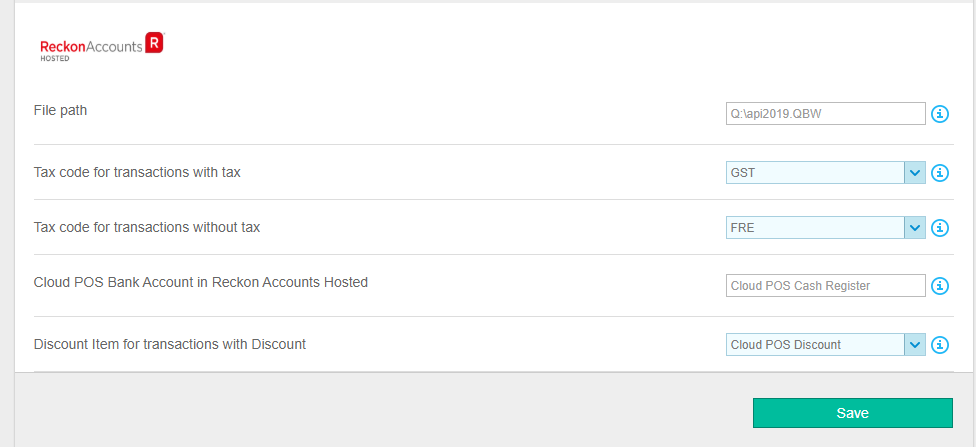
- Once you're redirected to Accounting Software page, File Path will be prefiiled with the data that you typed in the previous step (it's a read-only field and can't be changed until you reset your Hosted Integration if it's an existing connection or refresh the page without clicking Save when linking for the first time)
- Tax Code for transaction with tax: Tax code to use in the transactions processed in the Cash Register where there was a Tax. This code will be added to the transactions when the End of Day (Z) will be posted to RAH
- Tax Code for transaction without tax: Tax code to use in the transactions processed in the Cash Register where there were no Tax (Tax free items). This code will be added to the transactions when the End of Day (Z) will be posted to RAH
- Cloud POS Bank account in Reckon Accounts Hosted: The bank account where End of Day (Z) will be posted. You can then transfer over to other accounts if required. For example: Cash related transactions can go to one account and EFTPOS related to another.
- Discount Item for transactions with Discount : The discount item to use in the transactions that contain any type of discount. You will need to have an existing discount item in your Hosted company file, otherwise you will need to create it first in your company file before you can integrate Reckon Cloud POS with Reckon Accounts Hosted.
To create a discount item in RA Hosted:- Open your Company file in RA Hosted
- Go to Lists > Item List
- Click on the Item menu from the bottom left part of the window and choose New
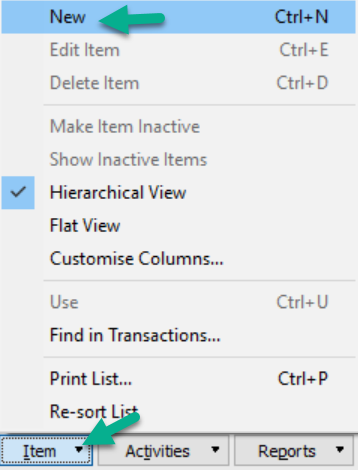
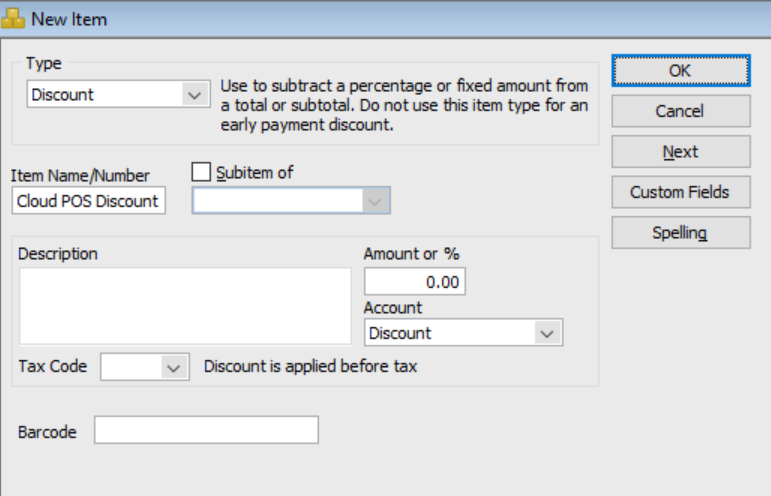
- Choose the Type as Discount
- Give it a name and choose/create the Account you want to link it with
- Hit OK when you are done
- Once you've chosen your options from the drop-down menus, click the Save button
- Come back to Reckon Cloud POS and you will be able to choose the Discount item you created just then from this drop-down menu
POST transactions to Reckon Accounts Hosted
- Complete your End of Day (Z) from your Cash Register/s
- Go to Management System
- From REPORTS > go to Z Report Archive
- Status:
Always go to your Hosted data file to cross check the transactions that were posted successfully.- POST Click this button to post End of Day (Z) transaction(s) to your connected Reckon Accounts Hosted data file. Please wait until it completes posting transaction(s) over to your data file. It might take a while.
- POSTED: EOD was posted successfully to Reckon Accounts Hosted. Always go to your Hosted data file to cross check the transactions that were posted successfully.
- Retry Click on this button to post the EOD to Reckon Accounts Hosted again. You might get this error if it timed out posting your End of Day or there were some errors in that post.
Example of an error: You might NOT have used a Customer in a REFUND transaction so it can't be posted. Always go to your Hosted data file to cross check the transactions that were posted successfully. - Cancel Click on this button if user wants to cancel this post. If clicking Retry doesn't fix or you've been informed by Reckon Support team that it can't be posted or you've decided not to post an End of Day (Z) anymore, you can click on this button and the status will be changed to "CANCELLED". Once cancelled, it can't be changed anymore. To change back from this status please contact technical support. https://www.reckon.com/au/support/
.png)
Sync
If you have made any changes to your company file in Reckon Accounts Hosted, for example: added new barcodes, created new items etc., you will have to perform "Sync" in Reckon Cloud POS to get the latest data from your company file.
- Go to Management System > PREFERENCES > Accounting Software
- Click on Sync button next to Reckon Accounts Hosted
- Tick on the barcode checkbox if you want to import barcodes
- Click Confirm
- Wait until the screen reloads
- Your items, customers and other information from Reckon Accounts Hosted are now updated in Reckon Cloud POS

Viewing transactions in Reckon Accounts Hosted
Sales Receipt
.png)
Refund/Adjustment Note
.png)
Disconnect
To disconnect Reckon Accounts Hosted integration:
- Go to Management System > PREFERENCES > Accounting Software
- Click on Disconnect button next to Reckon Accounts Hosted logo
.png)
- Click the Confirm button on the warning message pop-up
.png)
FAQ
- Why can't I add a new Item after I have integrated Reckon Cloud POS with Reckon Accounts Hosted?
- When you integrate Reckon Cloud POS with Reckon Accounts Hosted, you cannot create Items in Reckon Cloud POS. You will have to create the Item in Reckon Accounts Hosted and run a Sync to import into Reckon Cloud POS.
- Why can't I add a new Customer after I have integrated Reckon Cloud POS with Reckon Accounts Hosted?
- When you integrate Reckon Cloud POS with Reckon Accounts Hosted, you cannot create Customers in Reckon Cloud POS. You will have to create the Customer in Reckon Accounts Hosted and run a Sync to import into Reckon Cloud POS.
- What is my File Path?
- File Path is the exact location where your company file is saved in Reckon Accounts Hosted. To find out the location, open the file in Reckon Accounts Hosted and then press Ctrl 1 on your keyboard. You will find the file's location under Location section. Click the COPY button and you can then paste it in Reckon Cloud POS's File path text field.
Need more help?
Ask the Reckon Community at: https://community.reckon.com/categories/accountshosted
Or
Log a Support Ticket: https://www.reckon.com/au/support/