Table of Contents
Installing, Updating and configuring Reckon Accounts In windows server (terminal server)
Legacy KB ID: 5611
Question
I want to install Reckon Accounts Business Premier/ Enterprise on Windows Server 2019/2016/2012. do you have any guide or procedures I should follow for its smooth setup and functioning? Are there any recommendations for firewall configurations and Ports permission?
Answer
Yes, we have prepared this standard guide as general recommendations to assist with installing, updating and configuring Reckon Accounts Premier and Enterprise users in Microsoft Server 2016, 2012, 2019 and 2008 edition.
Please note this guide does not detail how to set up your network or Terminal Services. It is assumed users are already capable of doing so. However, this guide details the different installation methods of Reckon Accounts and appropriate permissions required for Reckon Account’s processes. It also outlines the firewall and Ports configurations.
Important: While we provide the information on this guide regarding the setup and configuration to run Reckon Accounts desktop on Server or Terminal server environment, we do not warrant that it is complete or sufficient to resolve all network related issues you may have. There could be other network/permission/firewall related issues, which you will need to seek assistance with your local system Admin/IT technician. Our Technical support team will NOT be able to assist you with the following:
- Setting up, configuring or enabling terminal services.
- Your LAN setup.
- User and permissions setup for your network.
- Any network latency or slow performance issue.
- Configuring your firewall and ports (basic instruction provided in the guide).
Introduction
This document is prepared to assist Reckon Account Business users who intend to use Reckon Accounts Business Premier or Enterprise on a Microsoft® Windows® Server 2008, 2012, 2016 and 2019.
Tested Environment:
- Server 2019 x64
- Server 2016 Essentials x64
- Server 2012 R2 Essentials x64
- Server 2008 R2 Enterprise x64
The following instructions will not detail steps on how to setup your network or Terminal Services – but instead, will assist on how to install and make sure that Reckon Accounts Business software and files are working properly when in this Environment.
Reckon Accounts Business users must be set up as part of the Power Users Group or Administrator Group on the server, to have the operating system rights to write to the registry keys and be able to use Reckon Accounts Business correctly.
Reckon Accounts Business and Terminal Services was only tested on a local area network using Microsoft® Remote Desktop Connection.
Citrix connections are known to work but may require additional configuration by the Citrix administrator. Not supported by Reckon.
Detailed Instructions:
Installing on a Windows Server 2012, 2016 and 2019
- Log in as the Windows Administrator.
- Add Remote Desktop Connection to run Reckon Accounts Business using Remote Access.Note: Your IT sets all the configuration settings in the server, the below are just steps how the Remote Desktop Services are needed to install for users to run Reckon Accounts in terminal servers or remote desktop connection.
- Go to Start > Control Panel > Administrative Tools > Server Manager
- From the Dashboard > click Add Roles and features
- Choose Role-based or feature-based installation > then follow the onscreen instructions.
- Once the installation is done > do the same step again this time choosing Remote Desktop Services installation > follow the onscreen instructions.
Installing on a Windows 2008
- Log in as the Windows Administrator.
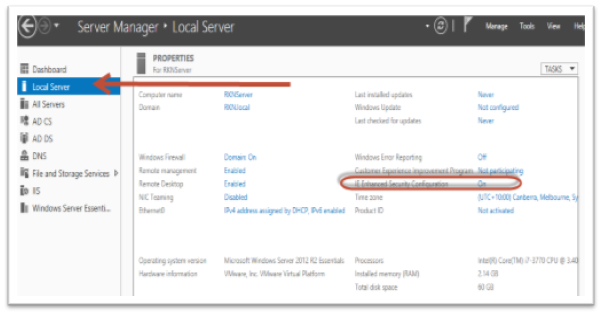
- Change IE ESC to OFF:Setting needs to be OFF as well to open Reckon Accounts Business. Otherwise, the application fails to launch.
- Go to Start> Control Panel > Administrative Tools > Server Manager
- Under the "security information section, click on the Configure IE ESC" link
- Change status to OFF; click OK.
- Turn off Windows Firewall.
- Activate the Terminal Server Role:
- Server Manager > Roles > Add Roles > Next
- Tick the box Terminal Services and then follow the prompts.
- Install Reckon Accounts Business:
- Install mode
In server 2008 Install mode needs to be enabled- Click the start button and then click > Run
- Type ‘cmd’ in the open box
- Once Command prompt opens, type > ‘Change user /install’ to place the server into Install mode.
- Install the application.
- After installing the application, open the command prompt again and use the ‘Change user /execute a’ command to place the server back into Execute mode before using the application.
- Server restart is needed.
- Installation via Control Panel
- Click Start > Control Panel > Install Application on Terminal Sever.
- Follow the prompts to locate the setup.exe file on the DVD drive or where the installer has been copied to and install (This works exactly same as Add/Remove program > Add New Programs)
- Install mode
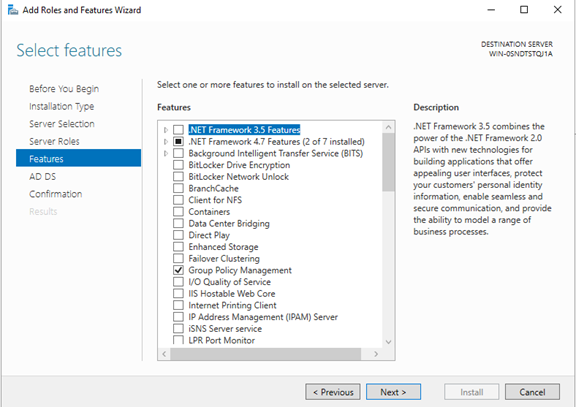
Enabling the (.Net Framework 3.5) – requirement for Reckon Accounts installation
- Go to Start > Control Panel > Administrative Tools > Server Manager
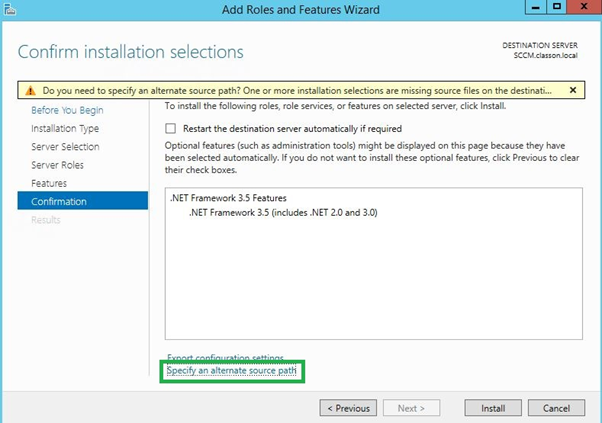
- From the Dashboard > click Add Roles and features
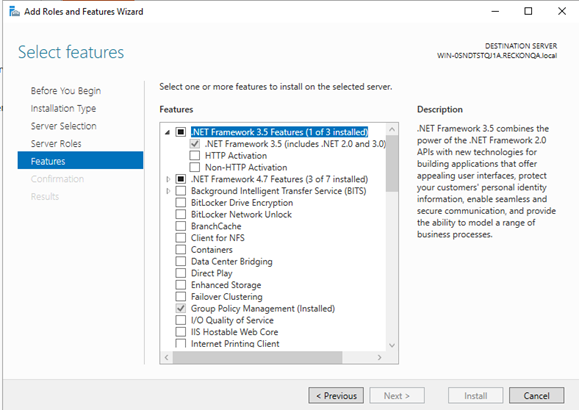
- Follow the wizard and from Select features choose .NET Framework 3.5 Features
Manual installation of .NET Framework 3.5
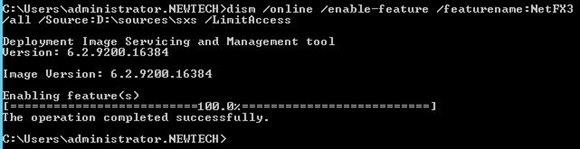
METHOD 1
- Insert the Server 2019 DVD
- Launch the Command Prompt
- Enter this command:
- dism /online /enable-feature /featurename:NetFX3 /all /Source:d:\sources\sxs /LimitAccessNote: Source should be the Windows installation disc. In my case, this was located on D.
- dism /online /enable-feature /featurename:NetFX3 /all /Source:d:\sources\sxs /LimitAccess
- Wait for the whole process to finish > Close CMD > .Net Framework 3.5 is now installed > you can now install Reckon Accounts.
METHOD 2
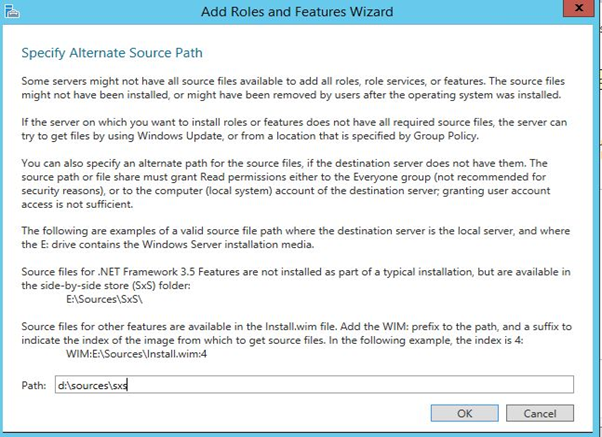
- Follow Step 1 of Enabling .NET Framework steps (wizard based), and once you reach the window below > choose to Specify an alternate source path
- Enter the path d:\sources\sxs (D is the DVD drive where the Windows Server installation disc is inserted). Or you can point it to the extracted Server installation files path).
Types of Reckon Accounts installation:
Below are the three options users can choose to install the Reckon Accounts:
- Install Reckon Accounts and Company File Server – choose when the computer will run Reckon Accounts and will share it’s Reckon Accounts company files with other computers.
- Install Reckon Accounts Only – choose when the computer will run Reckon Accounts but will not share its Reckon Accounts company files with other computers.
- Install Reckon Accounts Company File Server Only – choose when the computer will NOT run Reckon Accounts but will share its Reckon Accounts company files with other computers.
Type of Environment Installation
- Using server as file location only > install OPTION 3, install option 2 on workstations (computers)
- Using server as Terminal Server/Remote Desktop (for remote access) > install OPTION 1
- Using File Server only > install option 3 in the file server, then option 2 on workstations (computers)
Multi-user access and firewall configurations
Below you will find the information regarding the Port and firewall configurations recommended on your server and workstations, for Reckon Accounts Business to work seamlessly. Add Reckon Accounts Business Ports into your Firewall exclusions (This includes your Anti-virus. Please refer to the vendor's specific guide for more information).
Configuring Reckon Accounts ports in your firewall through inbound and outbound settings (TCP)
- Open Control Panel > double click Windows firewall
- On the left-hand side, > click Advanced Settings > Windows Firewall with Advanced Security window will open
- On the left-hand side, > click Inbound Rules > and on the right-hand side column under Actions > click New Rule
- On the New Inbound Rule Wizard, > click Port > leave the TCP chosen as it is > and in the Specific local ports box enter (the Reckon Accounts version port number) ex: 10181 > click Next.
- Make sure to choose the Allow the connection > click next.
- Make sure that Domain, Private, Public are ticked > click next.
- Give the Rule a Name > click Finish.
- Click the Outbound Rules from the left-hand side
- On the New Outbound Rule Wizard, > click Port > leave the TCP chosen as it is > and in the Specific local ports box enter (the Reckon Accounts version port number) ex: 10181 > click Next.
- Make sure to choose the Allow the connection > click next.
- Make sure that Domain, Private, Public are ticked > click next.
- Give the Rule a Name > click Finish.
Port Numbers:
Reckon Accounts Version | Port Number |
Latest | 10188 |
2024 | 10187 |
2023 | 10186 |
2022 | 10185 |
2021 | 10184 |
2020 | 10183 |
2019 | 10182 |
2018 | 10181 |
2017 | 10180 |
2016 | 10179 |
Permissions
QBDataService is the user created by Reckon Accounts which is required to have full access permission. to the file.
- Right-click the folder location of your (.qbw) > click Properties
- Click the Security Tab > make sure that the QBDataServiceUserXX (where xx is the version number of Reckon Accounts you are using) is added in the Group or user names list and with Full Control Access.
- Open the windows Services List and make sure that QuickBooks Database Manager Service and QuickBooksDBXX (where xx is the version number of Reckon Accounts you are using) is running and set to Automatic.
QBDataServices version
Reckon Accounts Version | QBDataServices Version |
Latest | QBDataServiceUser34 |
2024 | QBDataServiceUser33 |
2023 | QBDataServiceUser32 |
2022 | QBDataServiceUser31 |
2021 | QBDataServiceUser30 |
2020 | QBDataServiceUser29 |
2019 | QBDataServiceUser28 |
2018 | QBDataServiceUser27 |
2017 | QBDataServiceUser26 |
2016 | QBDataServiceUser25 |
QBDatabase version
Reckon Accounts Version | QBDataServices Version |
Latest | QuickBooksDB34 |
2024 | QuickBooksDB33 |
2023 | QuickBooksDB32 |
2022 | QuickBooksDB31 |
2021 | QuickBooksDB30 |
2020 | QuickBooksDB29 |
2019 | QuickBooksDB28 |
2018 | QuickBooksDB27 |
2017 | QuickBooksDB26 |
Configuring Reckon Accounts and DBSM in different environments
Option 1: Install Reckon Accounts and Company File Server
Setting UP DBSM and scanning the file:
This option is selected when you wish to use Reckon Accounts on the server too. It installs both Reckon Accounts Business and the Database Server Manager (DBSM). DBSM is used for hosting the file.
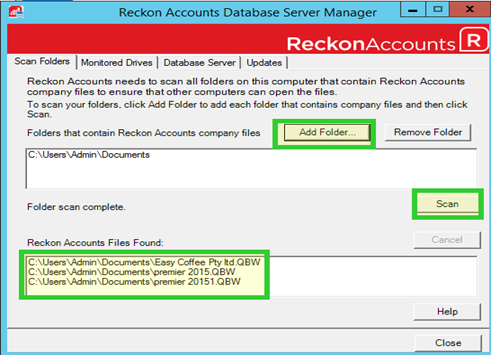
- Launch The Reckon Accounts Database Server Manager > Click Add folder > navigate and click the company file folder > click Scan
- It will list the (.QBW) file/s in the ‘Reckon Accounts Files Found’ section of the window.
- Once satisfied that all your required files are listed, close the window.
- This process of scanning will create a new .ND (network descriptor) file on the same folder where your Reckon accounts files (.QBW) lies. It has the same name as QBW files with the type as .ND.

Accessing the Reckon Accounts Company File
- Launch Reckon Accounts does not open the file yet, make sure that it is not hosting.
- Click the File menu > Utilities > (Host Multi-User Access) – this should be the status.
- Click the File menu > Utilities > (Stop Hosting Multiuser) – click this if this is the status.
- Follow the onscreen instructions till the Hosting is turned off. (After turning off hosting, QuickBooksDBXX and QuickBooks Data Base Manager Service will stop.)
- Close Reckon Accounts and Reckon Accounts Database Server Manager.
- Open the “Services List” and make sure that both have a status of Running and Automatic.
- Launch Reckon Accounts Database Server Manager and add the folder file location > Scan until the (.qbw) file shows.
- Launch Reckon Accounts > check to make sure that Hosting is off.
- Open the company file > then switch to multi-user access to allow others to access the file at the same time.
Remote Desktop Access
- Launch Reckon Accounts, make sure that is it not hosting.
- Open the company file.
Important Information
- You do not need to open the file using Reckon Accounts on the server. Any user can enable and disable the multi-user access. No other user should enable the Hosting in their own Reckon Accounts Program.
- This setup can also be done using a simple peer to peer network – but the computer that holds the file cannot be turned off.
Option 2: Install Reckon Accounts Only
This option is used to have other users that will not share the file but will access the shared Reckon Accounts B company file in multi-user access.
Option 3: Install Reckon Accounts Company File Server Only
This option is selected when you wish to host the file on the Server and not use Reckon Accounts from there. All other workstations will access the file from this server via a network. And you will install option 2, ‘Reckon Accounts only’ on each workstation.
Database Server Manager as a file host
- Right-click the folder location of your (.QBW) > click Properties
- Click the Security Tab > make sure that the QBDataServiceUserXX (where xx is the version number of Reckon Accounts you are using) is added in the Group or user names list and with Full Control Access.
- Open the windows Services List and make sure that QuickBooks Database Manager Service and QuickBooksDBXX (where xx is the version number of Reckon Accounts you are using) is running and set to Automatic
- Launch The Reckon Accounts Database Server Manager > Click Add folder > navigate and click the company file folder > click Scan
- It will show the (.QBW) file in the ‘Reckon Accounts Files Found’ section at the bottom of the window.
- Once satisfied that all your required files are listed, close the window.
- This process of scanning will create a new .ND (network descriptor) file on the same folder where your Reckon accounts files (.QBW) lies. It has the same name as QBW files with the type as .ND.
Workstation Access
- Install Reckon Accounts Only – or option 2.
- The file sitting on the server should be mapped on the workstation > Open Reckon Accounts and open the company file.
- Like the above settings make sure that Reckon Accounts is not set to Host the file.
- Log in to the company file using another login credentials.
Additional Information:
- If you are Upgrading to the new version, it is recommended you Uninstall the previous version from the server before installing the new version. Make sure you have sufficient backup of the data files.
- Whenever Reckon Accounts Business is re-installed (or Repaired), it must be activated again.
Need more help?
Ask the Reckon Community at: https://community.reckon.com/reckon