Authorisation is handled by Oauth 2.0. Reckon runs an identity server for both Reckon Accounts Hosted and Reckon One to enable you to obtain a security token for API calls.
Reckon API default all new accounts to the Authorization Code grant type for users to authorise the application. This ensures you do not store the Reckon username and password details of the customer. To use the Oauth 2.0 service you need a Client ID from the identity server (not be be confused with your Reckon Customer ID). This will be provided to you from the Reckon API team via email when you apply to become a Reckon Developer Partner. Authorisation requests should be sent to the following URL: https://identity.reckon.com/connect/authorize.
A token will be returned to you to be used for that session of API transfer. The key should be included in all API HTTPS calls using the Authorisation: Bearer header.Eg: Authorisation: Bearer <token>
Reckon must configure your API account on the Oauth identity server to access your client ID, and if required, client secret. For this we need your callback URL (aka redirect URI). If you have not already done so please inform the Reckon API team of the callback URL(s) for your application otherwise you cannot be provided with these IDs.
Reckon Developer Portal
The Reckon One API uses Microsoft Azure (AU) for API partner management, security and rate limiting purposes. Due to this an Azure subscription key is required to access the API. The key is appended to each HTTPS call (aside from the Oauth authorisation process) to confirm you as a valid subscriber to the APIs. The Azure key will be provided to you from the Reckon API Team via email when you apply to become a Reckon Developer Partner. Click here to learn about Subscription key.
Below is a sample call (for Reckon One) to show how the key is utilised.
The actual payload of the call is included in the HTTPS body.
Reckon only supports the JSON format.
Oauth Guide for the Reckon Identity Server
Introduction
As part of the security that Reckon has built for its new cloud API systems, Oauth 2.0 as an authentication service is a vital component in this workflow. The Oauth 2.0 system allows us to ensure that both applications and users are authorised to use the Reckon API services and also that the Reckon product user has authorised third-party applications to access their data. This allows Reckon users decide which applications can and cannot have access to their data with the default being no access until such time that the user authorises the third-party application.
Oauth 2.0 is an industry standard however we realise that for some developers this will be new. The purpose of this guide is to give a brief overview as to how best connect to the Reckon API services via Oauth as well as the experience that your users will have when interacting with the services via your application. If Oauth and grant types are new concepts to you, this is a great article to dip your toe.
Key Information
Supported Flows
Reckon officially supports the Authorization Code and Implicit grant types for Oauth 2.0, with Authorization Code being the default set by the Reckon API team for all new developer partners. If you would prefer to use a different flow, please contact the Reckon API Team and we will do our best to accommodate you with a solution.
Callback URL (Redirect URI)
As part of the Reckon Developer Partner signup procedure you will have been asked to provide a Redirect URI (also known as a Callback URL) to Reckon. If you have not done this, your access to the service is not complete and you will not be able to call the Oauth server successfully. You can provide this information to the API team by filling out a support ticket and selecting 'Reckon API' (do not directly email us).
You can also change this URL throughout the development process. So if you need to set one for development, testing and finally for production this can be accommodated.
Example:
127.0.0.1 (Localhost) might be your development environment but for production you might need something like auth.myapp.com/reckon/callback
Please note that due to the high level of security that the Reckon API systems have been setup with, when you are sending your Callback URL it must match exactly what you have provided to Reckon. For example if you told Reckon that your callback URl was http://127.0.0.1 and you send https://127.0.0.1 it will be rejected as its not a direct match. This is to ensure that people unable to spoof clients to malicious websites.
Token Expiry
You should code your application appropriately to ensure a pleasant user experience when it comes to tokens. To assist, here are our token expiry times:
Token
Expiry
Absolute refresh token
(the ability to refresh a token)
12 months
Refresh token
45* days if not active
Access token
180* minutes
*If your refresh_token and access_token expiry are less than above, then wait for few hours for the settings to be updated.
Authorization Code Flow
The Authorization code grant type for Oauth allows you to use refresh tokens when working with the Reckon API systems and thus you will only need to prompt the user for their credentials once, after which you will have access to their account unless they revoke permissions to your application.
ClientID
To use the Authorization Code grant type you will require the Client ID (eg. 0055e72bd331415bkf17702e006d45a9) from the Reckon Identity Server. If you do not have your Client ID, please fill out a support ticket and select 'Reckon API' (do not directly email us).
The client ID is sent encoded in Base 64 to the identity server with the authorization: basic header.
For example if your client id was 1234 you would be sending:
Authorization: Basic MTIzNA==
MTIzNA== is 1234 encoded into Base 64.
The Client ID (held in the Reckon Identity Server) is not to be confused with your Reckon User ID (or username) that is required to log into either the Reckon Hosted or Reckon One applications. eg. 123456-1
Note: If your application is a desktop application, you will need to build a web browser pop up window or something of that ilk to deal with this. You need to be able to present a website loaded from our server for the user to login with. If this is a major problem please fill out a support ticket and select 'Reckon API' (do not directly email us).
This is the call that you will trigger when the user requests to connect to Reckon Accounts Hosted or Reckon One. You may have an administration page where people do this but you will need to trigger this process somehow to get an authorisation key returned.
HTTPS Call Components Explained
authorize?client_id={clientId} This is where you set your client ID. This client ID is provided to you by Reckon once you have provided a Callback URL. If you do not have this Client ID please fill out a support ticket and select 'Reckon API' (do not directly email us).
&response_type=code This is where you set the response that you would like a code returned to you. This code is then used in a further call to obtain your access token and refresh token.
scope=read+write+offline_access This is where you set the permissions that you wish to have with the service. When the user is authorising your application they will be informed of what permissions you are requesting. In the case of Reckon Accounts Hosted and Reckon One you should always be asking for read, write and offline access. Offline access allows you to use refresh tokens with the API.
redirect_uri={redirectURI} This is where the redirect URI (Callback URL) is set. This URL must match the URL you gave to Reckon as the callback URL otherwise the security systems will block the request.
state This can be used to match identity server callback responses to the authorisation requests that generated them. Find out more from it here.
Once you have received a code from the identity server, this code can be used to obtain an access token and refresh token. To do that requires a second call to the identity server via HTTPS
Authorization:Basic <<CLIENTID:CLIENTSECRET ENCODED IN BASE64>>
After this call is successfully sent, the response will include an access token and refresh token. Once you have obtained this you can use the refresh token to obtain new access tokens without the user having to input their credentials again.
For example, if your client id is 1234 and your secret is 5678 the correct authorization header is Authorization: Basic <<1234:5678 ENCODED IN BASE64>>
After this call is successfully sent the response will again include a access token (which is used to access the API) and a refresh token which can be used in the future to obtain another access token. The refresh token should always be recorded to ensure that you can get a updated token without the users interaction.
Token request response
{
    "access_token": "{{access_token}}",
    "expires_in": 10800,
    "token_type": "Bearer",
    "refresh_token": "{{store it to obtain new access_token in future without starting the authorization flow}}"
}
Implicit Flow
The implicit grant is a simplified authorisation code flow optimised for clients implemented in a browser or mobile device using a scripting language such as JavaScript. In the implicit flow, instead of issuing the client an authorization code, the client is issued an access token directly. The implicit grant type does not support refresh tokens.
Client ID
To use the Implicit grant type you will require the Client ID (eg. 0055e72bd331415bkf17702e006d45a9) from the Reckon indentity server. If you do not have your Client ID please fill out a support ticket and select 'Reckon API' (do not directly email us).
The Client ID (held in the Reckon identity server) is not to be confused with your Reckon User ID (or username) that is required to log into either the Reckon Hosted or Reckon One application. e.g. 123456-1
Note: If your application is a desktop application, you will need to build a web browser pop up window or something of that ilk to deal with this. You need to be able to present a website loaded from our server for the user to login with. If this is a major problem please contact us.
This is the call that you will trigger when the user requests to connect to Reckon Accounts Hosted or Reckon One. You may have an administration page where people do this but you will need to trigger this process somehow to get an authorisation key returned.
HTTPS Call Explained (Key components)
authorize?client_id={clientId} This is where you set your client ID. This client ID is provided to you by Reckon once you have provided a Callback URL. If you do not have this Client ID please fill out a support ticket and select 'Reckon API' (do not directly email us).
&response_type=token This is where you set what response you would like from the server. This is always set to token. We will return to you two tokens. A token (token) and an access token (access_token). It is the access token which is used when calling the API after authorization.
scope=read+write This is where you set the permissions that you wish to have with the service. When the user is authorising your application they will be informed of what permissions you are requesting. In the case of Reckon Accounts Hosted and Reckon One you should always be asking for read and write.
redirect_uri={redirectURI} This is where the redirect URI (Callback URL) is set. This URL must match the URL you gave to Reckon as the callback URL otherwise the security systems will block the request.
HTTPS Response
When we send the user to the callback URL that you have set, we also send the tokens back with it. You will then capture the tokens from that response.
This is the end-to-end workflow a user will experience when authorising your application, including the sites which are loaded from the Reckon Identity server.
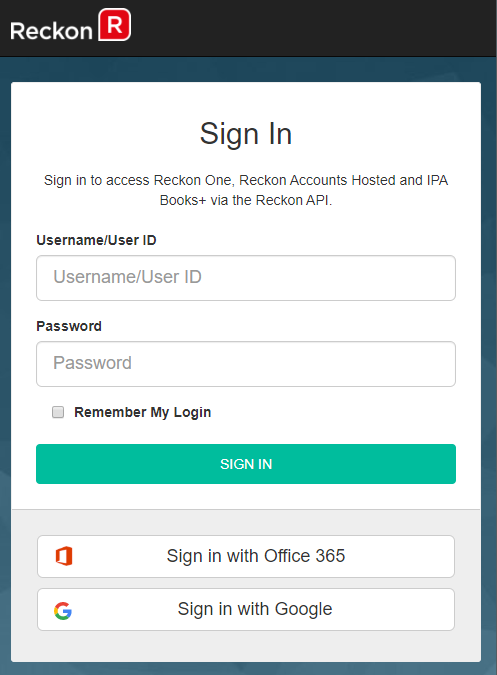
User clicks authorization/connect to Reckon * (*Terminology determined by individual developer).At this point a user will be presented with a website loaded from the Reckon Identity Server to allow your application to connect to their system. The user is asked to enter their Reckon Accounts Hosted or Reckon One credentials (This flow is exactly the same for both services). Once they enter these credentials, they click Login.
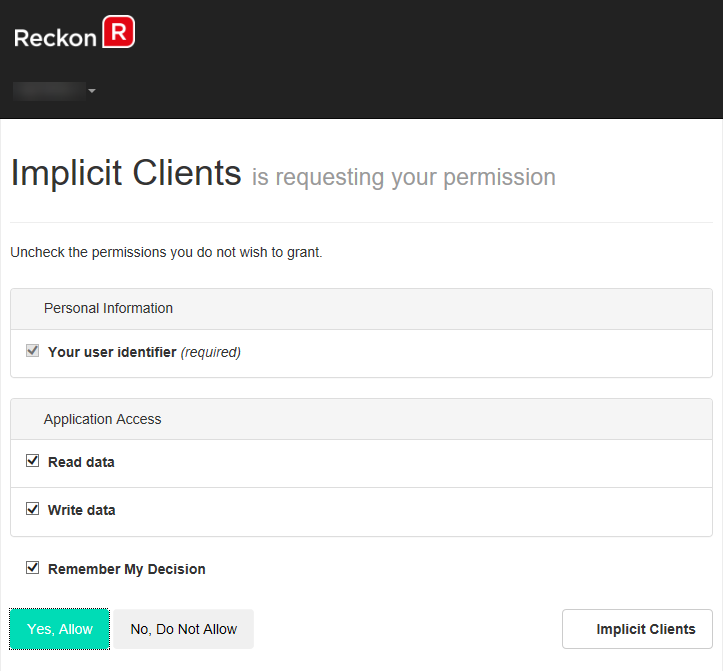
User confirms authorisationThe user is asked to confirm that they wish to allow access to your application. In this case, the user is being asked to allow Implicit Clients to access data in their account. As you can see, the user is informed which permissions you requested via the scopes input. It is suggested that users keep both read data and write data access available for both APIs. If the user un-checks ‘Remember my Decision’, they will be asked to confirm these permissions every time they connect to the service. If the user clicks ‘No, Do Not Allow’ then your application will not be allowed to interact with that users system and will be blocked. After the user clicks yes they will be returned to the Callback URL that you have provided to Reckon along with the token attached.
Callback URLIn the example above the Callback URL was set to the localhost (127.0.0.1). As you can see the user has been returned to the Callback URL with the token information attached. You will need to extract that token information out for the API calls that you make to the API service.
Resource Owner
Reckon also supports the Resource Owner flow for Oauth however the usage of this flow must be approved by Reckon and there needs to be a specific need for it. The reason being that this is a situation where you will be asking for the users credentials within your application, as opposed to displaying a website loaded from our identity server. If you are approved for the Resource Owner flow, please follow the below instructions. If you wish to use resource owner, please fill out a support ticket and select 'Reckon API' (do not directly email us).
This grant type should only be used when there is a high degree of trust between the resource owner and the client. Reckon do not generally allow this type of Oauth grant for our API developer partners.
Resource Owner doesn't accept Single Sign On or SSO (Microsoft or Google) because we don't have the user's information to validate their access. Users who use SSO to access our products will not be able to use your application if you are on Resource Owner flow.
Client ID/Client Secret
To use the resource owner flow you will require both the Client ID and Client Secret. If you do not have your client ID and secret please fill out a support ticket and select 'Reckon API' (do not directly email us).
The client ID and client secret are sent encoded in Base 64 to the identity server with the authorization: basic header.
For example, if your client id was 1234 and the client secret 5678 you would be sending:
Authorization: Basic MTIzNDo1Njc4
MTIzNDo1Njc4 = 1234:5678 encoded into Base 64.
Sample HTTPS Call
The key difference between the implicit flow and the resource owner flow is that the majority of information is sent in the body of the HTTPS request and headers, not within the direct URL call.
To access the resource owner flow, use the following URL:
https://identity.reckon.com/connect/token
As you can see, a lot of the information which is contained in the regular Implicit command is not sent with the URL in the resource owner flow. Instead, the headers become very important.
Sample HTTPS Headers
There is two headers that must be sent with this flow, authorization and content type. A sample is as follows:
Authorization: Basic MTIzNDo1Njc4
Content-Type: application/x-www-form-urlencoded
Sample HTTPS Body
A lot of key information is also included in the body in this flow. A sample is as follows:
Where <<USERNAME>> is the username you want to logon with (this is also known as the tenant id) and the password is the users password. The scope remains the same as the implicit scope. As you can see in this flow you need to build a mechanism into your system to allow the user to enter their username and password to the Hosted system.
It is strongly requested by Reckon that you do not store the username and password of users and instead cache per session.
Response
You will get a response back from the server. If successful the token will be returned, however only an "access_token" is returned with the Resource Owner flow. This token is to be used with the API calls.
You may also get a ‘invalid_client’ response. This can occur if clientId/clientSecret/redirectURI are wrong or the username/password is wrong or if you have set the Base64 encryption incorrectly.