Recurring Invoices - Reckon One
On this page
Recurring transactions permissions
Where do I find Recurring transactions?
Recurring transactions list screen
Recurring transaction schedule
Recurring template column on invoice list
Recurring transactions permission
A new set of permissions for recurring transactions is added to Roles (within the Day to Day role dropdown options). The permissions govern whether the specific user can create, edit or delete a recurring transaction template. Administrator and Superuser roles will have all recurring transactions permissions enabled by default.
View: Allows a user to view the recurring transactions list screen and recurring template. However users cannot create or edit a recurring transaction template.
Create and edit: Allows the user to create and edit recurring transaction templates. Note: Enabling this role also enables 'Create and edit' role options for Invoices, receipts and payments.
Delete: Allows the user to delete recurring transaction templates.
All: Includes View, Create and edit and Delete permission. All is enabled for the Administrator and Superuser role by default.
The recurring transaction list screen is located on the side menu Day to Day > Business > Recurring Transactions. A minimum role permission level of 'View' is required to access recurring transactions.
The recurring transaction list screen displays all recurring transaction templates set up in the book. Click Add invoice to set up a new recurring invoice from this list screen. To create a recurring template, you will require the Create and edit role permission to be enabled.
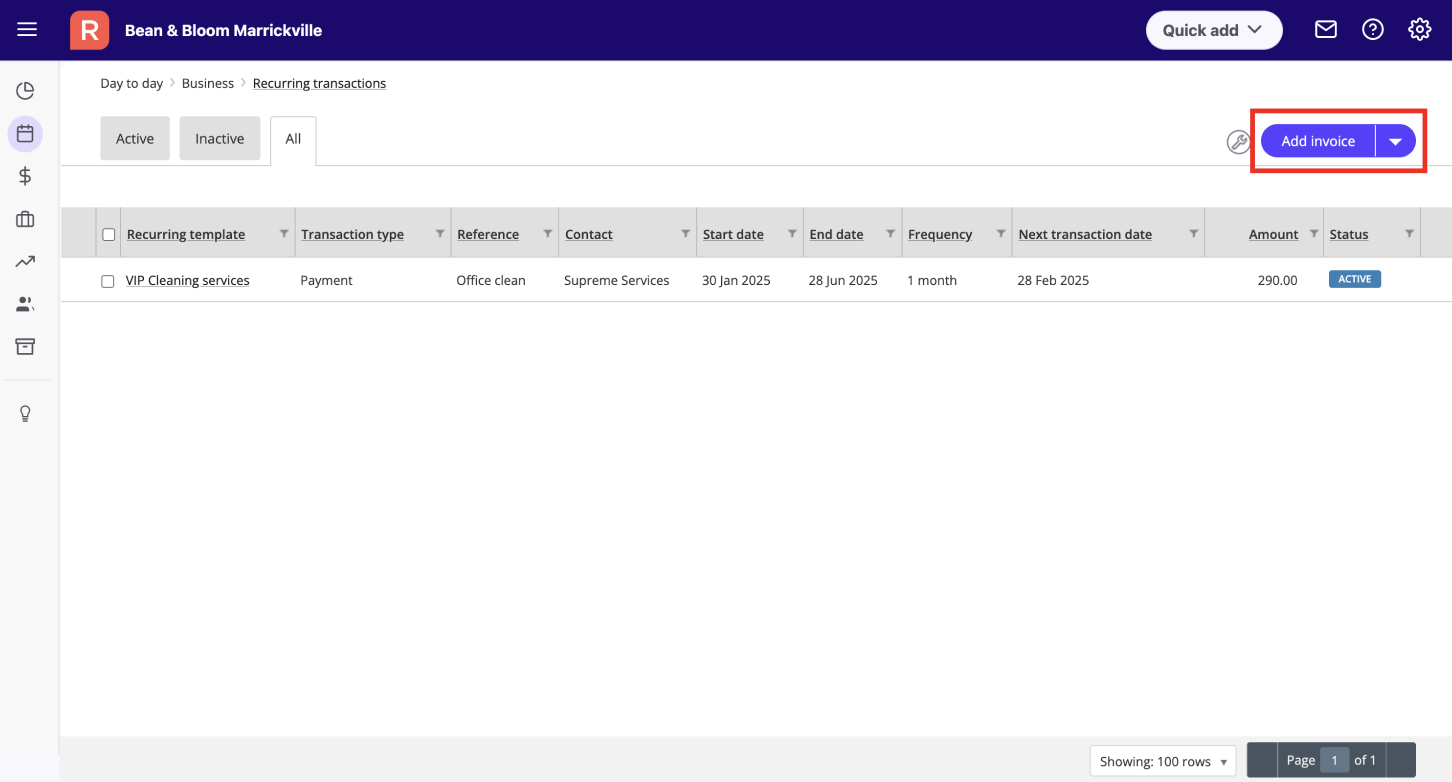
Recurring template: This is the name of the recurring invoice template.
Transaction type: Displays what transaction type the recurring template is set up for.
Reference: Reference as stated on the recurring invoice template.
Contact: This is the customer who the recurring invoice is created for.
Start date: The start date when the recurring invoice will be first created.
End date: The end date when the recurring transaction will finish. The end date will be blank if there is no end date specified or the status is inactive.
Frequency: The interval frequency which the recurring transactions will run.
Next transaction date: The date when the next recurring invoice will be created.
Status: Active or Inactive. The recurring invoice will not create when template is set to inactive. The status will be inactive when the recurring invoice has completed the last occurrence.
The example below shows the recurring invoice template where you can set up the details of the invoice and the recurring schedule. When creating a recurring tax invoice (or recurring invoice if you do not track GST on your book), select the customer, invoice payment terms, classification, invoice discount, accounts or items and quantity to be used when the recurring invoice is created.
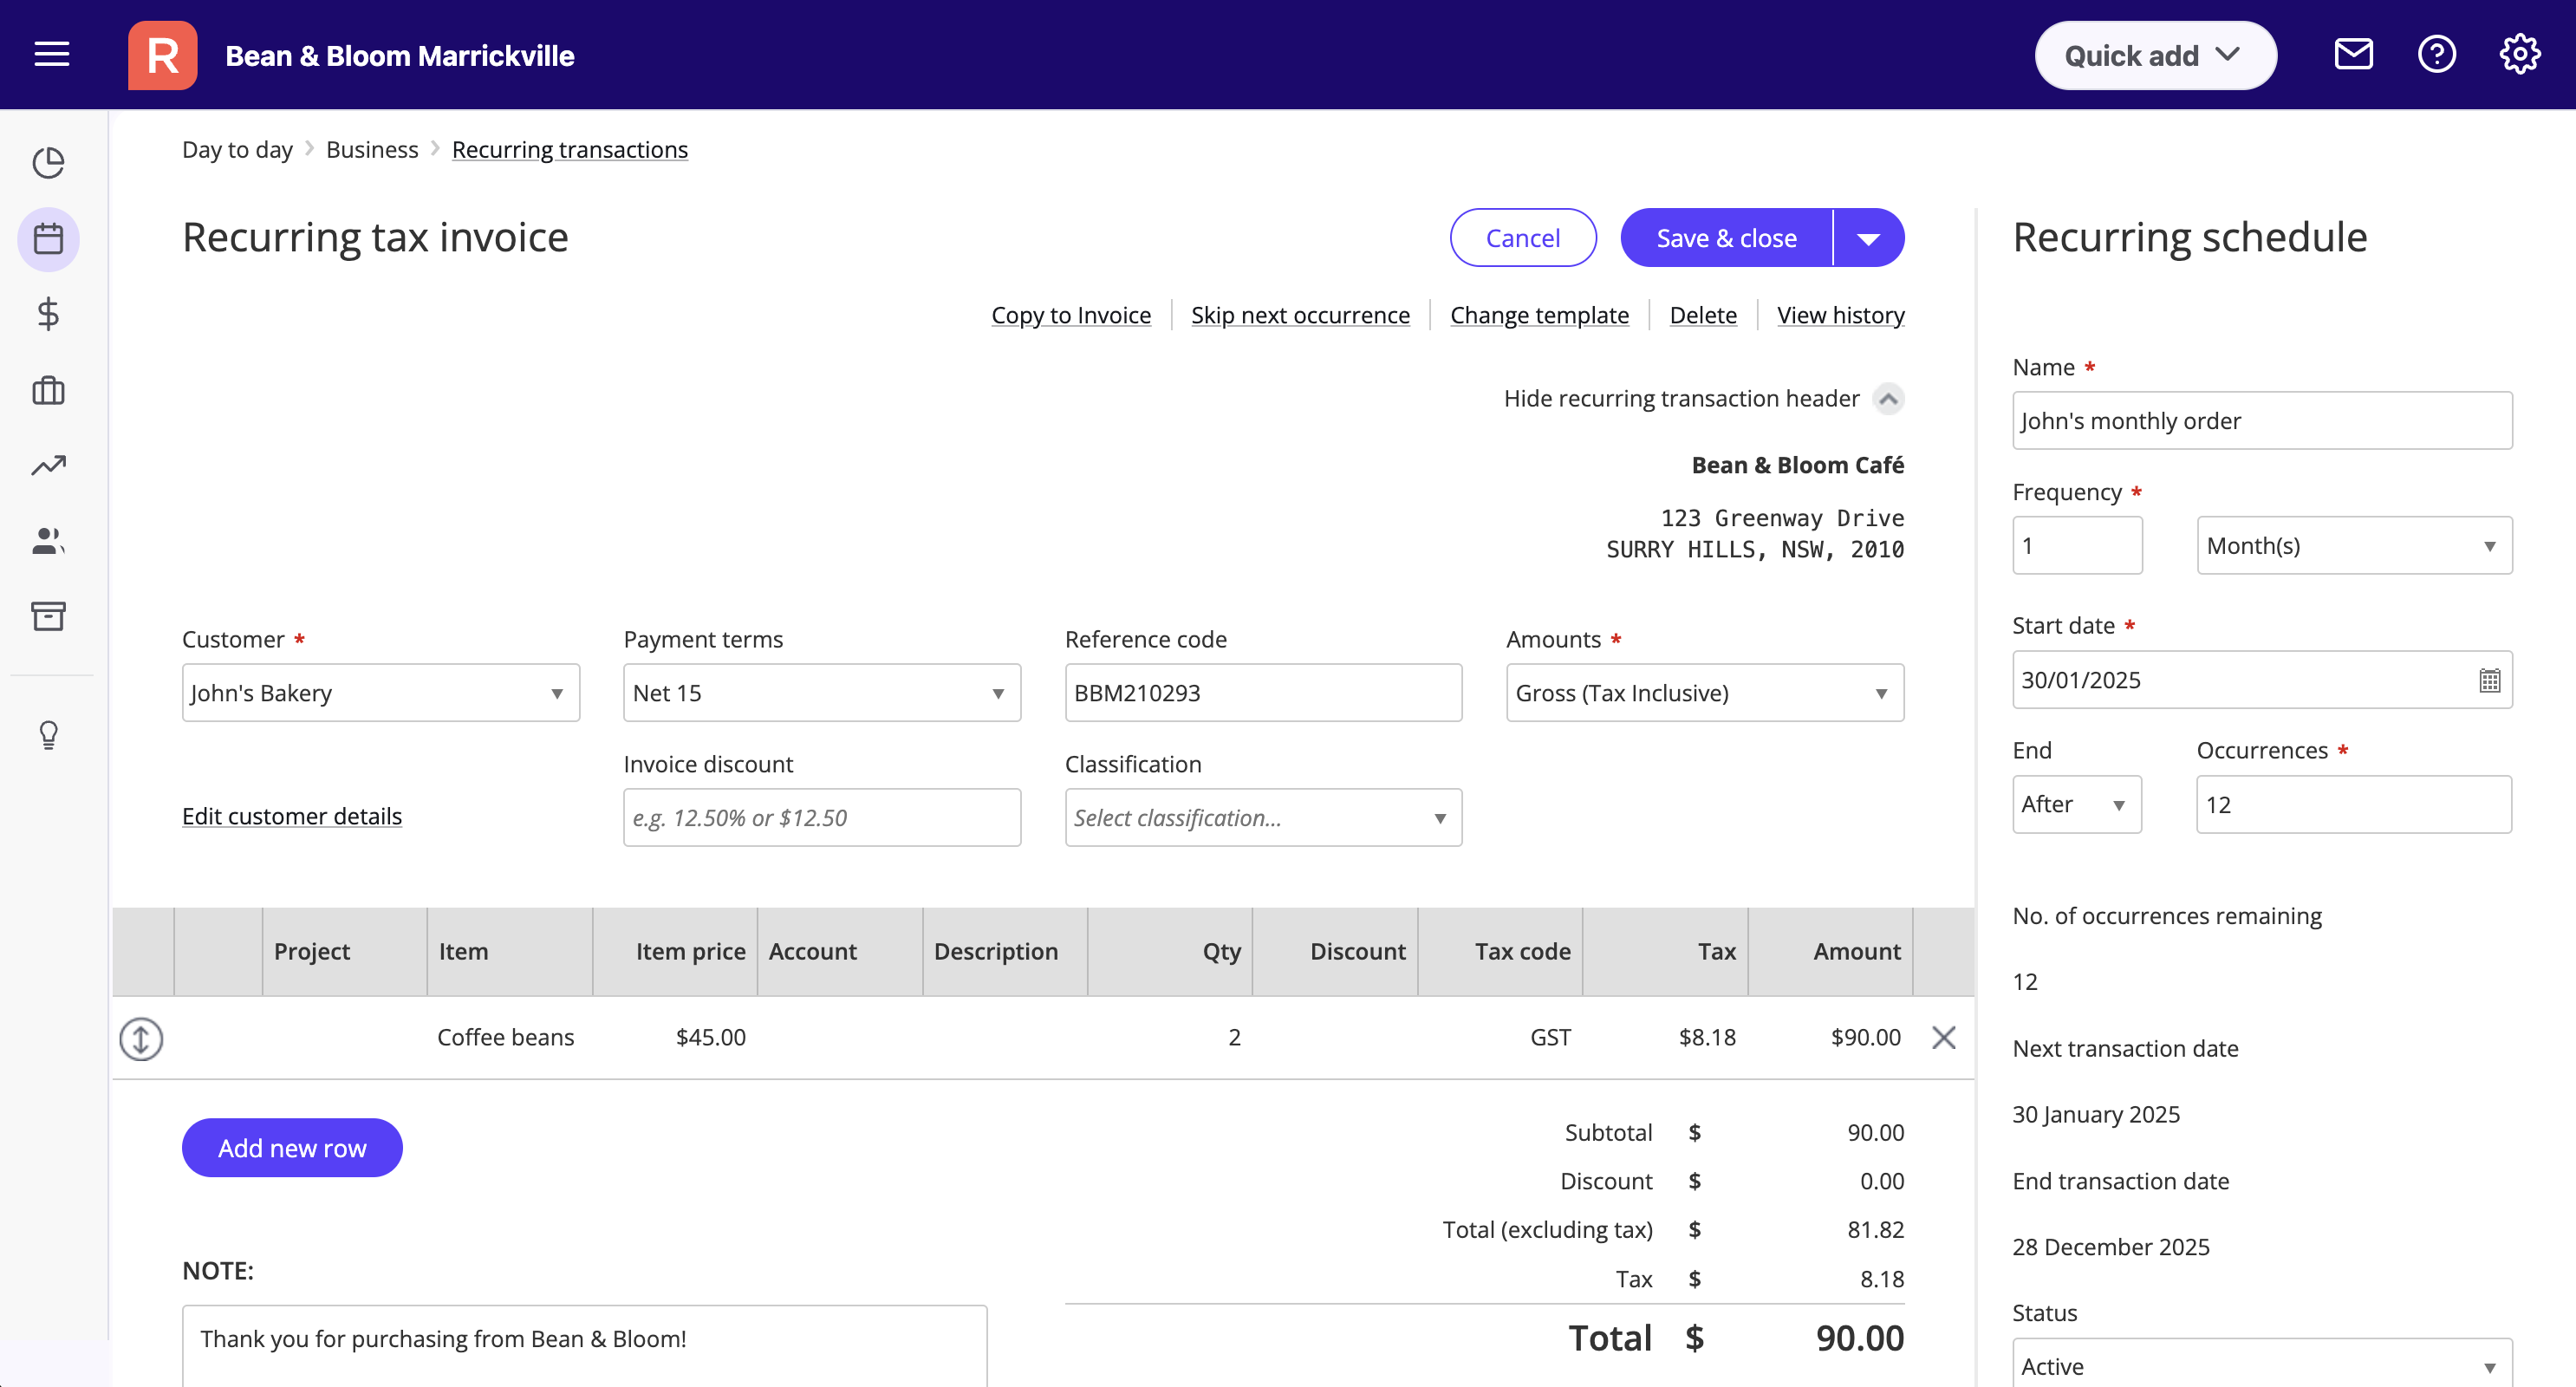
This is where you define at what date interval Reckon One will create the recurring transaction.
Name: This is the recurring transaction template name and is a mandatory field. Enter a unique name so you can easily identify the recurring template from the Recurring Transactions list.
Frequency: This is the frequency in which Reckon One will create the recurring invoice. There are 3 selections - Day(s), Week(s) or Month(s). For example, enter "2 weeks" if you want the invoice to be created fortnightly.
Start date: Select the date when you want the first recurring invoice to be created. If your start date is set on the last day of the month and frequency is monthly, an option will become available to select 'Use last day of the month'. If selected, this will allow Reckon One to create the recurring invoice on the last day of the calendar month. For example, you have a monthly recurring invoice template with a start date of 28 Feb 2019 and opt for 'Use last day of each month' selection, the next transaction date will be 31 Mar 2019.
End: Specify under which conditions the recurring invoice will end.
> After: Set the number of times you want the invoice created before it ends. The recurring invoice template will be set to inactive after it has completed the set number of recurring invoices.
> At date: Enter an end date when the last recurring invoice will created. Recurring invoice will not be created after the end date and the recurring invoice template will be set to inactive automatically.
> Never: The recurring invoice will continue to create at the set frequency without an end date.
No. of occurrences remaining: Reckon One calculates the number of occurrences remaining based on the start date, frequency and end date conditions.
Next transaction date: This is the next transaction date when the recurring invoice will be created on.
Email invoice automatically: When the checkbox is selected, Reckon One will email the invoice to your customer automatically after it is created.
Status: This is the recurring invoice template status. When the end date has lapsed (no occurrences remaining), the template will be set to inactive and no recurring invoices will not be created.
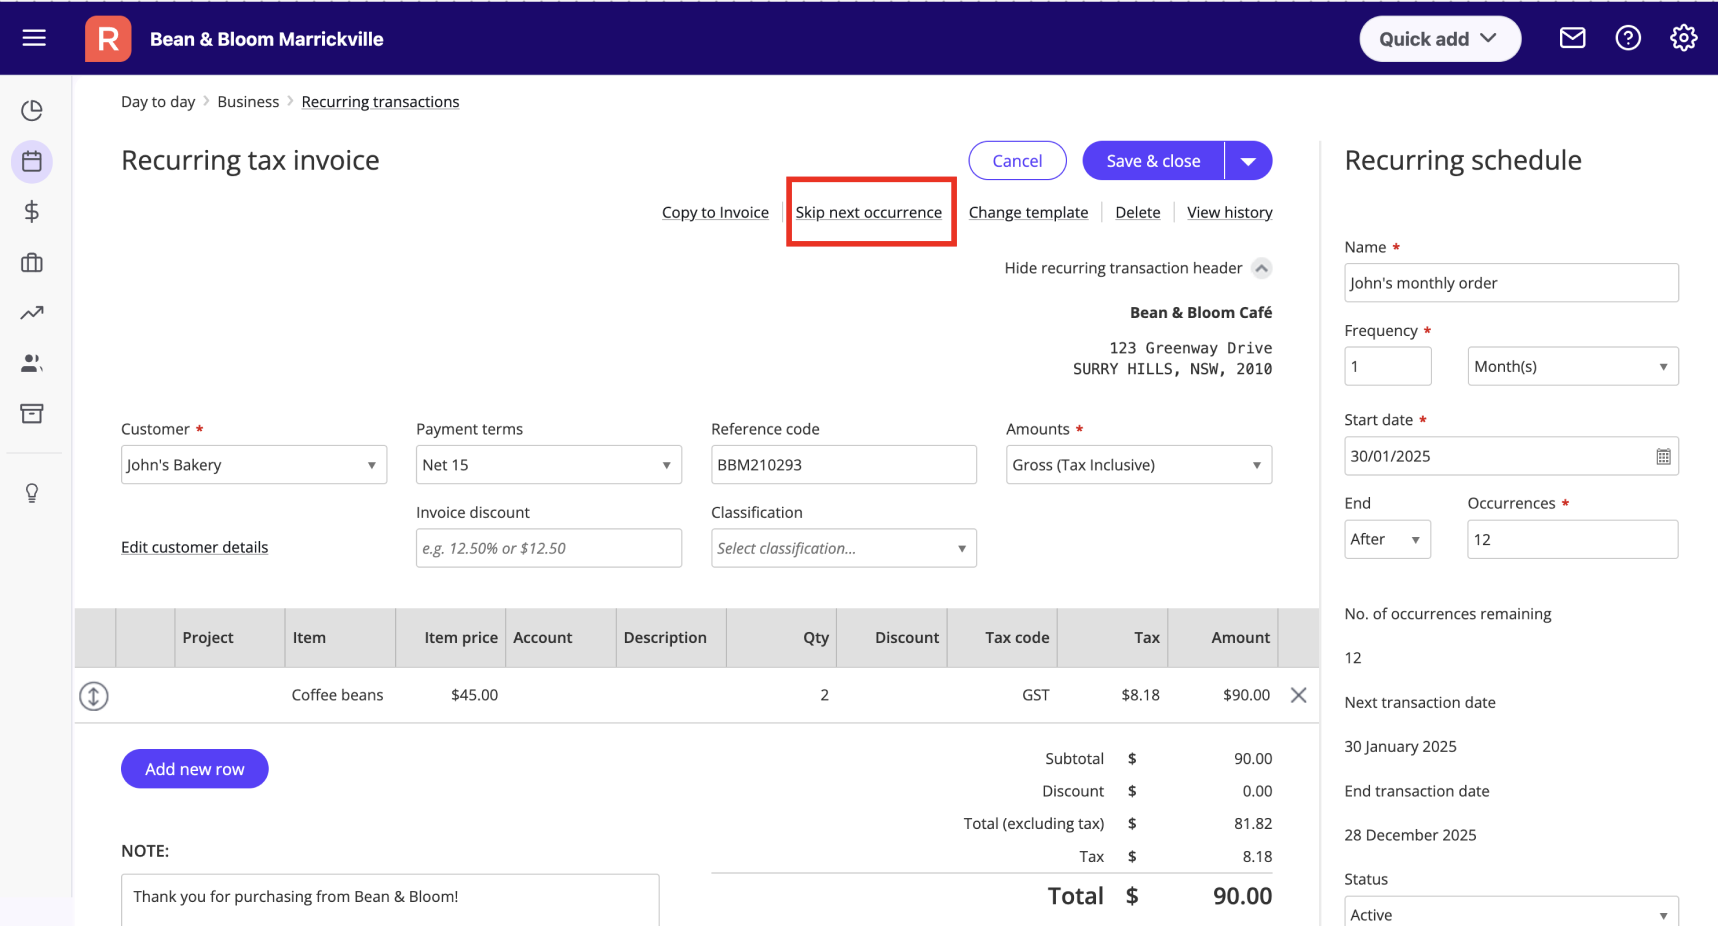
This function allows you to skip the next occurrence should you not require the recurring invoice to be created at any stage. When you click on 'Skip next occurrence' in the recurring transaction template, a message will appear asking you to confirm the action and the new next transaction date for the recurring invoice. The number of occurrences remaining will be reduced by 1 when you skip an occurrence.
You can also set up a recurring invoice template from an existing invoice. You will need to have Recurring transactions 'Create and edit' permission to set up a recurring invoice template. Invoice details such as Contact, Payment terms, Classification, Reference code, invoice discount and invoice line details will be copy onto a new recurring invoice template when you click 'Set as recurring' from the existing invoice.

To allow you to easily identify which invoices are created from a recurring invoice template, a Recurring template column has been added to the invoice list screen.
You will be able to open the recurring transaction template from the invoice list if you have Recurring transactions "Create and edit" permission. The recurring template name will be shown if the invoice was created from a recurring transaction.
Recurring template column are also available on other corresponding invoice tabs; All, Draft, Approved, Overdue, Unpaid and Paid.
Q: What time does Reckon One create the recurring invoices?
A: Reckon One creates the recurring invoices every hour.
Q: How can I tell if an invoice is created from a recurring invoice template or by another user?
A: The recurring invoice template name will be display in the Recurring template column. If the column is empty, it would mean the invoice transaction isn't associated to a recurring transaction. Alternatively, you can go to 'View history' on the Invoice and locate the 'Invoice created' description. Invoices created from recurring invoice template will display "System" as the full name of the invoice creator.
Q: I have set up a recurring payment with today as the Start date. However, when I go to the invoice list, it has not been created yet.
A: Please check the invoice list later as it has been queued. You can also check the 'Next transaction date' on the Recurring transactions list if it has been updated.
Q: Can Reckon One email the invoice to my customer when it is created?
A: Yes, you can set Reckon One to email the invoice automatically by selecting the "Email invoice automatically" checkbox on the Recurring invoice. You can view if the invoice have been emailed via the Email history or on the invoice View history.
Q: I can create invoices and view recurring transactions list on my book but I cannot add a recurring invoice.
A: You need to have the Create and edit permission enabled for Recurring Transactions in order to create a recurring invoice template. Check that you have the permission enabled in Settings > Books Settings > Roles. If you do not have the Create and edit permission enabled under Recurring Transactions, you will need to ask your book administrator to grant you access.
Q: Can I request other Reckon One transactions to be available as a recurring transaction?
A: You sure can. If there is something you would like please go to our Reckon One Ideas website to submit a feature request.