Table of Contents
Reckon One Postman Collection
Postman is a powerful HTTP client for testing RESTful APIs to learn, test and develop integration with a third party provider.
We've created a Postman collection that you can use to help you understand how Reckon One API works.
Steps
- Download Postman
- Import Reckon One collection
- Import environment
- Configure the environment
- How to run the collection
Download Postman
You can download Postman from here.
Import Reckon One collection
You'll need to import the collection first. Once it's imported, you'll find it in your collections, called R1 collection for Devs.
- Click Import from the top navigation bar > Import From Link
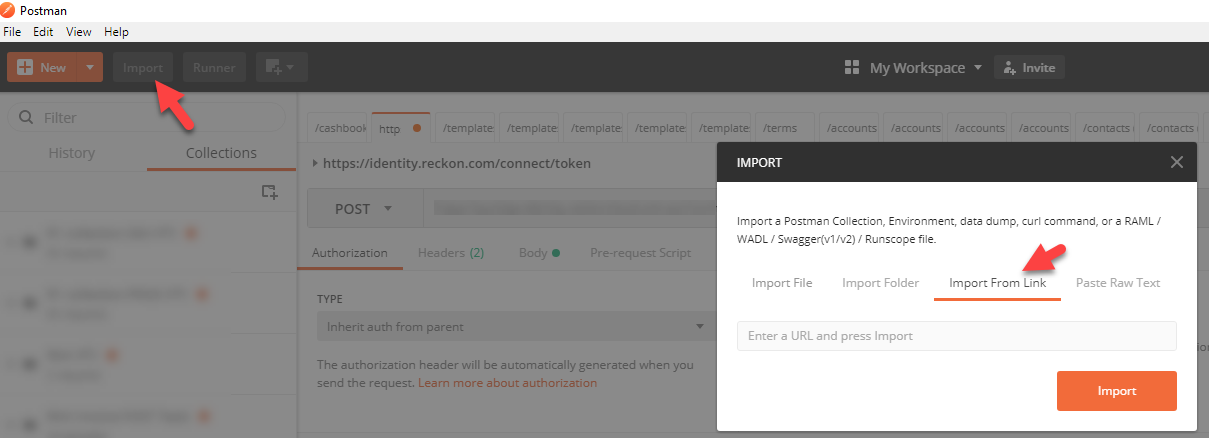
- Paste this link: https://www.getpostman.com/collections/5d087cb22f62b98a9df9
- Click Import
- You can now see the collection showing up as below:

If it doesn't import, try closing and opening Postman (the age old trick!) and the collection will show up.
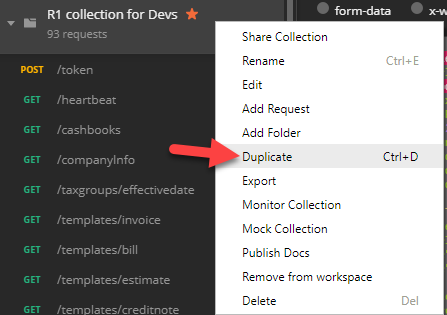
- If you want to modify the collection, you'll have to duplicate the collection by right clicking on the collection name > Duplicate.
Import the Environment
The collection uses variables to make it easier for you to make the API calls. The variables are saved in an environment. We've created an environment which you can utilise to fill the API calls to automate the process as much as possible.
- Download the environment json file: click here (you can use AU/NZ environment for UK as well)
- In Postman, click Import > Import File > Choose Files > select the file that you downloaded in step 1 > Open

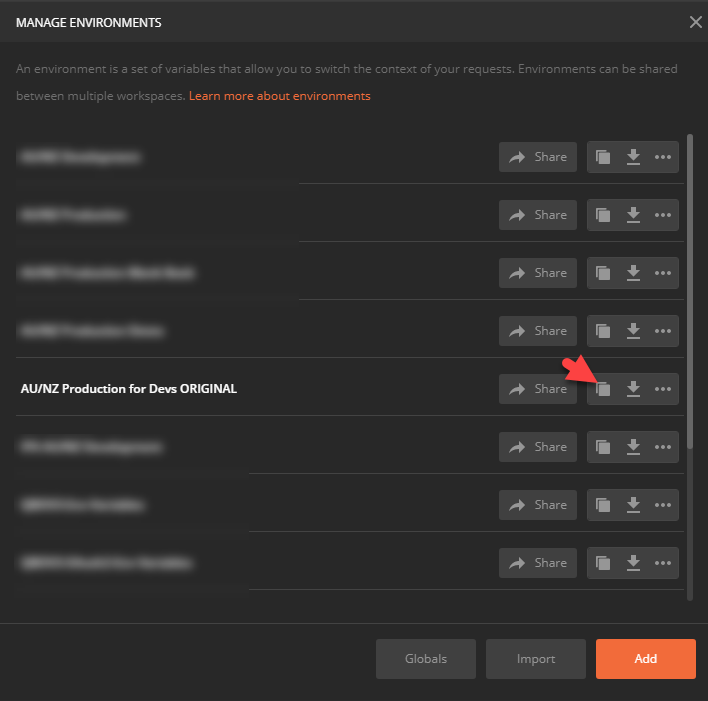
- If you want to modify the collection, you'll have to duplicate the environment by clicking on the duplicate icon in Environment settings.
Configure the Environment
You will need to configure the environment (only modify the duplicated environment as informed in previous step) to add your account and book's details so that the variables have the correct information. This includes adding your username and password, for authorisation (required for Resource Owner Authorization flow that we've used in the collection), your bookID etc. which are set as variables and are used in the calls (they'll show in calls as {{url}} for example) to make it easy for you to use them. You can change the values any time.
- From the Environment drop-down menu at the top, change to the environment that you want to use (duplicate of AU/NZ or UK) and click on the cog wheel button

- Click on your modified environment and you'll see the below screen
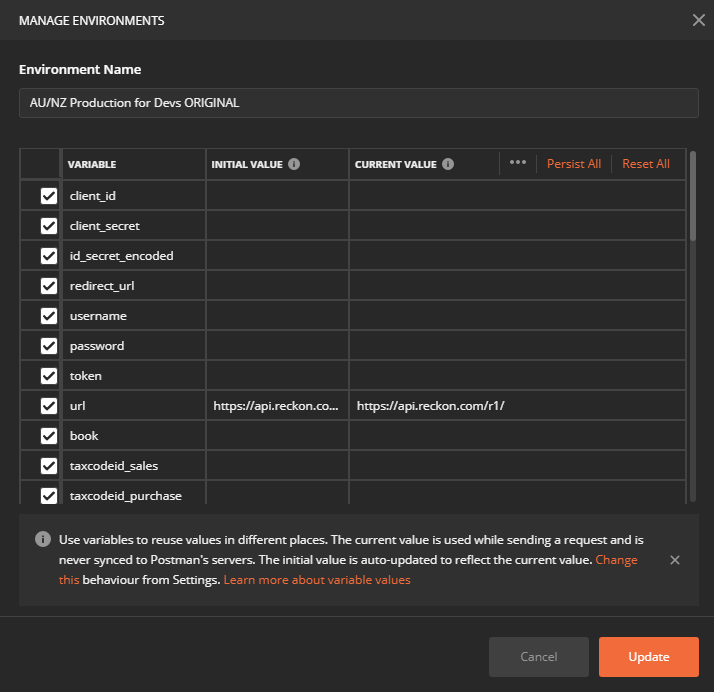
- This is where you'll enter the value for the variables
Name
Value
How to get the data
client_id
Your clientID
After you sign up, you will receive an email from the API team that will include your clientId. If you can't locate it, let the Support team know by emailing us.
client_secret
Your clientSecret
After you sign up, you will receive an email from the API team that will include your clientId. If you can't locate it, let the Support team know by emailing us.
redirect_url
RedirectURL where we send the authorisation code/access tokens back
You've supplied us with this information in your application form. If you need to change or want to know what you provided us with, email the Support team.
username
Username that you use to login to access Reckon One
Username that you use to login to Reckon Portal to access Reckon One
password
Password that you use to login to access Reckon One
Password that you use to login to Reckon Portal to access Reckon One
token
Leave it blank
Once you've run the "/token" call, it will save the received "token" data in this variable, which will be used in next calls
url
Leave as is
https://api.reckon.com/r1/
book
Enter the cashbookId of your book that you want to test the API collection against
- Either get the cashbookId by retrieving the cashbook lists or open up Reckon One book and you'll see the cashbookID in the URL
Example: https://app.reckonone.com/cashbookID/Core - OR get it via API endpoint
taxcodeid_sales
The tax code's ID that you want to use for sales type of transactions (example: GST)
- Open up Reckon Book > Settings > Settings > Tax codes and groups > open GST (for example) and get the id from the URL
Example: https://app.reckonone.com/{cashbookID}/TaxGroup/Edit/taxcodeid - OR get it via API endpoint
taxcodeid_purchase
The tax code's ID that you want to use for sales type of transactions (example: NCG)
- Open up Reckon Book > Settings > Settings > Tax codes and groups > open NCG (for example) and get the id from the URL
Example: https://app.reckonone.com/{cashbookID}/TaxGroup/Edit/taxcodeid - OR get it via API endpoint
templateid_sales
templateID of your Sales template
- Open up Reckon Book > Settings > Settings > Day to day > Money in > INVOICES > Manage templates > choose the template > Preview > and get the templateid from the URL
Example: https://app.reckonone.com/{cashbookID}/Core/CashbookSettings/PreviewTemplate?templateId=templateid&selectedOptions=2748055423&templateType=Invoice&selectedTemplateFontSize=7&selectedTemplateFont=Open%20Sans - OR get it via API endpoint
templateid_purchase
templateid of your Bills template
- Open up Reckon Book > Settings > Settings > Day to day > Money out > BILLS > Manage templates > choose the template > Preview > and get the templateid from the URL
Example: https://app.reckonone.com/{cashbookID}/Core/CashbookSettings/PreviewTemplate?templateId=templateid&selectedOptions=2748055423&templateType=Bill&selectedTemplateFontSize=7&selectedTemplateFont=Open%20Sans - OR get it via API endpoint
templateid_estimate
templateid of your Estimates template
- Open up Reckon Book > Settings > Settings > Day to day > Money in > ESTIMATES > Manage templates > choose the template > Preview > and get the templateid from the URL
Example: https://app.reckonone.com/{cashbookID}/Core/CashbookSettings/PreviewTemplate?templateId=templateid&selectedOptions=2748055423&templateType=Estimate&selectedTemplateFontSize=7&selectedTemplateFont=Open%20Sans - OR get it via API endpoint
templateid_can
templateid of your Customer Adjustment Notes
- Open up Reckon Book > Settings > Settings > Day to day > Money in > CUSTOMER ADJUSTMENT NOTES > Manage templates > choose the template > Preview > and get the templateid from the URL
Example: https://app.reckonone.com/{cashbookID}/Core/CashbookSettings/PreviewTemplate?templateId=templateid&selectedOptions=2748055423&templateType=CreditNote&selectedTemplateFontSize=7&selectedTemplateFont=Open%20Sans - OR get it via API endpoint
templateid_san
templateid of your Supplier Adjustment Notes
- Open up Reckon Book > Settings > Settings > Day to day > Money in > SUPPLIER ADJUSTMENT NOTES > Manage templates > choose the template > Preview > and get the templateid from the URL
Example: https://app.reckonone.com/{cashbookID}/Core/CashbookSettings/PreviewTemplate?templateId=templateid&selectedOptions=2748055423&templateType=BillCredit&selectedTemplateFontSize=7&selectedTemplateFont=Open%20Sans - OR get it via API endpoint
accountsreceivableid
Accounts Receivable's ID
- Open up Reckon Book > Settings > Chart of Accounts > Assets > open up Accounts Receivable and get the id from the URL
Example: https://app.reckonone.com/{cashbookID}/Core/Account/Edit/accountID - OR get it via API endpoint and look for the account and capture it's ID
accountspayableid
Accounts Payable's ID
- Open up Reckon Book > Settings > Chart of Accounts > Liabilities > open up Accounts Payable and get the id from the URL
Example: https://app.reckonone.com/{cashbookID}/Core/Account/Edit/accountID - OR get it via API endpoint and look for the account and capture it's ID
classificationid
ID of the class that you want to use
Make an API call to get the ID. Click here to find out how
refresh_token
Copy the data from Authorisation call for the first time, then it will be updated automatically once you run "Refresh Token" call
Read the instructions from below
Ocp-Apim-Subscription-Key
Your API product subscription key
Get your subscription key from your account's profile in Reckon Developer Portal (hosted in Azure). Click here to know more. Subscription keys will be mandatory to be sent with each API call in near future. However, we recommend you to start using it immediately. You can add it at the end of the URL or header of each call.
Rest of the variables will be filled by running POSTing Invoices, Bills etc. as they get filled from the responses
- Either get the cashbookId by retrieving the cashbook lists or open up Reckon One book and you'll see the cashbookID in the URL
How to run the collection
Before you can use any request that interacts with your company data file, you will need to follow the authorisation flow to get your access_token and refresh_token.
This collection uses the default Authorization Code flow.
- You will need to click "Authorise (get code and refresh token first)" request first > go to Auth tab > choose "OAuth 2.0" as the Type and click on "Get New Access Token" button.
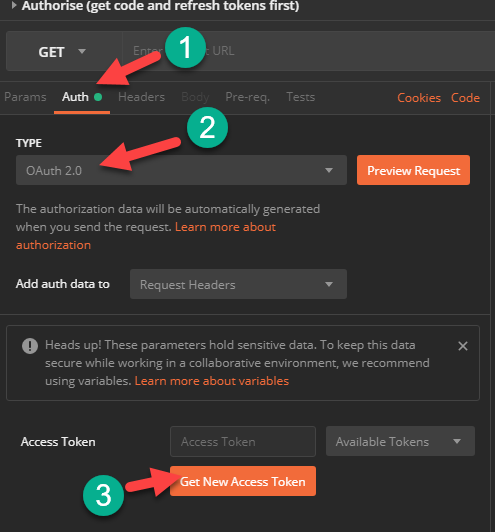
- This is where you will enter your details (clientID, ClientSecret etc.) to get "code", which will be used for "Refresh Token" call. If you've entered your ClientID, ClientSecret and RedirectURL in the environment settings, you can use them over here by entering them as {{client_id}} etc.
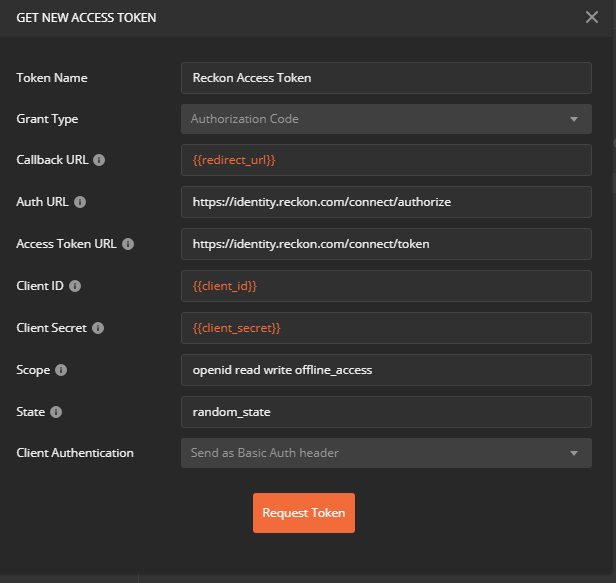
- After you've clicked on "Request Token" and you will be asked to login to Reckon IdentityServer and confirm the access grant
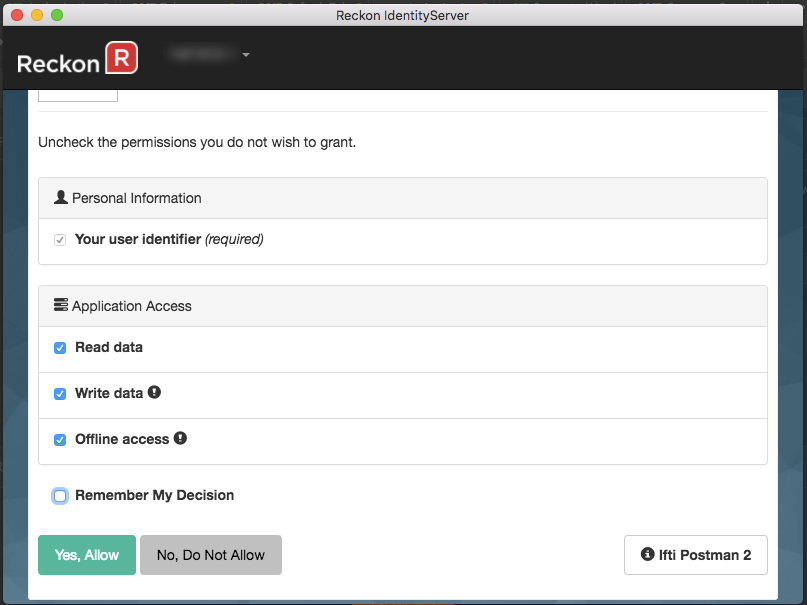
- Once the access is granted, you'll see the refresh_token in the next screen. Copy this refresh_token value
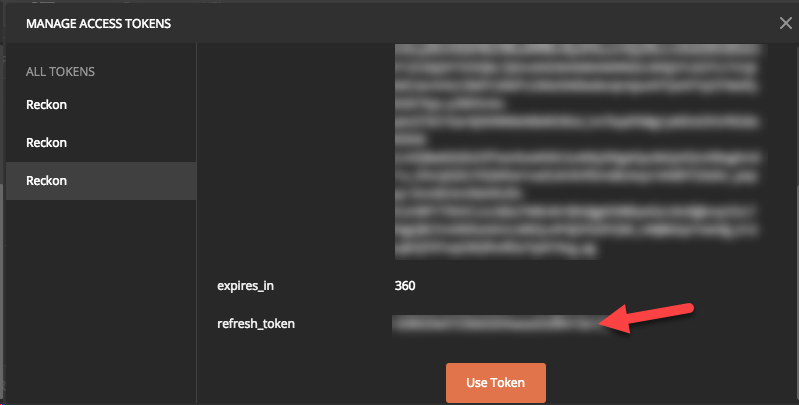
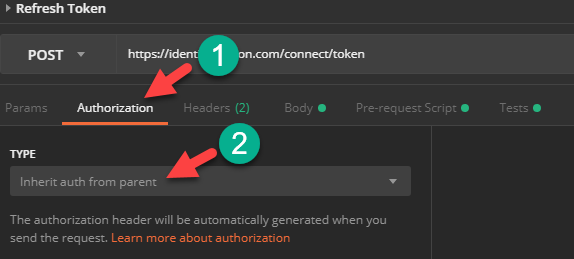
- You will then need to run Refresh Token call and go to Auth tab and choose "Inherit auth from parent". will get your new access_token and refresh_token as they get expired after a certain period. Click here to view the token expiry time.
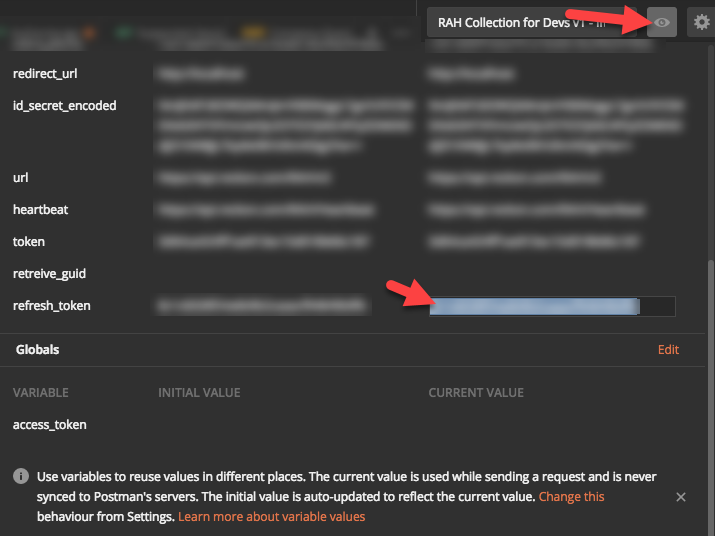
- Next to the Environment dropdown at the top right end of the screen, click on the eye icon to view the contents of the environment > next to refresh_token, hover over the row to see the edit icon > click on it and paste the refresh_token value that you copied in step 4 in the "CURRENT VALUE" field and press Enter key on your keyboard to save the data
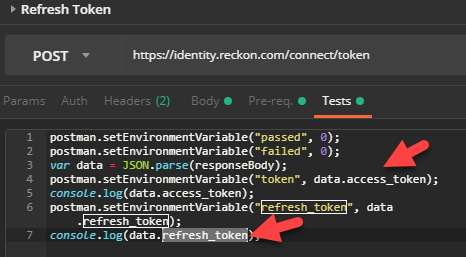
- After you run Refresh Token call, the new access_token and refresh_token will be saved in the variables automatically to help you send other calls.
- Before you click on any request, it's highly recommended that you run "Refresh Token" call to get the latest tokens, otherwise you might get authorisation errors as your previous tokens might have expired
- The only time you will need to run "Authorise (get code and refresh token)" call again is if you want to login as a different user or your refresh token token is used and you need a new one. After getting your and then run "Refresh Token" call again to get the other required tokens.