How to create a Customer Loyalty Card
Legacy KB ID: 3564
Question
Before Starting
Consider what you want to appear on the Loyalty Card. The minimum information will be:
· Customer Loyalty Number Barcode
· Customer Loyalty Number
· Company Name
· Date joined Loyalty program
You may want to add other information such as:
· Customer Name
· Customer Barcode
· Address
· Contact details
Loyalty information is added in POS; all other information needs to be entered into Quickbooks.
Answer
QuickGuide
Enter all necessary details into the Customer Record in QuickBooks, including if required, a customer barcode;
Transfer the Customer List to POS;
Activate the Loyalty function in POS Administrator, assign a loyalty number to the customer and create a Loyalty Card.
Refer to additional notes for Pre-printed Loyalty Cards and the use of scanners other than the DataLogic Touch65 and the Senor GST-318BU.
Detailed Instructions.
Enter all necessary details into the Customer Record in QuickBooks:
- Customer Centre > double click on the Company > Additional Info>
- Enter in details in the Custom Defined fields – the barcode number should be just the number.
- Close and Save
- Repeat for all customers
Transfer the Customer List to POS
In Administrator click on Transfer and select the Customer List to transfer only Customer information, or tick all boxes to transfer all data used by POS.
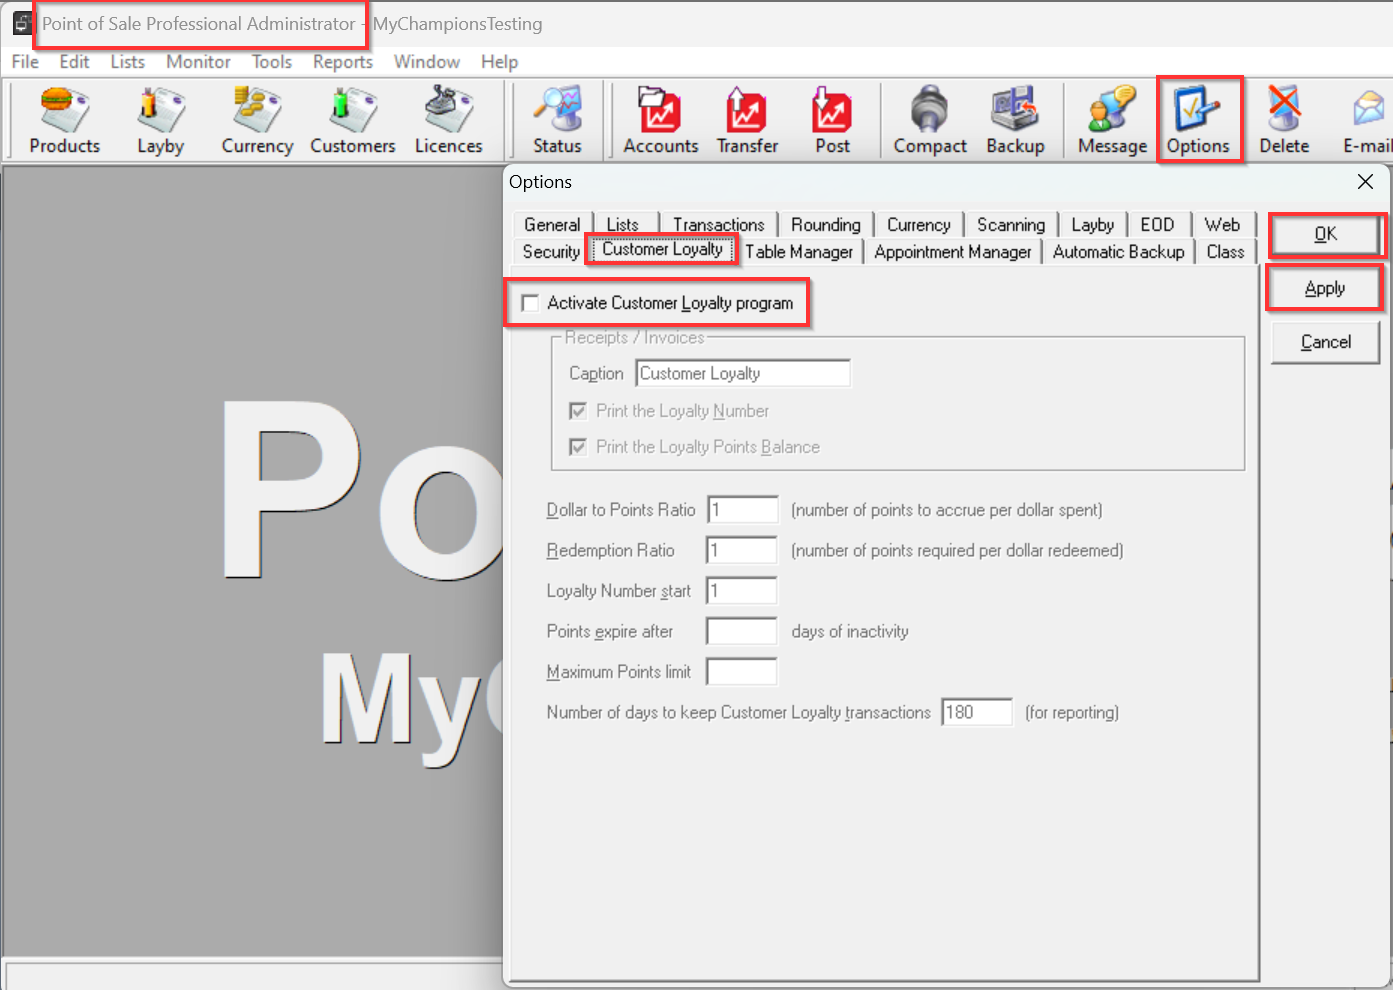
Activate the Loyalty Program in POS Administrator
Click on the Options Icon > Customer Loyalty tab
Tick Activate customer Loyalty Program
Under Receipts/Invoices, choose how to print Loyalty information:
- Leave Caption as Customer Loyalty
- Tick Print the Loyalty Number
· Tick Print the Loyalty Points Balance
Complete the remainder of the screen > Apply > OK
Make a Customer a member of the Loyalty Program
In Administrator, click on the Customers Icon
Highlight the Customer Name and click on the Loyalty button
- Tick Loyalty Member checkbox
- Assign a Loyalty Number
- Enter an opening balance Loyalty Points
Create the Loyalty Card
In Administrator, click on Customer Icon > Labels.
Select the customer category for the Loyalty Program:
- Selected Customer
- Marked Customers
- Range of Customers
Give the Loyalty Program a name then click on Design
Under the Format tab, define the size and printing space of the card
Click on Layout to define the content of the Loyalty Card
- In the Components box, tick items to be included on the card
- Use the mouse to move items to desired place on the card
- Use component Properties to fine-tune settings.
- Click OK to finish.

Click on Print to print the cards.
Click on Close when finished.
Additional Notes
Using Pre-printed Loyalty Cards
When using pre-printed Loyalty Cards it is important that they are prepared with the exact information required by POS to process correctly.
Barcodes must contain prefixes (normally added by the create processes inside POS) to allow POS to correctly distinguish between Item, Customer and Loyalty barcodes:
- Customer barcodes must be prefixed with a % symbol – eg. %123456789
- Loyalty barcodes must be prefixed with a %N, %n or ^ symbol – eg. %N987654321
You can check the barcode is correct by scanning it into a Notepad file and verifying the correct format:
- Customer barcodes: ~%123456789
- Loyalty barcodes: ~%N987654321
Using Scanners other than the DataLogic Touch65 or the Senor GST-318BU Scanner
The format for customer barcodes must be a format that your scanner can read. This may vary from one scanner to another, and can be programmed for a particular scanner. When POS Administrator prints customer barcode labels, it uses a few different formats:
- For 13 digit barcodes (including the %) POS uses EAN13
- For 12 digit barcodes (including the %) POS uses UPCA
- For 8 digit barcodes (including the %) POS uses EAN8
- For other lengths POS uses Code 39.
These formats are all supported by scanners supplied in the POS Retail Starter Kit and you will need to ensure that your scanner supports these formats.