How to Verify Data and Rebuild Data in the Reckon Accounts Business Range (Desktop)
When to perform the Verify Data and Rebuild Data process
There are several situations that indicate damage in the company data file.
Perform the Verify process to check for damage under the following conditions:
- You receive errors such as Invalid Protection Faults or Fatal Errors when operating Accounts Business.
- Discrepancies appear on reports, such as invoices or bills that post with a negative value. Do not forget to check for the correct dates and report basis (cash versus accrual) when troubleshooting report discrepancies.
- Payments that have been deposited show up in the Payments to Deposit window.
- Balance sheet reports are not showing all accounts.
- Names are missing from lists.
- Transactions are missing.
- Duplicate names.
- You want to run a data check-up to be sure the data is error free.
Step 1: Re-sort the Lists
1. Where possible, first restart the computer or close any other active application running on the computer.
2. If you currently have Reckon Accounts open, exit/close the software and then re-open Reckon Accounts and select the data file you wish to perform the verify and rebuild.
3. Open the Write Cheques window (go to Banking menu > Write Cheques or press CTRL+W).
4. Click in the Pay to the Order of field on the cheque form so that the cursor is flashing.
5. Press CTRL+L to open the Names List.
6. Click on the Name button in the bottom left corner and select Re-Sort List.
When asked if you really want to return the list to its original order, click OK
7. Close the Names list and the Write cheques window.
8. Go to the List menu and select the Chart of Accounts List.
9. Click on the Accounts button in the bottom left corner and select Re-Sort List.
10. Close the list.
11. Go to the List menu and select the Items List.
12. Click on the Items button in the bottom left corner and select Re-Sort List.
13. Close the list.
13. Repeat this process with the remainder of the entries in the list menu, including the Customer and Supplier Profile Lists sub-menu.
Step 2: Create a pre-verification backup
Create a backup to ensure that you have a current saved copy of the data file prior to any repairs being undertaken.
Before performing a file integrity test sequence it is highly recommended that a backup file (QBB) be created or at least a copy of the QBW file be saved in a separate location.
In some situations, badly damaged files are rendered unusable if the rebuild fails, so a backup is very important.
The backup you are to perform will be used during a file integrity test sequence, it will be known as your pre-verification backup. This means that you will need to select the option that does not include a verification as part of the backup operation.
The Verify Data utility detects many types of data damage. The utility looks at the data and then logs any errors it finds in a file named QBWin.log. This log file is contiguous. Each time you verify, rebuild, condense, or update your data, any integrity issues found will be appended to the end of the file. It is common for the QBWin.log to become very large.
How to create a backup in Reckon Accounts (Desktop)
Pre-Verification custom backup selections
Select the No verification (not recommended) option for this step.

Once the pre-verification backup has been created you can now perform the first verification step.
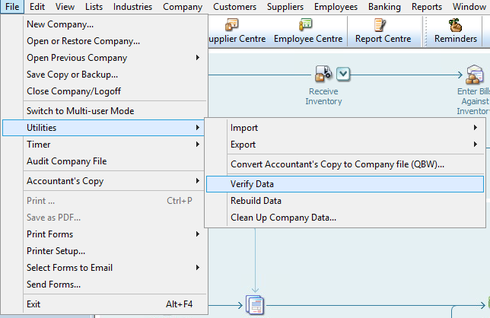
Step 3: Perform the first Verify Data operation
· Click on the File menu
· Select Utilities
· Then select Verify Data to perform the verify operation
· Then click OK when the process has been completed
Once the first verification has been performed, you would be informed whether or not any errors are detected.
If there are errors detected then continue on with the rebuild operation.
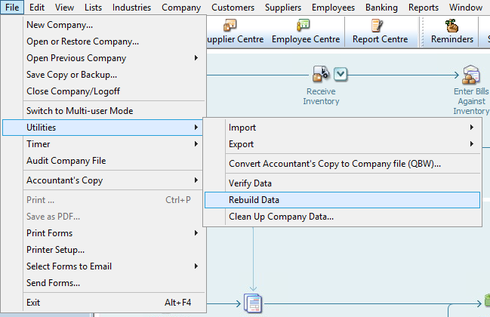
Step 4: Perform the first Rebuild Data operation
· Click on the File menu
· Select Utilities
· Then select Rebuild Data to perform the rebuild operation
When the rebuild data operation has completed, you will need to perform the 2nd verification to confirm whether there are any residual errors that may require further investigation.
Step 5: Perform the second Verify Data operation
· Click on the File menu
· Select Utilities
· Then select Verify Data to perform the verify operation
· Then click OK when the process has been completed
If there are no errors detected, then all is well.
If further errors are detected then you will need to investigate the logged errors in the QBWIN.LOG (error log file).
You can do this on your own or with one of the technicians in the Technical Support Team.

How to find the QBWIN.LOG file.
Knowledgebase articles on known errors and solutions
If you decide to contact the Technical Support Team for further troubleshooting advice, inform them that you have already performed the steps in the support article and that you can provide them with the resulting QBWIN.LOG file from that process.