Table of Contents
Authentication - Hosted API
The Reckon Accounts Hosted API uses Oauth 2.0 for authentication. You need an Oauth 2.0 client ID which will be provided by Reckon once you have completed the application form to access this service.
If you have not provided Reckon with a Callback URL (Redirect URI) during the application process, you MUST do this before beginning integration otherwise you will not be able to authenticate with the Hosted API service.
If you require a different URL for production and development this can be accommodated, please let the Reckon API Team know.
Authorisation Workflow
This is without a doubt the cause of most support requests we receive. The concept of using Oauth2 with what is essentially a hosted desktop app (Reckon Accounts) just doesn't seem logical to some developers, but yes it's true, you do use a combination of Oauth / RESTful / Desktop SDK to post and retrieve data from Reckon Accounts Hosted. Once you get past Oauth (and most developers are across Oauth anyway due to their work with other cloud apps) it is actually a lot easier to connect to Reckon Accounts Hosted then it is Reckon Accounts desktop.
Whilst there is plenty of detail in our help guides, sometimes developers just want the highlights. Therefore below we have a very quick overview of the identity server authorisation process.
- Get Authorization code:
https://identity.reckon.com/connect/authorize?client_id=<<CLIENTID>>&response_type=code&scope=openid+read+write+offline_access&redirect_uri=<<REDIRECT URL>>&state=random_state&nonce=random_nonce - Obtain access and refresh tokens:
- URL
https://identity.reckon.com/connect/token - Type
POST - Body
grant_type=authorization_code&code=<<CODE>>&redirect_uri=<<REDIRECT URI>> - Headers
Content-Type = application/x-www-form-urlencoded - Authorization:
Basic <<CLIENTID:CLIENTSECRET ENCODED IN BASE64>>
- URL
- Access token expires in 180 mins. To get a new access token:
- URL
https://identity.reckon.com/connect/token - Type
POST - Body
grant_type=refresh_token&refresh_token=<<REFRESH TOKEN>>&redirect_uri=<<REDIRECT URI>
- URL
- Use the access token in your header for each Hosted API call. Example:
curl -X POST \
https://api3.reckon.com/RAH \
-H 'Authorization: Bearer eyJ0eXAiOiJKV1QiLCJhbGciOiJSUzI1NiIsIng1dCI6Ik9PUzZNTDRMakt3eXR5V1hwb0E1YW1jY2FYOCIsImtpZCI6Ik9PUzZNTDRMakt3eXR5V1hwb0E1YW1jY2FYOCJ9.eyJjbGllbnRfaWQiOiI3ZmMyNGI0Ni0xNzlhLTQxZTQtYjU4ZS04NDY5ZmM2YTJkZGUiLCJzY29wZSI6WyJyZWFkIiwid3JpdGUiXSwic3ViIjoiRW1vbiIsIm5hbWUiOiJFbW9uIiwiYW1yIjoicGFzc3dvcmQiLCJhdXRoX3RpbWUiOiIxNTU3NzI2MDU5IiwiaWRwIjoiaWRzcnYiLCJwb3J0YWxUb2tlbiI6ImV5SmhiR2NpT2lKSVV6STFOaUlzSW5SNWNDSTZJa3BYVkNKOS5leUp6ZFdJaU9pSXhORFUyTlRJMUxURWlMQ0p6WTI5d1pTSTZJbk5sYkdZc0lIVnpaWEp6SWl3aWEybGtJam9pWmprMU5HRmlaallpTENKaFpHMXBiaUk2Wm1Gc2MyVXNJbWRwZG1WdVgyNWhiV1VpT2lKSlpuUnBJaXdpWm1GdGFXeDVYMjVoYldVaU9pSkRhRzkzWkdoMWNua2lMQ0oxYzJWeWJtRnRaU0k2SW1WdGIyNGlMQ0psYldGcGJDSTZJbVZ0YjI0ME1FQnZkWFJzYjI5ckxtTnZiU0lzSW1OdmRXNTBjbmtpT2lKQlZTSXNJbWxoZENJNk1UVTFOemN5TmpBMU9Td2laWGh3SWpveE5UVTNOell5TURVNWZRLklHVFJkZWduV3FYLUExcDRLYTE1NDN2eUx3V0J1Ri01MHI4Ukl2SUhwb28iLCJpc3MiOiJodHRwczovL2lkZW50aXR5LnJlY2tvbi5jb20uYXUiLCJhdWQiOiJodHRwczovL2lkZW50aXR5LnJlY2tvbi5jb20uYXUvcmVzb3VyY2VzIiwiZXhwIjoxNTg5MjYyMDU5LCJuYmYiOjE1NTc3MjYwNTl9.HdYxFe-hWzBd-rtzjUlEKs3PuBFczh3sYATuo-n64Vxzv2KBVXZol99kKUq6hYZTNN4i63VK9Cdoi2p96fqp9gyTxfS_TMN9MoznOnhFeUn2TyiZ_RWFXKfZU-Q-HDGwtT2pDwb8rPoEL_9RVMe4vjB2wGnKPCnYt8PcJYutSvZUp7lKp5ES3kDPOMXni_yN1cXDnrbqVu6vbw7ijqh4PWkinTzqX4dLjKqGsnZl6ECm8MFM7CfD3ThhXrcy534534345345345' \
-H 'Content-Type: application/json' \
-H 'cache-control: no-cache' \
-d '{
"FileName":"{{file_name}}",
"Operation":"<?xml version=\"1.0\"?>
<?qbxml version=\"6.1\"?>
<QBXML>
<QBXMLMsgsRq onError=\"continueOnError\">
<CompanyQueryRq />
</QBXMLMsgsRq>
</QBXML>",
"UserName":"{{file_username}}",
"Password":"{{file_password}}",
"CountryVersion": "{{country_version}}"
}'
Reckon Identity Server
- The Identity Server for the service is
https://identity.reckon.com - Authorization calls should be sent to
https://identity.reckon.com/connect/authorize - The configuration of the server (scopes etc) can be found at https://identity.reckon.com/.well-known/openid-configuration
- More information on the Reckon authorisation services is HERE.
Authorization Type
Once you have a token from the Oauth server, it should be included with the HTTPS call in an Authorization/Bearer header type. For example:
Authorisation: Bearer eyJ0eXAiOiJKV1QiLCJhbGciOiJSUzI1NiIsE1QSmxyZ......vEdnQeygKdmibA
For more information regarding the Oauth services, please see the Oauth guide.
Subscription Key
We will now only provide your Client ID and Client Secret once you advise your call-back URL in your application.
If you have signed up for the Reckon Accounts Hosted API, you should have received an email inviting you to join the Reckon portal on the Azure platform. If you have not received this invite, please contact the Reckon API Support Team by filling out a support ticket and selecting 'Reckon API' (do not directly email us).
Once you have signed up for the portal, in your profile you will have access to two API Keys.
These keys are required to be sent with each API call.
Click show to show the full key and if you believe a key has been compromised, please regenerate the key
You will notice that there are two keys. One is a backup and/or can be used for development purposes.
It is best to use the primary key in production so that if we are troubleshooting with you, we know what we should be looking for.
API Call including subscription key
Example: https://api.reckon.com/RAH/Heartbeat?subscription-key=<<SUBSCRIPTIONKEY>>
Click here for instructions.
Endpoints
The Reckon Accounts Hosted API has two endpoints.
Endpoint | Description | Method | URL | Authorisation Required |
Heartbeat | This endpoint allows you to test that the Hosted API is running at the current time. You should get a response of OK if the API is currently up
| GET |
| No |
Post Data | This endpoint allows you to post a qbXML package for a response from the server. You need to include the location of the Reckon Accounts file you want to access as well as the qbXML payload. On a successful transmission, the qbXML response will be included in the body on the response payload
| POST |
| Yes |
Sample request (JSON)
{
"FileName":"<<filename path for qbw>>",
"CountryVersion": "2018.R2.AU",
"Operation": "<?xml version=\"1.0\"?><?qbxml version=\"6.1\"?><QBXML><QBXMLMsgsRq onError=\"continueOnError\"><CompanyQueryRq/></QBXMLMsgsRq></QBXML>"
}

Supported Versions
To get the latest list of supported Versions and Countries you need to send a HTTPS call to the following endpoint:
https://api.reckon.com/RAH/V2/supportedversions?subscription-key=<<SUBSCRIPTIONKEY>>
You need to include your subscription key with this call
The response will list all the supported versions at the time. When a version is decommissioned from the service, it will be removed from this list.
Sample response (AU)
[
    {
        "CountryVersion": "2019.R2.AU",
        "Country": "Australia",
        "Version": "2019.R2",
        "Description": "",
        "EndDate": null
    }
]
Sample response (NZ)
 [
    {
        "CountryVersion": "2019.R1.NZ",
        "Country": "New Zealand",
        "Version": "2019.R1",
        "Description": "",
        "EndDate": null
    }
]
The array will contain the supported versions.
Finding the Location of the File in the Accounts Hosted Platform
The Reckon Accounts file can be found on either the Q:\ directly (if the user has not shared the file with other users on the service) or in a shared folder linked from the Q:\.
Your users will no longer need to go to RA Hosted application to get their File's location and then paste it in your application.
You can now present their list of files in a drop-down menu to choose from. You can then save the selected filePath and then add it to your payloads.
This reduces human error and your users will be able to integrate with RA Hosted quickly.
fileName in the /userfiles endpoint response gives you the exact name of the company file.We recommend you to present a Company file selection drop-down menu to your users from the response of this endpoint response. You will then map the selected item's filePath to the FileName object for the subsequent Hosted API payloads.Endpoint
https://api.reckon.com/RAH/V2/userfiles?subscription-key=<<SUBSCRIPTIONKEY>>
Method
GET
Header
- Authorization:
Bearer {{token}} - Content-Type:
application/json
Sample Response
{
    "numberOfFiles": 2,
    "availableFiles": [
        {
            "fileName": "File from Q Drive.QBW",
            "filePath": "Q:\\File from Q Drive.QBW",
            "lastWrite_datetime": "2020-02-26T04:34:05.025Z"
        },
        {
            "fileName": "Shared File.QBW",
            "filePath": "\\\\RAH-HG-FSS-90\\063659-1573258-SharedFile\\Shared File.QBW",
            "lastWrite_datetime": "2020-02-12T03:13:47.806Z"
        }
    ]
}
File path structures:
- Q:\\My company file.QBW (Scenario 1: where the file is saved just under a user's Q drive)
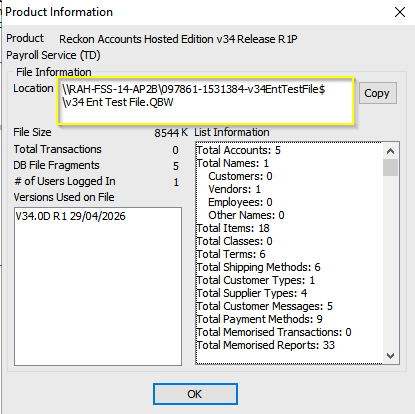
- \\\\ServerName\\SharedFolderName\\My Company file.QBW (Scenario 2: where the file is shared across multiple users and is sitting under a shared folder). You can get the path by opening your company file in Reckon Accounts Hosted and pressing Ctrl + 1 (Product Info). How to view the Product Information screen for Reckon Accounts desktop and Reckon Accounts Hosted - Reckon Help and Support Centre
{
    "numberOfFiles": 2,
    "availableFiles": [{
        "fileName": "File 1.QBW",
        "filePath": "Q:\\File 1.QBW",
        "lastWrite_datetime": "2025-09-18T07:11:02.896Z"
    }, {
        "fileName": "v34 Ent Test File.QBW",
        "filePath": "\\\\RAH-FSS-14-AP2B\\097861-1531384-v34EntTestFile$\\v34 Ent Test File.QBW",
        "lastWrite_datetime": "2026-05-15T03:54:39.928Z"
    }]
}
Test Console
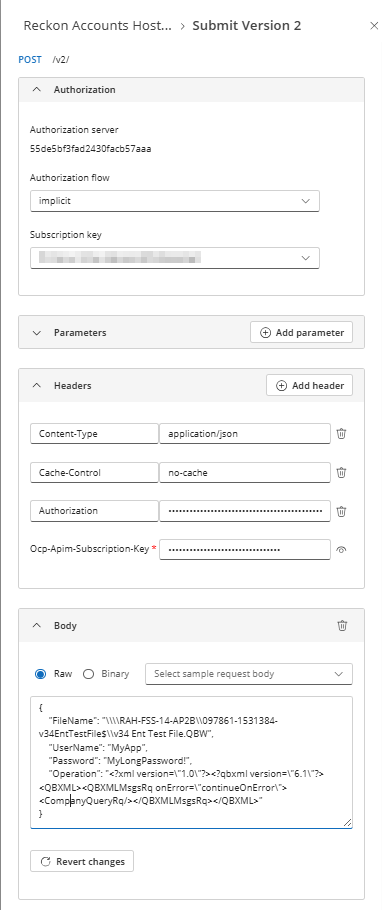
The Reckon Developer Portal has a test console allowing you to fire sample code at the server and see responses.
Please note this console uses IMPLICIT Authorisation Flow type only.
{
    "FileName": "\\\\RAH-FSS-14-AP2B\\097861-1531384-v34EntTestFile$\\v34 Ent Test File.QBW",
    "UserName": "MyApp",
    "Password": "MyLongPassword!",
    "Operation": "<?xml version=\"1.0\"?><?qbxml version=\"6.1\"?><QBXML><QBXMLMsgsRq onError=\"continueOnError\"><CompanyQueryRq/></QBXMLMsgsRq></QBXML>"
}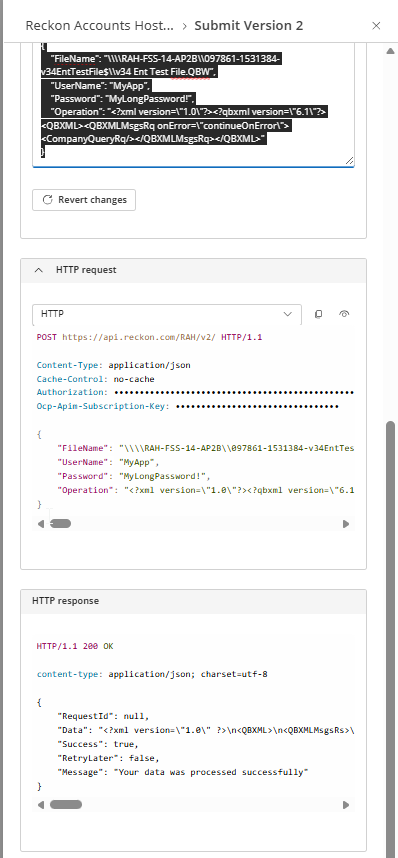
{
"RequestId": null,
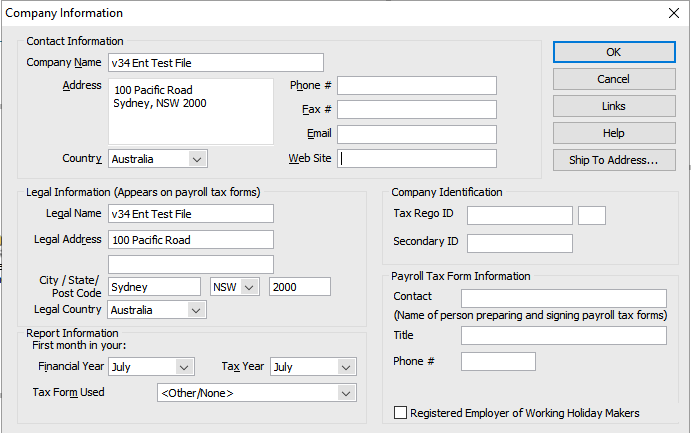
"Data": "<?xml version=\"1.0\" ?>\n<QBXML>\n<QBXMLMsgsRs>\n<CompanyQueryRs statusCode=\"0\" statusSeverity=\"Info\" statusMessage=\"Status OK\">\n<CompanyRet>\n<IsSampleCompany>false</IsSampleCompany>\n<CompanyName>v34 Ent Test File</CompanyName>\n<LegalCompanyName>v34 Ent Test File</LegalCompanyName>\n<Address>\n<Addr1>100 Pacific Road</Addr1>\n<City>Sydney</City>\n<State>NSW</State>\n<PostalCode>2000</PostalCode>\n</Address>\n<AddressBlock>\n<Addr1>100 Pacific Road</Addr1>\n<Addr2>Sydney, NSW 2000</Addr2>\n</AddressBlock>\n<LegalAddress>\n<Addr1>100 Pacific Road</Addr1>\n<City>Sydney</City>\n<State>NSW</State>\n<PostalCode>2000</PostalCode>\n</LegalAddress>\n<FirstMonthFiscalYear>July</FirstMonthFiscalYear>\n<FirstMonthIncomeTaxYear>July</FirstMonthIncomeTaxYear>\n<TaxForm>OtherOrNone</TaxForm>\n</CompanyRet>\n</CompanyQueryRs>\n</QBXMLMsgsRs>\n</QBXML>\n",
"Success": true,
"RetryLater": false,
"Message": "Your data was processed successfully"
}
Setting up the User to be used via Hosted API
When you send a payload to Hosted, you need to include the company file's username and password. The following information is considered ‘best practice’ for authorisation by the Reckon API team. It ensures that a specific user can be defined to authorise the API, whilst protecting the Admin password of the users data file.
- Open the Users and Roles administration area of the Reckon Accounts Hosted Company File (this requires Admin user rights)
- Click the Company drop down, select Users and select Set up Users and Roles…
- Click to add a new user
- Click New
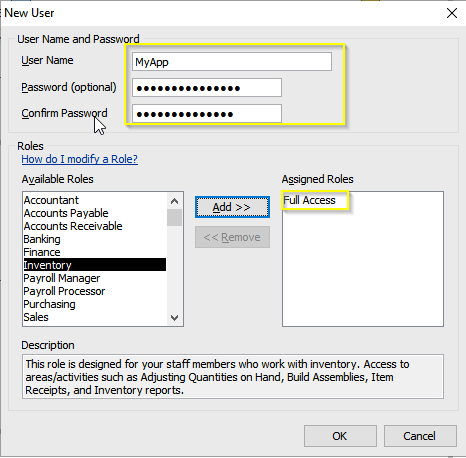
- Name your user and add a password. Ensure the user has Full Access as the assigned role.
We recommend the name of your app as the user name however you can use 'whatever makes sense' to the file owner.NB. The password is NOT optional for API users.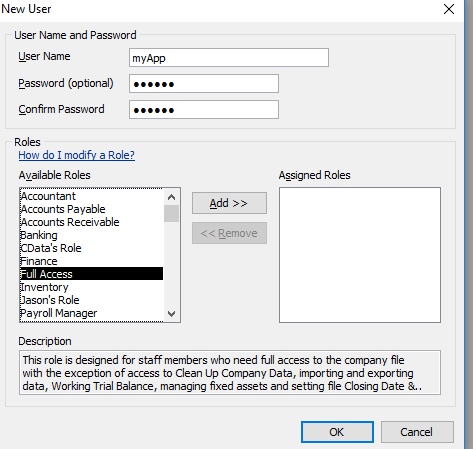
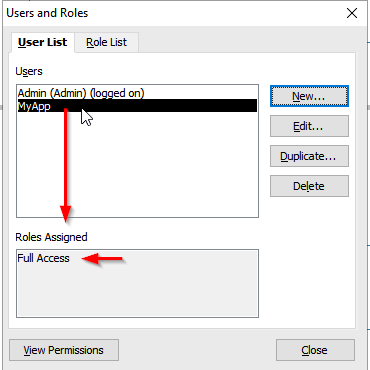
- Once you have finished, click OK. Your user is now setup.
Despite what it displays in the Reckon Accounts UI and the above graphic, a password is NOT optional and MUST be set for the API User. It is this password that you will send via the API . ** This password can be changed at any time by those with Admin Rights to the company file. The API user must also have the Full Access assigned role. This is due to the nature of the Accounts SDK which is being used.
Setting an API user (not Admin) also enables the ‘always on’ Reckon Accounts audit trail to capture all posts by the integrated application, so we suggest you also select this user for your ongoing calls between the two applications (via the Integrated Applications preference window). This is very helpful when proving what the integrated app did versus changes made to posts by other users.
Changes to the API Payload to accommodate the Authorisation of files
As part of the new update, you no longer need to authorise your app with the QBW file admin credentials. Once the new user is created (eg. myApp) you can use those credentials in your calls. The username and password are case-sensitive. If you don't enter them correctly, you'll get an error that contains "Could not access Reckon Accounts".
Sample:
Method: POST
Header: Authorization: Bearer eyJ0eXAiOiJKV1QiLCJhbGci......QeygKdmibA
Body:
{
    "FileName": "Q:\\Cougar Enterprises.QBW",
    "UserName": "myApp",
    "Password": "myAppPassword",
    "Operation":
        "<?xml version=\"1.0\"?>
        <?qbxml version=\"6.1\"?>
            <QBXML>
                <QBXMLMsgsRq onError=\"continueOnError\">
                    <CompanyQueryRq />
                </QBXMLMsgsRq>
            </QBXML>"
}
When you use the API for the first time it is highly recommended you change the file to multi-user mode and log out via File > Close Company/Logoff
If you receive a response that the file is not authorised or could not access Reckon Accounts, it means that:
- the user in your payload is not setup for Full Access in the company file, or
the login credentials in your payload do not match those credentials for the Hosted API (myApp) user. - the Username / Password combination is incorrect (username and password are case-sensitive so ensure you've entered them correctly)
- You should NEVER allow a Reckon Accounts Hosted user to use the API (myApp) login. In fact, you, as the developer, SHOULD NOT be logged in as the API user for UI testing. We'd recommend creating another user for these purposes as this may cause errors.
{
    "FileName": "\\\\RAH-FSS-14-AP2B\\097861-1531384-v34EntTestFile$\\v34 Ent Test File.QBW",
    "Operation": "<?xml version=\"1.0\"?> <
        ? qbxml version = \"6.1\"?> <
        QBXML >
        <
        QBXMLMsgsRq onError = \"continueOnError\"> <
        CompanyQueryRq / >
        <
        /QBXMLMsgsRq> <
        /QBXML>",
    "UserName": "MyApp",
    "Password": "MyLongPassword!"
}