Table of Contents
- System Requirements
- New users
- Activate Reckon Accounts
- Existing users
- Multi-user access and firewall configurations
- Enhancements in Reckon Accounts
- Upgrading from a prior Reckon Accounts version
- Upgrading from QuickBooks 2012/13 or QuickBooks 2011/12
- Upgrading from QuickBooks 2010/11
- Upgrading from QuickBooks 2009/10
- Upgrading from QuickBooks 2008/09
- Upgrading from Reckon Accounts 2007/08
- Before you begin – changes you should note
- Autorun and Networks
- Server only install
- Installing Reckon Accounts on Winows 10
- Multi-user mode on Windows Windows 10
- Using QuickBooks 2007/08 after upgrading to Reckon Accounts
- Change in EasyStep Interview availability
- Audit Trail
- Printing preferences
- Customised templates
- Memorised reports
- Stock items are called Inventory items
- Units of Measure
- Change in Payroll Setup (Australia only)
- Bonus payroll item is carried over in upgrade to Reckon Accounts (Australia Only)
- Addition and Deduction payroll items (Annual Limit) (Australia Only)
- Payroll Reports only option (Australia Only)
- Changes to terms used for Payroll (Start Date and Left Date) (Australia Only)
- Fringe Benefits Tax (Australia Only)
- New Payroll item type: Overtime Pay (Australia Only)
- Multiple Tax Agencies
- Tax Items and Tax Codes
- Exporting Tax Codes
- Industry-Specific Editions and Reckon Accounts Enterprise
- Multi-user licences with Reckon Accounts Enterprise
- Reckon Accounts Enterprise User Rights
- Prepare your company file for upgrade
- Upgrading your company file
- After you upgrade
- Activate Reckon Accounts
- Before you begin – changes you should note
Installation & Upgrade Guide
- System Requirements
- New users
- Activate Reckon Accounts
- Existing users
- Multi-user access and firewall configurations
- Enhancements in Reckon Accounts
- Upgrading from a prior Reckon Accounts version
- Upgrading from QuickBooks 2012/13 or QuickBooks 2011/12
- Upgrading from QuickBooks 2010/11
- Upgrading from QuickBooks 2009/10
- Upgrading from QuickBooks 2008/09
- Upgrading from Reckon Accounts 2007/08
- Before you begin – changes you should note
- Autorun and Networks
- Server only install
- Installing Reckon Accounts on Winows 10
- Multi-user mode on Windows Windows 10
- Using QuickBooks 2007/08 after upgrading to Reckon Accounts
- Change in EasyStep Interview availability
- Audit Trail
- Printing preferences
- Customised templates
- Memorised reports
- Stock items are called Inventory items
- Units of Measure
- Change in Payroll Setup (Australia only)
- Bonus payroll item is carried over in upgrade to Reckon Accounts (Australia Only)
- Addition and Deduction payroll items (Annual Limit) (Australia Only)
- Payroll Reports only option (Australia Only)
- Changes to terms used for Payroll (Start Date and Left Date) (Australia Only)
- Fringe Benefits Tax (Australia Only)
- New Payroll item type: Overtime Pay (Australia Only)
- Multiple Tax Agencies
- Tax Items and Tax Codes
- Exporting Tax Codes
- Industry-Specific Editions and Reckon Accounts Enterprise
- Multi-user licences with Reckon Accounts Enterprise
- Reckon Accounts Enterprise User Rights
- Prepare your company file for upgrade
- Upgrading your company file
- After you upgrade
- Activate Reckon Accounts
- Before you begin – changes you should note
System Requirements
- A 2.0 GHz dual-core processor or higher (e.g. Intel Core i3 or equivalent) is required.
- 1GB of RAM for Windows® 10 users (Windows 10 require 1GB for 32-bit & 2GB for 64-bit)
- 1GB RAM for Windows Server 2016/2019/2022*
- Windows 10/11 operating system
- 1 GB of disk space (additional space required for company files)
- A supported and up-to-date web browser (e.g. Microsoft Edge, Google Chrome, or Mozilla Firefox) is required.
- Microsoft® .NET Framework Common Language and Runtime 2.0 & 3.5 (provided with the downloaded Reckon Accounts Installation, requires an additional 150MB)
- Requires 9 MB for Pro Timer
- A video A screen resolution of 1024 × 768 or higher is recommended for optimal viewing.
- All online features and services require internet access with a minimum 12 Mbps download speed (High-speed broadband such as NBN, Cable, or Fibre is recommended).
Integration/compatibility requirements
- Microsoft Word, Excel and Outlook integration require Microsoft Word, Excel and Outlook 2019, 2021, or 365.
- Compatible with Reckon Point of Sale Professional v22 or Lite v22.
Multi-user requirements
- Multi-user mode is optimized for Windows Server 2016, Windows Server 2019, Windows Server 2022 operating systems, and for Windows 10 and Windows 11.
- Terminal Services are supported for Reckon Accounts Premier and Enterprise.
** Not all versions of Windows 10/11 are supported. Support is provided for Windows 10 Pro and above.
New users
Before you install Reckon Accounts:
Take a few moments to read through all of these installation instructions and then follow the steps provided below:
- Log on to your PC as an Administrator
- Close all programs
- Disconnect from the Internet
- Disable your anti-virus software and firewall
- After you have installed Reckon Accounts:
- Enable your anti-virus software and firewall
- Connect to the Internet
- Activate Reckon Accounts, as described here.
Installing Reckon Accounts
- If you have downloaded Reckon Accounts setup file, open the file by clicking on the file from either your browser or where you have saved the setup file (example: Downloads folder). Click on Run > Yes > Unzip. This will start the installation process.
Download Reckon Accounts installation files and open the downloaded file to start the installation. If you have the DVD, insert the Reckon Accounts DVD in your computer’s DVD drive.
If the Installation Wizard does not start automatically, click Start in the Windows taskbar, then click Run. Type D:\setup.exe (where D is the DVD drive letter) and Click OK.
- Click My Virus scan has been disabled and then click Begin.
- Read the License Agreement by clicking the applicable link, click I accept the terms in the license agreement and then click Next.
- Enter your Reckon Accounts Installation Key Code and then click Next.
You can find your Installation Key by logging into Member’s site. - Select the installation type you want to use and then click Install Now. (For more information on this, refer to the Reckon Accounts Startup Guide.)
- If you don’t have Microsoft .NET Runtime installed, you will be prompted to install it. Click Next.
- Click Next.
- Select your installation folder and then click Next.
- Click Install.
- Click Finish.
- Depending on your PC configuration and your edition of Reckon Accounts, you may be prompted to reboot your PC to complete the Reckon Accounts installation. If you receive a prompt, you should reboot your system now.
- Double-click the icon on your desktop to open Reckon Accounts.
- Create a new company file or browse the features of Reckon Accounts using the sample company file.
Activate Reckon Accounts
After the installation process is complete, you should activate your copy of Reckon Accounts. You need an Internet connection in order to activate online. If you have not already done so, establish a connection to the Internet now.
To activate your copy of Reckon Accounts:
- In Reckon Accounts, create a new company file, or open the sample company file.
- Go to the File menu, click Activate Reckon Accounts, then follow the on-screen instructions.
For more information about activating Reckon Accounts, refer to the in-product Help.
If you do not have an Internet connection, press Ctrl+3 on your keyboard (not numeric keypad), or press Ctrl+F12 to open the Reckon Accounts Activation window. You will be prompted to call the Reckon Customer Service Centre to activate Reckon Accounts over the phone. Click here for the Reckon Customer Service phone number.
Windows Terminal Services
Reckon Accounts Premier and Enterprise Multi-user versions run on Windows Terminal Services with certain configurations. For more information, please click here.
Existing users
Check the upgrade path for your current version
You can only upgrade to Reckon Accounts directly from Reckon Accounts (Former known as Quickbooks) 2007/08 or higher. If you are using an earlier version of the software, you will need to first upgrade to Reckon Accounts 2007/08, and then upgrade to the latest version of the software.
If you are using Reckon Point of Sale
Reckon Accounts works with Reckon Point of Sale v22.
Determine your upgrade path
After you have determined your upgrade path and are ready to install the new version, you must:
- Log on to your PC as an Administrator
- Close all programs
- Disconnect from the Internet
- Disable your anti-virus software and firewall
After you have installed Reckon Accounts:
- Enable your anti-virus software and firewall
- Connect to the Internet
- Activate Reckon Accounts, as described here
If you are currently using QuickBooks 2007/08 or later, follow the upgrade instructions from here.
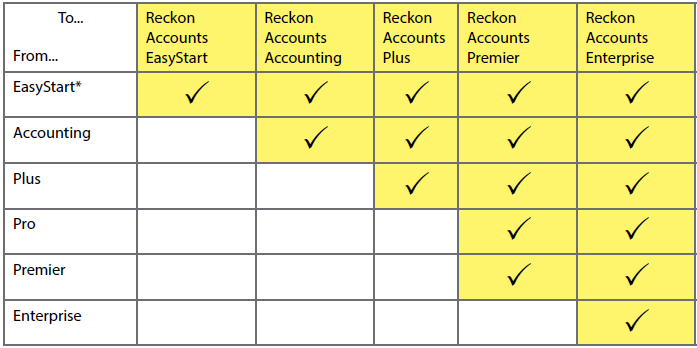
If you are using an earlier version of the software, find your current version in the following table, then check the upgrade path. If there is a tick for your version, you can upgrade to QuickBooks 2007/08 directly and then to the required version.
Otherwise, you must first upgrade to the interim version specified (trial versions are used for this step) and then upgrade to QuickBooks 2007/08 followed by the required version. Go here and follow the upgrade instructions for your version.
Trial versions of previous releases of the software are available here.
After installing older trial versions, you will need to do the following:
- Locate the icon on your desktop
- Right-click the icon and select Properties
- Click on the Compatibility tab
- Tick Run this program in compatibility mode for: and select Windows XP (Service Pack 2)
- Click Apply and OK
Your current version | Upgrade path to QuickBooks 2007/08 | Upgrade path to Reckon Accounts 2023/24 and above |
QuickBooks 2006/07 or QuickBooks Enterprise 2006/07 | ✓ | ✓ |
QuickBooks 2005/06 or QuickBooks Enterprise 2005/06 | ✓ | ✓ |
QuickBooks 2004 or QuickBooks Enterprise 4.0 | ✓ | ✓ |
QuickBooks 2003 or QuickBooks Enterprise 2.0 | ✓ | ✓ |
QuickBooks 2002 | ✓ | ✓ |
QuickBooks v8 (Australia only) | via QuickBooks 2002 | ✓ |
QuickBooks v7.4 (AUS) / v7.5 (NZ) | via QuickBooks 2002 | ✓ |
QuickBooks v7.3 and earlier | via QuickBooks v7.4/v7.5 and then QuickBooks 2002 | ✓ |
Quicken Cashbook 2004 | via QuickBooks 2005/06 | ✓ |
Quicken Cashbook 2003 | via QuickBooks 2005/06 | ✓ |
Earlier versions can only be upgraded to a compatible Reckon
Accounts product. Check the following table for compatible Reckon Accounts products for your current version.
Multi-user access and firewall configurations
To view information regarding the Port and firewall configurations recommended on your server and workstations for Reckon Accounts Business to work seamlessly, please click here.
Enhancements in Reckon Accounts
To view the latest changes, please click here.
Upgrading from a prior Reckon Accounts version
The notes below are intended to provide a brief overview of major changes to the software that are relevant to the upgrade and installation process and to highlight potential upgrade issues you should be aware of.
For more detailed information about any topic, please refer to the Reckon Accounts Startup Guide.
For technical assistance, support contact details are available here.
Before you begin - changes you should note
The QODBC add-on is no longer included with Reckon Accounts (if upgrading from 2016)
The QODBC add-on is no longer provided as part of the Reckon Accounts installation, for a list of third-party Data Synchronization applications, please refer to Reckon Add-on Marketplace.
Leave balance on the paycheques for periods prior to upgrading the file (if upgrading from 2013)
If you would like to view the leave balance for an employee in the paycheque details screen but has selected a paycheque which was finalized prior to the upgrade and prior to the leave and accrual balances being written into the transaction, the current Personal, Holiday, Other 1 and Other 2 leave hours would show as blank. The payment won’t appear on the Leave Accrual Summary and Detail report either.
Editing paycheques
Editing paycheques should always be carried out with care as updating the available leave will also affect the company’s leave liability and payroll accounts. This is even more important if the payroll officer updates a paycheque which has been finalised in the previous financial year or in the locked off period. A warning message currently appears every time a user unlocks a pay.
The payroll officer needs to ensure that when a previous paycheque is edited, they follow good record keeping principles and re-issue the pay slip which has been amended to the employee and be mindful that all subsequent paycheques will also be updated and may need to be reissued.
For example, where more leave should have been taken in a previous pay or a leave form for taken holiday had not been processed, at the time it was lodged. It is highly recommended that the payroll officer processes the holiday leave in the next pay period.
Customised letter templates
Earlier versions used to store all the Letter Templates in the ‘QuickBooks Letter Templates’ folder.
In Reckon Accounts, the Letter Templates are now located in the ‘Reckon Accounts Letter Templates’ folder.
If you have previously edited or created any templates, after upgrading you won’t be able to find your customised templates in Reckon Accounts.
You should manually copy the templates from the ‘QuickBooks Letter Templates’ folder and replace the ones in the ‘Reckon Accounts Letter Templates’ folder.
Upgrading from QuickBooks 2012/13 or QuickBooks 2011/12
The notes below are intended to provide a brief overview of major changes to the software that are relevant to the upgrade and installation process, and to highlight potential upgrade issues you should be aware of.
For more detailed information about any topic, please refer to the Reckon Accounts Startup Guide (available on the Reckon Accounts Installation files).
For technical assistance, support contact details are available here.
Before you begin - changes you should note
Opening New Zealand data files in Reckon Accounts Australia or vice versa
Due to the introduction of the New Zealand Payroll feature, you may experience issues if you upgrade any data files from your previous New Zealand versions of the software in Reckon Accounts Australia or vice versa.
Once you have upgraded to Reckon Accounts Australia your file will not be able to be opened in New Zealand and vice versa.
Export/Import Payroll Item List and Employee List
You may experience issues if you export or import the Payroll Item List or Employee List between the Australian version and the New Zealand version of Reckon Accounts.
It’s highly recommended that you do not export or import the Payroll Item List and the Employee List between the Australian version and the New Zealand version of Reckon Accounts.
Print Sick leave on pay slips (New Zealand)
As required by the New Zealand payroll system, “Sick Leave” isn’t normally printed on pay slips.
After you upgrade to Reckon Accounts New Zealand, the “Print Sick Leave used and sick available” option in the Preference settings will default to be de-selected.
To turn the option back on:
- Go to Edit menu and click Preferences...
- Select Payroll & Employees item on the left-hand panel.
- Click the Company Preferences tab.
- Click Printing Preferences in the Pay Slip and Voucher Printing area.
- Click to select the Print sick leave used and sick available option.
- Click OK.
Tax amounts on INB & ETP Payment Summaries
Due to an enhancement in Reckon Accounts to the way ETP Tax Amounts are calculated, the PA YG amounts on the INB & ETP Payment Summaries in Reckon Accounts may not match the pre-upgrade Payment Summaries.
If you need to re-print the Payment Summaries, please note that the PA YG amounts may be different, however, they still add up to the same Total.
ETP item tax tracking type changes during upgrade
Due to the new ETP laws in place from the Federal Government, any ETP item you currently have set up before upgrading to Reckon Accounts will automatically have its tax tracking type change to the ‘R’ variant of the ETP item. In the new ETP laws, you must split payments between ‘Included’ and ‘Excluded’ payments. By default, these items will upgrade to the ‘Excluded’ payment type. For more information on the ETP changes please consult the Australian Taxation Office website or your accountant.
Upgrading from QuickBooks 2010/11
The notes below are intended to provide a brief overview of major changes to the software that are relevant to the upgrade and installation process and to highlight potential upgrade issues you should be aware of.
For more detailed information about any topic, please refer to the Reckon Accounts Startup Guide (available on the Reckon Accounts Installation files).
For technical assistance, support contact details are available here.
Before you begin - changes you should note
MAPI error when denying access to email
When you have the Display each email when sending more than one preference disabled in your preferences and you send emails you will see a message asking you to allow or deny access. If you click Deny, a MAPI error will appear.
Email preview shows BCC address in the To and CC fields
If you have enabled BCC email addresses for supplier remittance advice and entered a BCC email address. And have set up a Supplier with an email address and a CC email address, when you email a remittance advice to the Supplier, the remittance preview shows the BCC email address in the To and CC fields in the preview. However, the sent email shows the correct email addresses.
Google Marketing Tools (Australia Only)
The Google Marketing Tools options are no longer available in Reckon Accounts.
Upgrading from QuickBooks 2009/10
The notes below are intended to provide a brief overview of major changes to the software that are relevant to the upgrade and installation process and to highlight potential upgrade issues you should be aware of.
For more detailed information about any topic, please refer to the Reckon Accounts Startup Guide (available on the Reckon Accounts Installation files).
For technical assistance, support contact details are available here.
Before you begin - changes you should note
Adobe Acrobat 9.0.0 and the Previous Reconciliation PDF report
If you have Adobe Acrobat 9.0.0 installed and create a Previous Reconciliation PDF report; Detail, Summary or Both, your software may crash with an unrecoverable error.
You will need to update to the latest version from http://get.adobe.com/reader/.
Emailing forms
If you have To be emailed unticked and click Email on a form, you are not informed that the email has been sent. Therefore, you must make sure that you do the following:
- Go to the Edit menu, click Preferences.
- Click Online.
- Click the Company preferences tab.
- Click to select Display each email when sending more than one.
Installation - File in Use
If you are upgrading from QuickBooks 2009/10, you may receive a message stating QuickBooks Installation Files in Use. If you do get this message, click Ignore. The installation will continue.
Cheque transactions and the Clean Up Data Utility
When you use the Clean Up Data Utility, any cheques that have a Tax Code will not be removed during this process.
Error not enough memory when importing a 2007/08 IIF
If you import an IIF file that was exported from QuickBooks 2007/08 into Reckon Accounts you may receive an import error stating Not Enough Memory.
If you want to import a QuickBooks 2007/08 list into Reckon Accounts, do the following:
- Upgrade the QuickBooks 2007/08 data file to Reckon Accounts.
- Export the list to an IIF from Reckon Accounts.
- Import the IIF into the Reckon Accounts data file.
Upgrading from QuickBooks 2008/09
The notes below are intended to provide a brief overview of major changes to the software that are relevant to the upgrade and installation process and to highlight potential upgrade issues you should be aware of.
For more detailed information about any topic, please refer to the Reckon Accounts Startup Guide, (available on the Reckon Accounts Installation files).
For technical assistance, support contact details are available here.
Before you begin - changes you should note
Employee payments
Before upgrading to Reckon Accounts, make sure that no transaction type of “bank payment” exist in any employee transactions. If they do exist please contact Reckon Customer Service for information about how to upgrade your file.
Multicurrency
If you are on a version of QuickBooks 2008/09 prior to R8, Multicurrency will be added to your data file for those on Pro and above.
To verify which software version you currently have installed, press Control+1 or F2 on your keyboard to display the product information and then look for the R number. For example R8.
To turn on the Multicurrency feature, go to the Accounting section of preferences.
Edit Tax on Transactions Preference
If you are on a version of QuickBooks 2008/09 prior to R8 then a new preference will be added to your data file in the Tax Section of preferences to turn the editing of tax amounts on transactions on or off.
To verify which software version you currently have installed, press Control +1 or F2 on your keyboard to display the product information and then look for the R number. For example R8.
Employee Organiser
In Reckon Accounts Plus and above, a new Employee Organiser has been added which works hand in hand with the Payroll section of the product. Due to this change, while using the Payroll section you may encounter new dialogue boxes which asks you questions such as if you would like help when hiring staff.
W1 on the BAS (Australia Only)
The W1 field on the BAS now calculates amounts based on Tax Tracking type and not expense accounts as in previous versions of the software. This is a response to the issue where pre-tax Superannuation contributions (e.g. Super Salary Sacrifice) would not be deducted from the Gross Pay amount reportable on W1.
If any workarounds have been applied in the previous version, they are no longer needed in Reckon Accounts.
If you use another system to pay your employees (e.g. Payroll Premier) you will need to manually enter the gross wages amount into the W1 field. This is because Reckon Accounts now taps into the actual employee payments for the BAS W1 instead of the expense accounts.
W2 on the BAS (Australia Only)
The W2 field on the BAS has been enhanced so that you can now pay a tax liability for a previous quarter in the current BAS quarter without affecting the BAS amounts for the current quarter.
If any workarounds have been applied in the previous version, they are no longer needed in Reckon Accounts.
Tax Codes on Equity Accounts
Default Tax Codes can now be selected for Equity type accounts.
Home Page Colours
You can now change the default colour of the Reckon Accounts homepage. To do this:
- Go to Edit menu and select Preferences...
- Select Desktop View from the list on the left.
- From the Colour Scheme drop-down list select one that you want to apply to your homepage.
- Click OK.
Account Balances
In QuickBooks 2008/09, account balances were always displayed on the Home page, top-right position. This has now been changed, by default the account balances are switched off and don’t appear on the Home page. To turn it back on:
- Go to Edit menu and select Preferences...
- Select Desktop View from the list on the left.
- Click Company Preferences tab.
- Click to select the Show Account Balances on the Home Page option.
- Click OK.
The preference is a global, company-wide preference which means that it is applicable to all users in a multi-user environment.
Payroll Item (Australia Only)
When creating a Wage (Hourly Wages, Annual Salary, Other, Bonus) type of payroll item, you will notice that the Taxes dialogue has been introduced. This allows the user to specify the PA YG Tax and State Payroll Tax settings.
This means that the user now has two ways to configure the Taxes settings. The first can be found when creating or maintaining the Wage based payroll items. The other method is to access the PAYG Tax or State Payroll Tax wizards and maintain all the payroll items in one window.
In addition, when creating a Contribution type of payroll item, the Include payments in contribution dialogue has been introduced in the wizard.
Upgrading from Reckon Accounts 2007/08
The notes below are intended to provide a brief overview of major changes to the software that are relevant to the upgrade and installation process and to highlight potential upgrade issues you should be aware of.
For more detailed information about any topic, please refer to the Reckon Accounts Startup Guide, (available on the Reckon Accounts Installation files).
For technical assistance, support contact details are available here.
Before you begin – changes you should note
Autorun and Networks
In Reckon Accounts, the Autorun system works only if you install from the DVD. To start the installation from any other location, such as a network server, go to the directory where your Reckon Accounts installation files are located and run setup.exe.
Server only install
Reckon Accounts allows you to install a Database Server with Reckon Accounts Premier, and Enterprise editions. Although the Database Server uses the same installation sequence and IKC code as Reckon Accounts, it does not count as one of your licensed installations. For example, with Reckon Accounts Premier you can install Reckon Accounts on up to five computers, based on the maximum user permitted with your Premier edition and install the Database Server without violating the End User License Agreement.
Installing Reckon Accounts on Winows 10
To install Reckon Accounts on Windows 10, you must have Administrator rights under the Windows operating system. Once installed, however, users need only to have Power User rights in order to use Reckon Accounts.
Multi-user mode on Windows Windows 10
Please note that Multi-user mode is supported only on Window 10 Pro and above.
Using QuickBooks 2007/08 after upgrading to Reckon Accounts
After Reckon Accounts is installed on a PC, you cannot use a previously installed version of QuickBooks 2007/08, as the Navigators in QuickBooks 2007/08 will produce an error. After installing Reckon Accounts, if you need to use QuickBooks 2007/08, you will need to uninstall the 2007/08 software, then reinstall it.
Unregistered earlier versions of the software become trial versions Following the installation of Reckon Accounts, any previously installed versions of the software (in a different folder) which have not been activated will become trial versions. If you plan to use the earlier software versions after installing Reckon Accounts, please ensure that the software is activated before installing Reckon Accounts.
Change in EasyStep Interview availability
In Reckon Accounts, after the EasyStep Interview has been completed, it cannot be accessed again. This is different from earlier versions, in which the EasyStep Interview was always accessible.
Audit Trail
During the upgrade process, the Audit Trail will be automatically switched on, even if it was not switched on in your QuickBooks 2007/08 data file. In Reckon Accounts, with significant enhancements in performance over earlier versions, the Audit Trail is always on. This ensures that an accurate record of your data is maintained.
Printing preferences
Any printing preferences you may have set up in QuickBooks 2007/08 are cleared during the upgrade process. You will need to set your printing preferences after the company file has been upgraded.
Customised templates
If you had customised templates in QuickBooks 2007/08 after you upgrade to Reckon Accounts, the layout of the templates may have changed. Therefore, after you upgrade you should check the layout of your templates.
Memorised reports
Any memorised reports you may have set up in QuickBooks 2007/08 or earlier will not be available after upgrading to Reckon Accounts, and cannot be imported. New memorised reports can be created using the default reports available in Reckon Accounts.
Stock items are called Inventory items
Stock items in QuickBooks 2007/08 are referred to as Inventory items in Reckon Accounts. For example, Stock Assembly items in QuickBooks 2007/08 are referred to as Inventory Assembly items in Reckon Accounts.
Units of Measure
During the upgrade process, any Units of Measure you may have set up in your company file will change. In Reckon Accounts, Units of Measure sets are introduced. Therefore, if your items with Units of Measure enabled have multiple Units of Measure assigned, Reckon Accounts will determine the smallest unit, then use that as the base unit for stocking that item in Reckon Accounts.
All other units will be linked to this base unit as related units.
Change in Payroll Setup (Australia only)
The Payroll Setup wizard is no longer part of the EasyStep Interview. It can be accessed via the Employees menu.
Bonus payroll item is carried over in upgrade to Reckon Accounts (Australia Only)
If you have set up a Bonus payroll item in QuickBooks 2007/08, after upgrading it retains the Addition payroll item type. The item will function in the same way as it did in the 2007/08 software, and will not take on the new functionality offered by the specific Bonus payroll item introduced.
Addition and Deduction payroll items (Annual Limit) (Australia Only)
Both Addition and Deduction payroll items now have an Annual Limit checkbox. Unlike the limit appearing in the Deduction payroll item in previous versions, this checkbox works on an annual rather than a pay period basis.
Payroll Reports only option (Australia Only)
The Payroll Reports only preference has been removed from the software. If this preference is set to “on” when you upgrade from QuickBooks 2007/08, the Full Payroll preference will be enabled automatically. If you do not wish this to happen, change the preference to No Payroll before upgrading in QuickBooks 2007/08.
Changes to terms used for Payroll (Start Date and Left Date) (Australia Only)
In the payroll system, there have been changes to some of the terminology. The Start Date is now known as the Hire Date, and the Left Date is now known as the Release Date.
These dates are still found in the employees’ profiles.
Fringe Benefits Tax (Australia Only)
Previous versions of the software required the reportable Fringe Benefits Tax (FBT) amount for the year ending March 31 to be entered in the software before June 30. The software would then display an amount for the financial year, July 1 to June 30, in the payment summary.
Reckon Accounts, however, refers to the payment date when determining the amount to show in the payment summary.
Thus, the date range of April 1 to March 31 is used instead of the financial year, July 1 to June 30.
New Payroll item type: Overtime Pay (Australia Only)
Reckon Accounts has a new payroll item type, called Overtime Pay. After you have defined the overtime pay factor, (e.g., 1.75), Reckon Accounts will determine the overtime hourly rate for each employee.
More importantly, Reckon Accounts will automatically update these rates in line with any increase for each employee.
The Overtime Pay payroll item type can also be used for non-overtime payments, such as penalty rates. For example, an afternoon shift may attract a shift penalty of 12.5%. In this case, an Overtime Pay payroll item can be configured to multiply the current regular hourly rate by 1.125 to arrive at the amount due for the afternoon shift work. The employee pay slip and other payroll reports will display the name you assign to this payroll item. Thus, the automation found in the new Overtime Pay payroll item type can be used for other purposes.
For more information about how to configure overtime payments, refer to the in-product Help.
Multiple Tax Agencies
The Tax Agency (such as the Australian Taxation Office or Inland Revenue Department) is no longer set in preferences. In Reckon Accounts, you can have multiple tax agencies in one data file. Tax agencies have become suppliers, included in the Suppliers list.
Tax Items and Tax Codes
There is a new tax system incorporating Tax Codes and Tax Items. During the upgrade process, all existing Tax Codes in your QuickBooks 2007/08 data file will be associated with Tax Items, the Sales Tax Item and the Purchase Tax Item.
Note if you are using a New Zealand version, please refer to the additional GST Upgrade notes found at https://www.reckon.com/nz/support/.
Exporting Tax Codes
To export custom Tax Codes from Reckon Accounts, and import them into a new data file, you must also export the Item list. Tax Codes are now linked to Tax Items. If the Item list is not exported, Tax Items are not exported, and the Tax Codes will not function in the new company file.
Industry-Specific Editions and Reckon Accounts Enterprise
Reckon Accounts Enterprise users can enable industry-specific editions. After installing Reckon Accounts, you will be asked which edition you would like to use. If you prefer not to use an industry-specific edition, select General as the industry type.
Multi-user licences with Reckon Accounts Enterprise
Reckon Accounts Enterprise can have up to thirty users connected into the one company data file, depending on the number of licences you have purchased. If you purchase additional licences, e.g., you are moving from a ten-user to a fifteen-user licence, you do not need to re-install the product on the original ten PCs.
Reckon Accounts Enterprise User Rights
Reckon Accounts Enterprise has a revised user rights system, allowing you to set user access rights to over 100 areas of the program.
Upon upgrading from QuickBooks Enterprise 2007/08 or earlier, you should check the user rights for each user to ensure they still have access to the areas they require.
Prepare your company file for upgrade
Before you begin the upgrade process, we strongly recommend that you complete the following steps to
protect your company file and ensure its accuracy.
- Cancel Accountant’s CopyNote: If you proceed with cancellation, your accountant's changes will not be imported. If you have Accountant’s Copy switched on, you need to cancel it before you proceed.To cancel Accountant’s Copy:
- Go to the File menu, click Accountant’s Copy, then click Cancel Accountant’s Changes.
The main title bar indicates whether the Accountant’s Copy is switched on. Refer to the in-product Help for more information about Accountant’s Copy.
- Go to the File menu, click Accountant’s Copy, then click Cancel Accountant’s Changes.
- Back up your company file to your usual backup media Make sure you label your backup media correctly and store it in a safe place in case you need it later. Do not overwrite this backup copy. For additional information about backing up your data, refer to the Reckon Accounts Startup Guide.
- Create and print a Trial Balance report for your company Print a Trial Balance report from your current version of the software before you upgrade. (Your current version will have specific instructions for doing this). Set the printed Trial Balance report aside for reference after you have upgraded your company file.
- Complete the processing of any online banking (ABA) files. You will need to complete the processing of all online banking files before upgrading. Any unprocessed online payments created in the software will no longer be available after the upgrade. These unprocessed payments may also cause problems when creating ABA files in the new version. Make sure the ABA supplier is not inactive in QuickBooks 2007/08, or in earlier versions before you upgrade.
- Verify your company file in your current version of the software
To verify data in earlier versions of the software:- Go to the File menu, click Utilities, then click Verify Data.
- If, during the verification process, the software recommends that you rebuild your data file, click Yes to do so.
- For instructions on how to verify data in earlier versions of the software, refer to the documentation provided with the product.
- Read Changes you should ensure that you have read Before you begin -- changes you should note.
- Schedule your upgrade to minimise disruption to your business. We recommend that you schedule your upgrade carefully in order to minimise any disruption to your business. The most appropriate times are often in the evenings, weekends, or after tax time.
Upgrading your company file
To upgrade your company file:
- Double-click the Reckon Accounts icon on your desktop. The No company open window opens.
- Click Open or restore an existing company. Select Open a company file (.QBW) if you want to open a company file. Select Restore a backup copy (.QBB) if you want to open a backup file.
- Browse to your company (.QBW) or backup (.QBB) file, select it, then click OK. Follow the on-screen instructions to back up the current data file and upgrade it to Reckon Accounts.
This process may take several minutes to complete, especially if you have a large data file. Do not interrupt the process, exit from Reckon Accounts, or shut down your computer until the upgrade has been completed. If you experience problems during the upgrade of your data file, please step through the upgrade procedures at least one more time before contacting Technical Support.
After you upgrade
After upgrading your company file to Reckon Accounts, you need to check that the upgrade was successful so that you can start using your company file in the new version.
- Create and print a Trial Balance report for your company file
To create a Trial Balance report:- Go to the Reports menu, click Accountant, then click Trial Balance.
- Compare the printed Trial Balance against the Trial Balance you created from your previous version.
- Verify your company file
To verify your company file:- Close all open windows within Reckon Accounts.
- Go to the File menu, click Utilities, then click Verify Data.
- If, during the verification process, the software recommends that you rebuild your data file, click Yes to do so.
- Back up your company file to your usual backup media
DO NOT OVERWRITE YOUR PREVIOUS BACKUP! You may choose to back up your company file to a CD-ROM or other storage media. Ensure that you label each disk correctly and store them in a safe place in case you need them later. Do not overwrite this backup. (For more information on backing up your data, see your Reckon Accounts Startup Guide, which is available on the Reckon Accounts Installation files.) - Check your Tax Codes and Tax Items
Check that your Tax Codes have correctly had Tax Items associated with them.Note if you are using a New Zealand version, please refer to the additional GST Upgrade notes found at https://www.reckon.com/nz/support/. - Check your Units of Measure items
Check that any Units of Measure items you may have been using have also been upgraded, with the smallest unit of the item in QuickBooks 2007/08 defined as the Base Unit in Reckon Accounts. See the Reckon Accounts Startup Guide, available on the Reckon Accounts Installation files, for details about how Units of Measure are modified by the upgrade process. - Rebuild your company data file
To ensure your company data file performs optimally, we recommend that you rebuild your company data file three times before using Reckon Accounts.
To rebuild your company data file:- Close all open windows within Reckon Accounts.
- Go to the File menu, click Utilities, then click Rebuild Data.
Activate Reckon Accounts
After the installation process is complete, you should activate your copy of Reckon Accounts. You need an Internet connection to activate online.
To activate your copy of Reckon Accounts:
- 1. In Reckon Accounts, have your company file open, create a new company file, or open the sample company file.
- 2. Go to the File menu, click Activate Reckon Accounts, then follow the on-screen instructions. For more information about activating Reckon Accounts, refer to the in-product Help. If you do not have an Internet connection, press Ctrl+3 on your keyboard (not numeric keypad), or press Ctrl+F12 to open the Reckon Accounts Activation window.
Upgrading to QuickBooks 2007/08 from earlier versions
Before you begin – changes you should note
Upgrading from QuickBooks Version 8 or earlier
Changes to QuickBooks Tax Payable account structure
Your GST and WET Tax Liability account will be consolidated to the Tax Payable parent account as of QuickBooks 2002. This is to improve the accuracy and efficiency of tax reporting. Please note that this will cause the Trial Balance report in QuickBooks 2007/08 to differ from the Trial Balance report in your previous version. For more information about this, refer to our Knowledge Browser at: https://help.reckon.com/.
Before updating your company file, you must ensure that all the sub-accounts of the Tax Payable account are either GST or WET-related. If you have any other sub-accounts which are related to other items, such as PAYG, you need to move them outside the Tax Payable account.
Reporting of deposits (Australia Only)
If you entered deposits with tax in Version 8 or earlier, these transactions were reported as negative inputs. These will now be reported as positive outputs on the Tax Detail report in QuickBooks. This will not affect your Tax Payable control account.
Online banking transactions from Versions 7 and 8
If you used the online banking functionality in QuickBooks Versions 7 or 8, you may have online banking transactions that are marked as To Send in your company file. You need to complete the processing of these transactions before you upgrade your company file.
From the Online Banking Centre, either send these transactions to your bank or remove them from the Items to Send area.
To remove the transactions:
- Highlight the transaction, then click Edit.
- Clear the Online Bank Pmt checkbox.
- Click OK.
Ensure that you have no unsent online transactions or statements in the Online Banking Centre before upgrading your company file.
Upgrading from QuickBooks 2002
Changes to Item Wholesale Price and Price Levels the Wholesale Price field has been phased out since QuickBooks 2002. We have replaced this feature with price levels. You can assign default price levels to specific customers so that the appropriate price levels automatically fill on invoices and other sales forms, saving time and reducing data entry errors. If you have previously used the Wholesale Price field, we recommend that you make a record of your wholesale prices to assign to the new Price Level list.
Changes to templates
QuickBooks now offers greater flexibility and functionality for customising your templates. You can add new fields to templates and customise them to your requirements.
QuickBooks may not recognise some templates created in older versions of QuickBooks Pro. For example estimates, progress invoices or remittance advices. QuickBooks uses the default set if it cannot find a template after upgrading.
We have provided some templates to replace these defaults.
To view the new default templates:
- Go to the List menu, click Templates, then click Import.
- Browse to the template you require and click OK.
Company and legal information
You need to make a note of your company and legal information exactly as it appears in QuickBooks 2002. You will re-enter this information in QuickBooks 2007/08.
To view your company and legal information:
- Go to the Company menu and click Company Information.
- Make a note of your company and legal information.
Upgrading from QuickBooks 2003 or QuickBooks Enterprise 2.0
If you are upgrading from QuickBooks 2003 New Zealand version, please contact Customer service on 0800 447 292 to receive an NZ Install Code to guide you through the New Zealand upgrade process.
Employee titles
Employee title data (Mr, Mrs, Ms or Dr) that you recorded in QuickBooks 2003 may need to be updated in the employee record once you have upgraded your company file. For each employee, open the employee record and choose the appropriate title from the drop-down list.
Complete online banking (ABA) files
You need to complete all online banking files before upgrading. Any unprocessed online payments created in QuickBooks 2003 will no longer be available after the upgrade.
To create online banking files:
- Go to the Banking menu and click Online Banking Centre.
- Select the payees to include in the online banking file.
- Click Create ABA File.
- Enter a name and save the file. Pay a Customer or Other Name using the Bank (Online) method QuickBooks 2007/08 does not allow payments to a customer or other name using the Bank (Online) method. You can only pay a customer or other name using the Cheque-to-print or Cash/Cheque method.
Upgrading from QuickBooks 2004 or QuickBooks Enterprise 4.0
Changes to reports
We have improved and renamed several reports within QuickBooks. The Superannuation, Employee Super Contribution and Super Contribution Paid reports have been renamed Super Report by Fund, Super Report by Employee and Employer SGA Contributions report, respectively. The Leave Liability report has also been customised.
Complete online banking (ABA files)
You will need to complete all online banking files before upgrading. Any unprocessed online payments created in QuickBooks 2004 will no longer be available after the upgrade.
To create online banking files:
- Go to the Banking menu and click Online Banking Centre.
- Select the payees to include in the online banking file.
- Click Create ABA File.
- Enter a name and save the file.
Business Activity Statement configurations (Australia Only)
QuickBooks 2007/08 retains your BAS configurations after you have upgraded your company file. QuickBooks will look for the BAS configurations from the last detected version of QuickBooks installed. However, we recommend that you verify the BAS configurations following the upgrade.
Industry-specific configurations
If you are installing an industry-specific edition for the first time or changing from an industry-specific edition, your personal settings and feature set will change after the upgrade. Your personal settings will now reflect the features specific to the edition that you are installing.
Upgrading from QuickBooks 2005/06
Import Web Connect File
If you use the Import Web Connect File feature in QuickBooks 2005/06 for a Westpac Bank account, after you upgrade your company file to QuickBooks 2007/08 you will need to edit the Westpac Bank account by changing the branch code. In the Branch Code field, the number will appear in the format XXX-XXX. Simply remove the dash (-) so that the format is XXXXXX. Click OK.
Upgrading from QuickBooks 2006/07
Tax Code Exception report
If your company file originated in QuickBooks Version 5 or earlier, you may experience a small error in the Tax Code Exception report after you upgrade to QuickBooks 2007/08.
This is due to an upgrade issue that occurs with General Journal entries created in early versions of QuickBooks. If your company file is from a later version of QuickBooks, or you do not use General Journal entries, this error will not occur.
Commissions payroll item type (Australia Only)
In the Payroll Item List, the Commissions payroll item type is now displayed as Other. This enhanced payroll item type can now be used for other purposes, such as time in lieu payments, as well as for tracking commissions.
To view the Payroll Item list:
- Go to the Lists menu and click Payroll Item List.
QuickBooks 2007/08, QuickBooks Customer Manager 2006/07 and Windows Vista
QuickBooks Customer Manager 2006/07 runs under the Windows Vista operating system and integrates with QuickBooks 2007/08. However, in order to ensure that all of the integration functionality between QuickBooks 2007/08 and Customer Manager 2006/07 works without incident under Windows Vista, you need to ensure that you are running Customer Manager 2006/07 as the Administrator. If you do not, you may experience unexpected results when you attempt to integrate your QuickBooks customer data with Customer Manager.
This requirement does not exist under Windows XP. Windows XP users may continue to use the QuickBooks software as per normal after upgrading to QuickBooks 2007/08.
QuickBooks Customer Manager 2006/07 is not compatible with QuickBooks 2007/08
Note that after you upgrade to QuickBooks 2007/08, you can no longer use QuickBooks Customer Manager 2006/07.
Due to substantial product changes in QuickBooks 2007/08, these products are not compatible. However, there is a version of Customer Manager that is compatible with QuickBooks, please contact Reckon for more information.
Prepare your company file for upgrade
Before you begin the upgrade process, we strongly recommend that you complete the following steps to
protect your company file and ensure its accuracy.
- Cancel Accountant’s Copy
If you have Accountant’s Copy switched on, go to the File menu, click Accountant’s Copy, then click Cancel Accountant’s Changes. The main title bar indicates whether the Accountant’s Copy is switched on. Refer to the in-product Help for more information about Accountant’s Copy. - Back up your company file to your usual backup Media
Make sure that you label your backup file correctly and store it in a safe place in case you need it later. Do not overwrite this backup. For information on backing up, refer to the in-product Help. - Create and print a Trial Balance report for your company
Print a Trial Balance report from your current version of QuickBooks before you upgrade. (Your current version will have specific instructions for doing this). Put the printed Trial Balance report aside for reference after you have upgraded your company file. - Complete any online banking (ABA) files
You will need to complete the processing of all online banking files before upgrading. Any unprocessed online payments created in QuickBooks will no longer be available after the upgrade. These unprocessed payments may also cause problems when creating ABA files in the new version. - Verify your company file in your current version of QuickBooks :
- Go to the File menu, click Utilities, then click Verify Data.
For instructions on how to verify in earlier versions of QuickBooks, refer to the documentation provided with the product.
- Go to the File menu, click Utilities, then click Verify Data.
- Read Changes you should note
Ensure that you have read Before you begin -- changes you should note. - Schedule your upgrade to minimise disruption to your business
We recommend that you schedule your upgrade carefully to minimise any disruption to your business. The most appropriate times are often in the evenings, weekends, or after tax time.
Upgrade your company file
Reminder: Before upgrading, have you:
- Printed a Trial Balance report from your original QuickBooks program?
- Created a backup of your original company file and verified it?
- Cancelled the Accountant’s Copy?
- Completed all online banking transactions?
To upgrade from QuickBooks Version 8 or earlier, continue reading this page.
To upgrade from QuickBooks 2002, 2003, 2004, 2005/06 or 2006/07, click here.
Upgrading from Version 8 or earlier
If using a New Zealand version prior to 2002, follow the steps outlined in the additional upgrade notes, available at www.reckon.com/nz.
Reckon has sunsetted QuickBooks Versions 8 and earlier. To convert your company file to QuickBooks 2007/08, you need to step your company file up through more recent versions of QuickBooks (we use the trial version of previous QuickBooks releases to do this). This involves installing and upgrading to an interim version of QuickBooks, then moving up to the next version.
The following table explains how to upgrade your company file up to QuickBooks 2007/08 from each version.
Current version | Upgrade path |
|
|
|
|
These trial versions are previous releases of the software are available here.
Important Note:
For installing older trial versions on Windows 10:
After installing older trial versions of QuickBooks you will need to do the following:
- Locate the QuickBooks icon on your desktop
- Right-click the icon and select Properties
- Click on the Compatibility tab
- Tick Run this program in compatibility mode for: and select Windows XP (Service Pack 2)
- Click Apply and OK
Install QuickBooks V7.5
To install the QuickBooks V7.5 Trial:
- Download from here and run the file to begin the installation
- Open your company file.
- Follow the on-screen instructions to upgrade your company file.
- Click OK to the warning about having in excess of 200 transactions.
- Close the company file and QuickBooks.
Install QuickBooks 2002 Trial
To install the QuickBooks 2002 Trial:
- Download from here and run the file to begin the installation
- Click Yes to the Important Message for Upgraders message about upgrading your company file.
- Follow the on-screen instructions to complete the installation.
- Open QuickBooks 2002 (Version 9) Trial and open your company file.
- Follow the automatic instructions to upgrade your company file.
- Click OK to the warning about having in excess of 500 transactions.
- Close the company file and QuickBooks.
Upgrading from QuickBooks 2002, 2003, 2004, 2005/06 or 2006/07
QuickBooks 2007/08 upgrades files from QuickBooks 2002, QuickBooks 2003, QuickBooks 2004, QuickBooks 2005/06 and QuickBooks 2006/07 directly.
Install QuickBooks 2007/08
Before you install QuickBooks 2007/08:
Take a few moments to read through all of the installation instructions. Then:
- Log on to your PC as an Administrator
- Close all programs
- Disconnect from the Internet
- Disable your anti-virus software and firewall
After you have installed QuickBooks:
- Enable your anti-virus software and firewall
To install QuickBooks 2007/08:
- Download from here and run the file to begin the installation
- Enter your relevant QuickBooks 2007/08 Installation Key Code:
2007/08 Australia installation keys:- QuickBooks Accounting 82500-12693-32946-720042
- QuickBooks Plus 83011-93664-25001-510143
- QuickBooks Pro 84911-62689-21002-210142
- QuickBooks Premier 85210-55686-74244-920042
2007/08 New Zealand installation keys:- QuickBooks Accounting 82103-00616-38646-220063
- QuickBooks Plus 83603-67677-24001-410162
- QuickBooks Pro 84404-16681-25002-010163
- QuickBooks Premier 85503-18605-08449-20062
- Follow the on-screen instructions to install QuickBooks 2007/08.
- Reboot your PC to complete the QuickBooks installation.
Upgrade your company file
Double-click the QuickBooks 2007/08 icon on your desktop. QuickBooks 2007/08 automatically detects your company file and opens the Update Utility. This utility updates the format of your company file so that it can be opened in QuickBooks 2007/08.
If QuickBooks does not detect your existing company file:
- Click Open an existing company in the No company open window.
- Browse to your company file, select it, then click Open.
- Follow the on-screen instructions to back up the current company file and upgrade it to QuickBooks 2007/08. This process may take several minutes to complete, especially if you have a large data file. Do not interrupt the process, exit from QuickBooks 2007/08, or shut down your computer until the upgrade has been completed. If you experience problems during the upgrade of your data file, please step through the upgrade procedures at least one more time before contacting Technical Support. Charges may apply for this service.Note: If you receive the error message C=44, view this article. This error occurs as a result of corrupt transactions detected in QuickBooks that need to be deleted and re-entered.
After you upgrade
After upgrading your company file to QuickBooks 2007/08, you need to check that the upgrade was successful so that you can continue upgrading to Reckon Accounts.
- Create and print a Trial Balance report for your company file
To create a Trial Balance report:- Go to the Reports menu, click Accountant, then click Trial Balance.
Compare the printed Trial Balance against the Trial Balance you created from your previous version.
Note: If upgrading from QuickBooks Version 8 or earlier, you will notice a change in your Trial Balance report. For more information, see Changes to QuickBooks Tax Payable account structure on page 39.
- Go to the Reports menu, click Accountant, then click Trial Balance.
- Verify your company file
To verify your company file:- Close all open windows within the software.
- Go to the File menu, click Utilities, then click Verify Data.
- Back up your company file to your usual backup media
DO NOT OVERWRITE YOUR PREVIOUS BACKUP! You may choose to back up your company file to a CD-ROM or other storage media. Ensure that you label each disk correctly and store them in a safe place in case you need them later. Do not overwrite this backup.
(For more information on backing up your data, see the Reckon Accounts in-product Help.) - Set preferences for State Payroll Tax (Australia Only)
If you use the integrated payroll feature in the software, you need to edit each Wage and Addition payroll item to turn on the State Payroll Tax option in the Taxes window.
To edit Wage and Addition Payroll Items:- Go to the Lists menu and click Payroll Item List.
- Double-click a payroll item. The Payroll Item wizard opens.
- Select the State Payroll Tax option in the Taxes window.
This change also applies to a Payroll Item list that you import into QuickBooks 2007/08 as an IIF file.
You also need to edit each employee record that should be included in the State Payroll Tax report.
To edit employee records to include them in the State Payroll Tax report:- Go to the List menu and click Employee List.
- Double-click the employee record you want to edit.
- In the Edit Employee window, select the Payroll Info tab, then click Tax Details.
- Click the State tab and select the Include in State Payroll Tax checkbox.
Next step: upgrade to Reckon Accounts
To complete the upgrade process, click here and follow the instructions to upgrade from QuickBooks 2007/08 to Reckon Accounts.
Need more help?
Ask the Reckon Community at: https://community.reckon.com/categories/reckonaccounts
Or Log a Support Ticket: https://www.reckon.com/au/support/