Table of Contents
Upload bank transactions to Reckon One
Learn how to upload electronic bank statements into Reckon One so you can reconcile your bank transactions against your Reckon One transactions (such as invoices, payments, and bills). An alternative way to do this is to connect a bank feed, which automatically pulls your bank transactions into Reckon One, saving you manual effort.
Before you start
Before you start, you'll need to generate and download your bank statement:
- Log into your financial institution and export your electronic bank statement or bank transactions as a QIF, CSV or TXT file.
- Save it on your computer, ready for uploading to Reckon One.
If you have bank transactions already imported, a manual upload will overwrite any that have yet to be allocated.
File types supported by Reckon One
- QIF (Quicken Interchange Format) - This file type is easiest to upload, as it does not require you to map how the data appears in Reckon One after uploading.
- CSV (Comma-Separated Values) - requires you to manually map how the data appears in Reckon One after uploading.
- TXT (Text file) - requires you to manually map how the data appears in Reckon One after uploading.
Upload your transactions
- In the Banking menu, select Bank accounts.
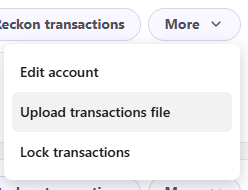
- Next to the bank account you want to upload transactions to, click More, then select Upload transactions file.You can also upload transactions from the Bank transactions screen: In the Banking menu, select Bank transactions, then click Manual upload.
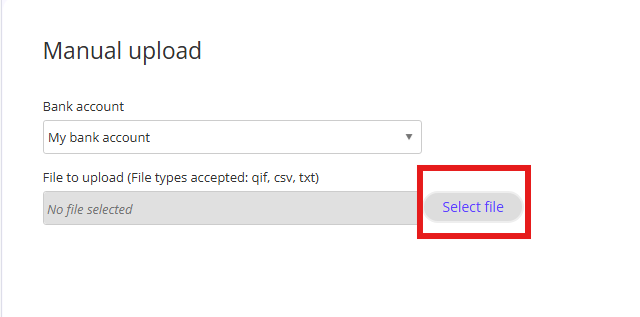
- On the Manual upload screen, select the bank account from the Bank account dropdown menu.
- Click on Select File.
- Find and select the previously saved QIF, CSV or TXT file, then click Import the file.
- If you uploaded a CSV or TXT file, you'll see some options to manually map how the data appears in Reckon One:
- Select an option for Columns are separated by:
- Comma
- Tab character
- Specific character - if you choose this, enter the character in the field.
- In the Import from row field, enter the row number in your file that corresponds with where the data begins.
- Map the headings from your bank statement to those used in Reckon One. You must map the following fields if they are visible (the rest can be optionally mapped):
- Date - Choose Date from the dropdown menu at the top of the column that contains dates.
- Debit and credit - Choose Debit and Credit from the dropdown menu at the top of the columns containing debit and credit amounts, or if you have an Amount column on your bank statement, choose Amount from the dropdown menu at the top of the column containing amounts.
- Description - Choose Description from the dropdown menu at the top of the column containing payee details.
- Reference - Choose Reference from the dropdown menu at the top of the Category column.
- If your CSV has extra columns (e.g., balance), you can ignore them during mapping.
- Select an option for Columns are separated by:
- Click Import the File again.
- Transactions will appear in Latest Manual Upload under Upload source located at the top right of the Bank Transactions screen
Summary of transactions
The top right of the bank transactions screen shows:
- Upload Source. Where the bank transactions came from (either bank feed or manual upload)
- Date of last import.
- Completed. Whether the transactions have all been allocated (this is shown in the Completed column - this will say No until all transactions on the screen have been allocated. Once all transactions have been allocated, this will say Yes).

Read more
- Learn how to automate this process in Reckon One using bank feeds