Table of Contents
Create and manage custom reports in Reckon One
Learn how to create, edit and delete custom reports in Reckon One, so you can run reports specifically tailored to your business needs.
About custom reports
What custom reports are
Custom reports allow you to save the changes you make to a Reckon One report, so you can easily access reports that are tailored to suit your needs. To create a custom report, open any Reckon One report (or previously created custom report), adjust the filters, data and display options to suit your needs, then save it as a custom report with its own name.
Who can view custom reports
Only the person who creates the custom report can see it, unless that person chooses to share it with the book.
Custom report groups
When you create a custom report, you can choose to have it display in an existing report group or create a new custom group for it. Only you can see the custom report groups that you create.
Create a custom report
To create a custom report in Reckon One:
- In the Reporting menu, select Reports.
- Click on the report you wish to change and save as a custom report.
- Change the reporting and comparison periods, filters, data and display options as desired. If you select a reporting or comparison period that doesn't contain specific dates (e.g. This financial year), the time period will update based on when the report is opened (for example, if you create a custom report in the 2024-25 financial year and open it in the 2025-26 financial year, the data will show for the 2025-26 financial year). If you select a reporting or comparison period with exact dates, those dates will apply regardless of when the report is accessed.
- Click Save as custom.
- Enter a Report name and optional Description.
- (Optional) Select a Report group for the report, or click on the dropdown and select Create new report group to create a new one.
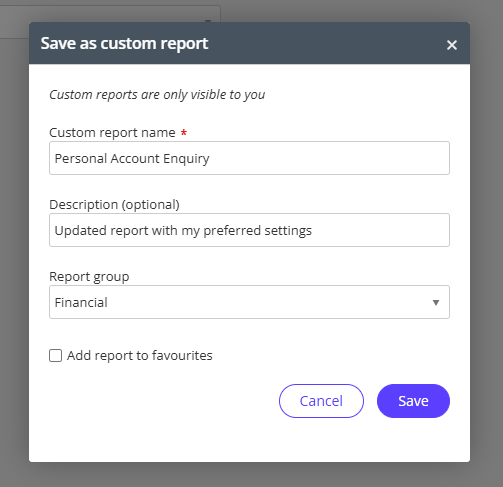
- (Optional) Click the 'Add report to favourites' checkbox. This will pin the report to the top of the All tab on the Reports screen, and create a link to the report in the side navigation of Reckon One, making it quicker to access.
- Click Save.
- Your custom report will appear in the All and Custom tabs on the Reports screen in Reckon One.
Edit a custom report's filters and data and display options
To edit the filters and data and display options of a custom report:
- In the Reporting menu, select Reports. This will show all your reports, or to see only your custom reports select the Custom tab on this screen.

- Click to open the custom report you want to edit.
- Make desired changes.
- You can either save your changes, or save the report as a new custom report:
- To save changes, click Save changes.
- To save as a new custom report, click the Save changes dropdown, then select Save as new custom.
Edit custom report name, description, or group
To edit a custom report's name, description, or group:
- In the Reporting menu, select Reports. This will show all your reports, or to see only your custom reports select the Custom tab on this screen.
- Click on the More options menu (3 dots) to the right of the report.
- Click Edit report details & sharing.
- Edit the required details. You can also select to Add the report to favourites and share the report with the book.
Delete a custom report
To delete a custom report:
- In the Reporting menu, select Reports. This will show all your reports, or to see only your custom reports select the Custom tab on this screen.
- Click to open the custom report you want to delete.
- Click the Save changes dropdown, then select Delete.

Manage custom report groups
Custom report groups and changes made to them can only be seen by the person who created the. To view, create, rename or delete your custom report groups:
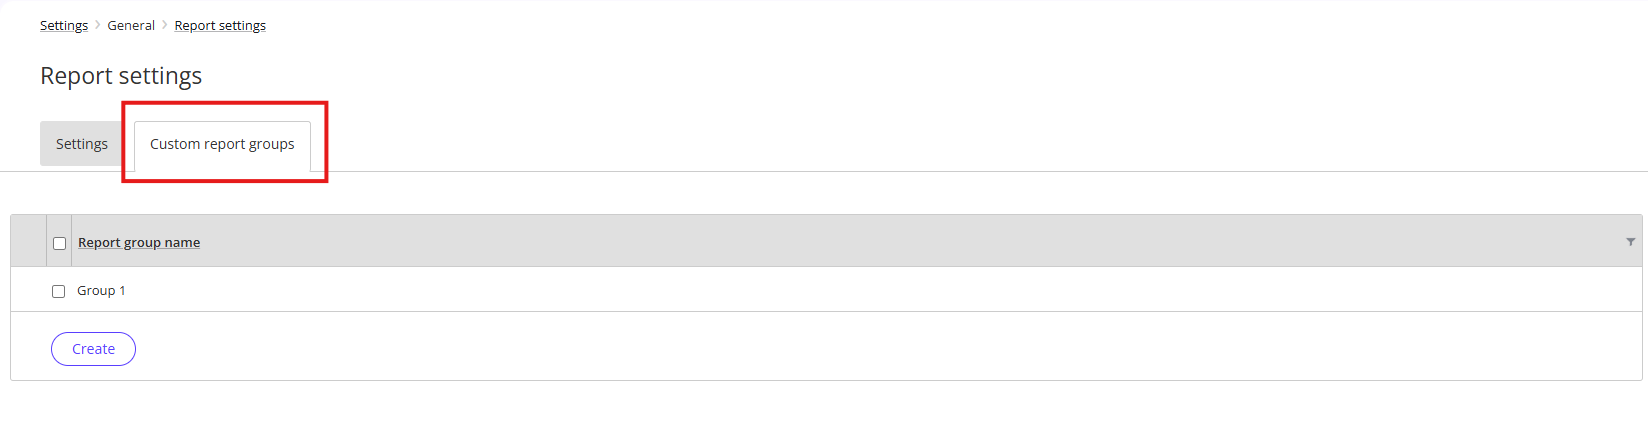
- From the reports screen or from within a custom report, click Global report settings in the top right.
Alternatively, from any screen in Reckon One, click on the cog icon in the top right, select Settings, then click on Report settings in the General section.
- Click on the Custom report groups tab.
Create custom report groups
To create a custom report group, click Create and enter a report group name.
Rename custom report groups
To rename a custom report group, click on the report group name, enter a new name, and click Save.
Delete custom report groups
To delete a custom report group, select the checkbox next to the report group and click Delete.
Read more
- Learn how to find and access reports
- Learn how to share a custom report to your book