Table of Contents
Add logo and branding to invoices in Reckon One
Learn how to add your company logo and branding to invoice templates in Reckon One. Adjust the font, colours and header image for your chosen template.
Customise the font
To change the font type and size for the chosen template:
- Go to Settings (cog icon in top right corner), General, then Manage templates.
- From the Template dropdown, select the template you wish to customise.
- In the Font dropdown, select the font.
- In the Size dropdown, select the size you want text to be.
- To see your changes in the preview, click Refresh preview in the top right. You can also click Print to see how the invoice will appear printed.
- To save your changes, click Save.
Customise the feature colour
Colour customisation is only available on Bold, Light and Compact templates.
To change the colour of key elements in the chosen template:
- Go to Settings (cog icon in the top right corner), General, then Manage templates.
- From the Template dropdown, select the template you wish to customise.
- Click on the Colour box.
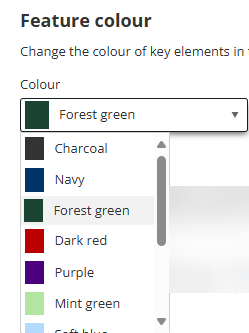
- Select from the list of available colours.
- To see your changes in the preview, click Refresh preview in the top right. You can also click Print to see how the invoice will appear printed.
- To save your changes, click Save.
Add company logo
To add your company logo to the chosen template:
- Go to Settings (cog icon in the top right corner), General, then Manage templates.
- From the Template dropdown, select the template you wish to customise.
- Draft and drop your logo into the Company logo area, or click Browse to choose from your files.
Supported file types are BMP, PNG, JPG, GIF. Maximum file size is 5MB.
- Once uploaded, you’ll see your file name in the Company logo area. To remove the file, click on the small cross next to the file name.
- (Optional) Use the Position toggle to choose whether the logo should be Left aligned or Right aligned. It defaults to Left aligned.
You can only set the logo position on Bold, Light and Compact templates.
- To see your changes in the preview, click Refresh preview in the top right. You can also click Print to see how the invoice will appear printed.
- To save your changes, click Save.
Add header image
Header image is only available on Bold, Light and Compact templates.
A header image is an image that will display across the top, running the full width of the invoice. To add a header image to the chosen template:
- Go to Settings (cog icon in top right corner), General, then Manage templates.
- From the Template dropdown, select the template you wish to customise.
- Draft and drop your image into the Header image area, or click Browse to choose from your files.
Supported file types are BMP, PNG, JPG, GIF. Maximum file size is 5MB.
- Once uploaded, you’ll see your file name in the Header image area. To remove the file, click on the small cross next to the file name.
- (Optional) Select the Apply to first page only checkbox if you want the image to appear only on the first page of the invoice.
- (Optional) Adjust the image height using the Image height slider.
- To see your changes in the preview, click Refresh preview in the top right. You can also click Print to see how the invoice will appear printed.
- To save your changes, click Save.
Read more
- Learn how to customise the information that will appear on invoices
- Learn more about invoice templates