New/Departed Employees
Employers will need to upload details of new and departed (or terminated) employees. This information is expected to be supplied to IR no later than the next filing of employment information but can be supplied earlier as per the Taxation Act 2018 - Section 23 L.
In Reckon Accounts, you can export the New/Departed employees, which you can then upload at IR Portal. You will need to export ALL of your employees before you lodge your first ever Employment Information (EI).
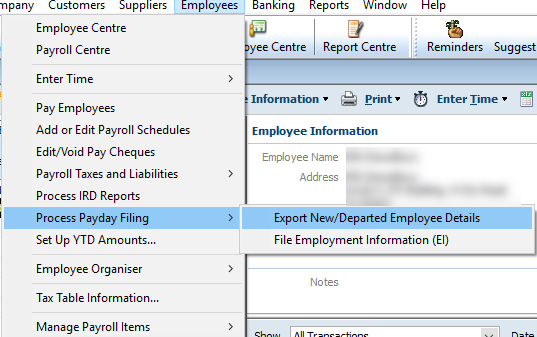
To export New/Departed employees, go to:
- Employees menu from the top menu bar > Process Payday Filing > Export New/Departed Employee Details
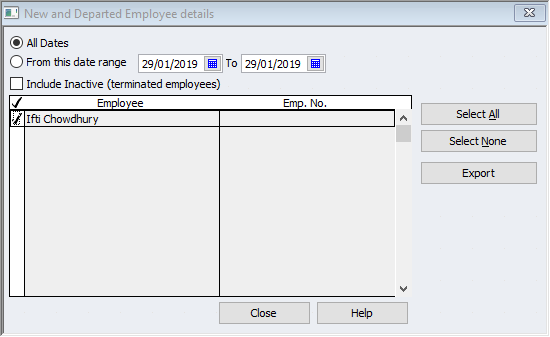
- Select the appropriate date range
- Tick the employees either manually or click Select All to choose all of them
- When you're ready to export, click Export button and choose the location where you want to save this file
You can open this exported file in E-file Checker to view the contents and if you have to make any changes to it.
Reckon Accounts Hosted:
.png)
Reckon Accounts Desktop:
- Install E-File Checker from your installation folder.
- You can find it from C:\Temp (if you used the default extract to location during installing Reckon Accounts)\Reckon_Accounts_20##\Tools\EMS Checker\Setup.exe)
- Once installed, you can find it from your Start menu
You can only make changes to the below fields:
- Employee title: You can change the employee Title to the one that is listed in the drop-down menu as IR will only accept the title if you choose from one of these available titles
- Kiwisaver status: Below are the valid Kiwisaver status. Reckon Accounts will try to choose the appropriate status
- AK - Active KS member
- CH - Contributions Holiday
- NK - Not eligible for KS
- NM - Non-Member
- OT - Opted Out
.png)
Lodging New/Departed Employees data
Once you've completed the above steps, you will have to upload this exported file to your MyIR Portal.
Click here to read the instructions from IRD.