Table of Contents
Quick guide to Reckon One after Reckon Accounts migration
Learn how to navigate and where to find different features in Reckon One after migrating from Reckon Accounts Hosted or Desktop. See a list of menu options with comparisons to Reckon Accounts, and a quick look-up table to find features you're looking for.
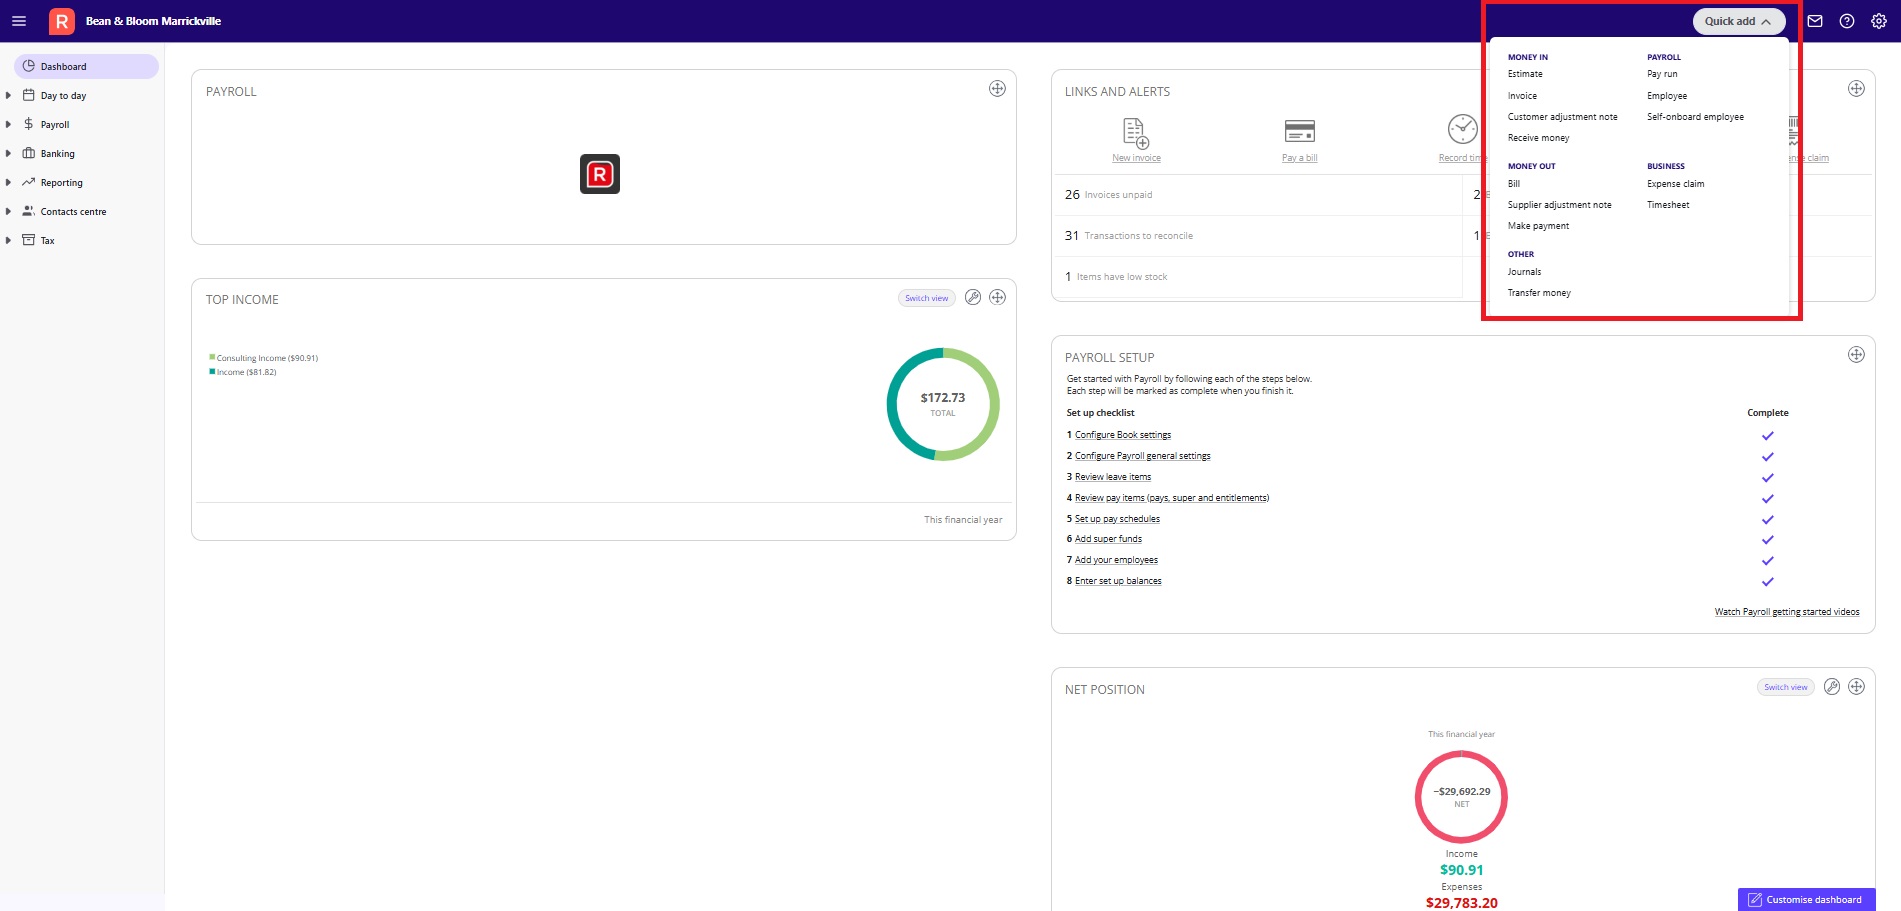
Quick add menu
The Quick add menu (located in the top right of your Reckon One book) is a really quick, easy way to do common tasks in Reckon One, such as (depending on your plan):
- customer and supplier transactions
- journals
- transferring money (called 'transfer funds')
- payroll transactions, including adding and paying employees
To use Quick add, click on Quick add, then select from the list shown.
Reckon One side navigation
The other main way to get around is via the side menu.
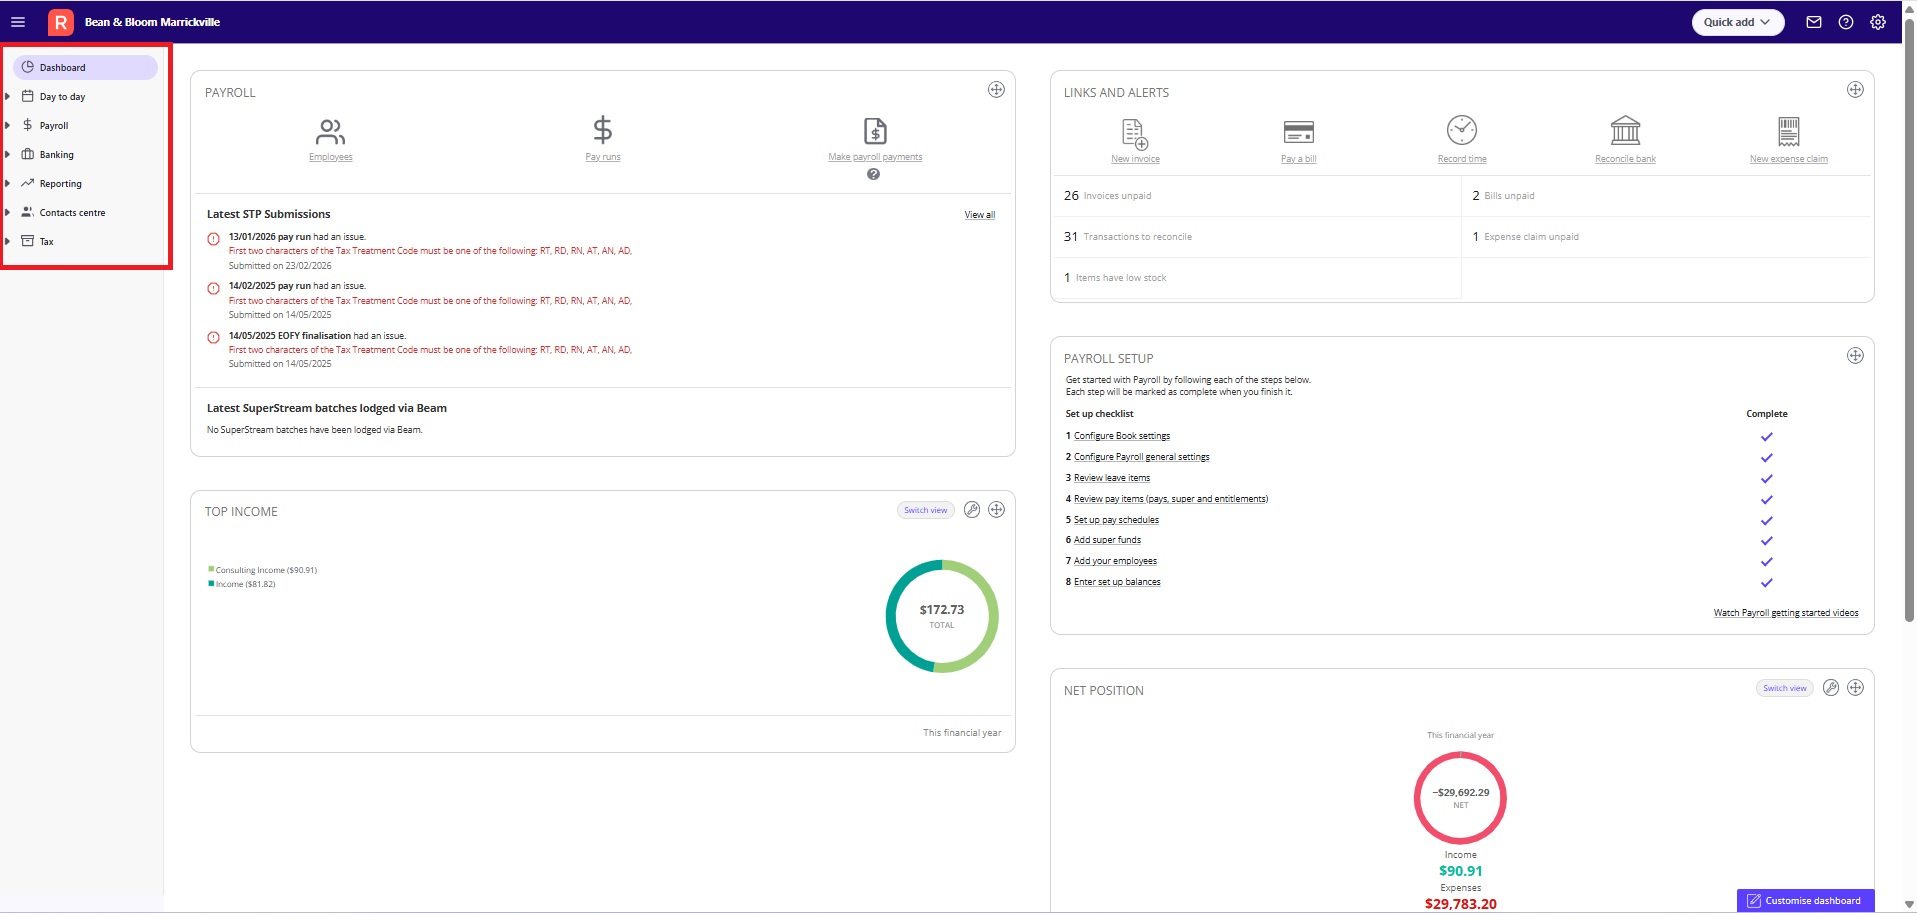
The items you'll see in this menu will differ depending on your subscription. Here's a breakdown of what's in the different menu items:
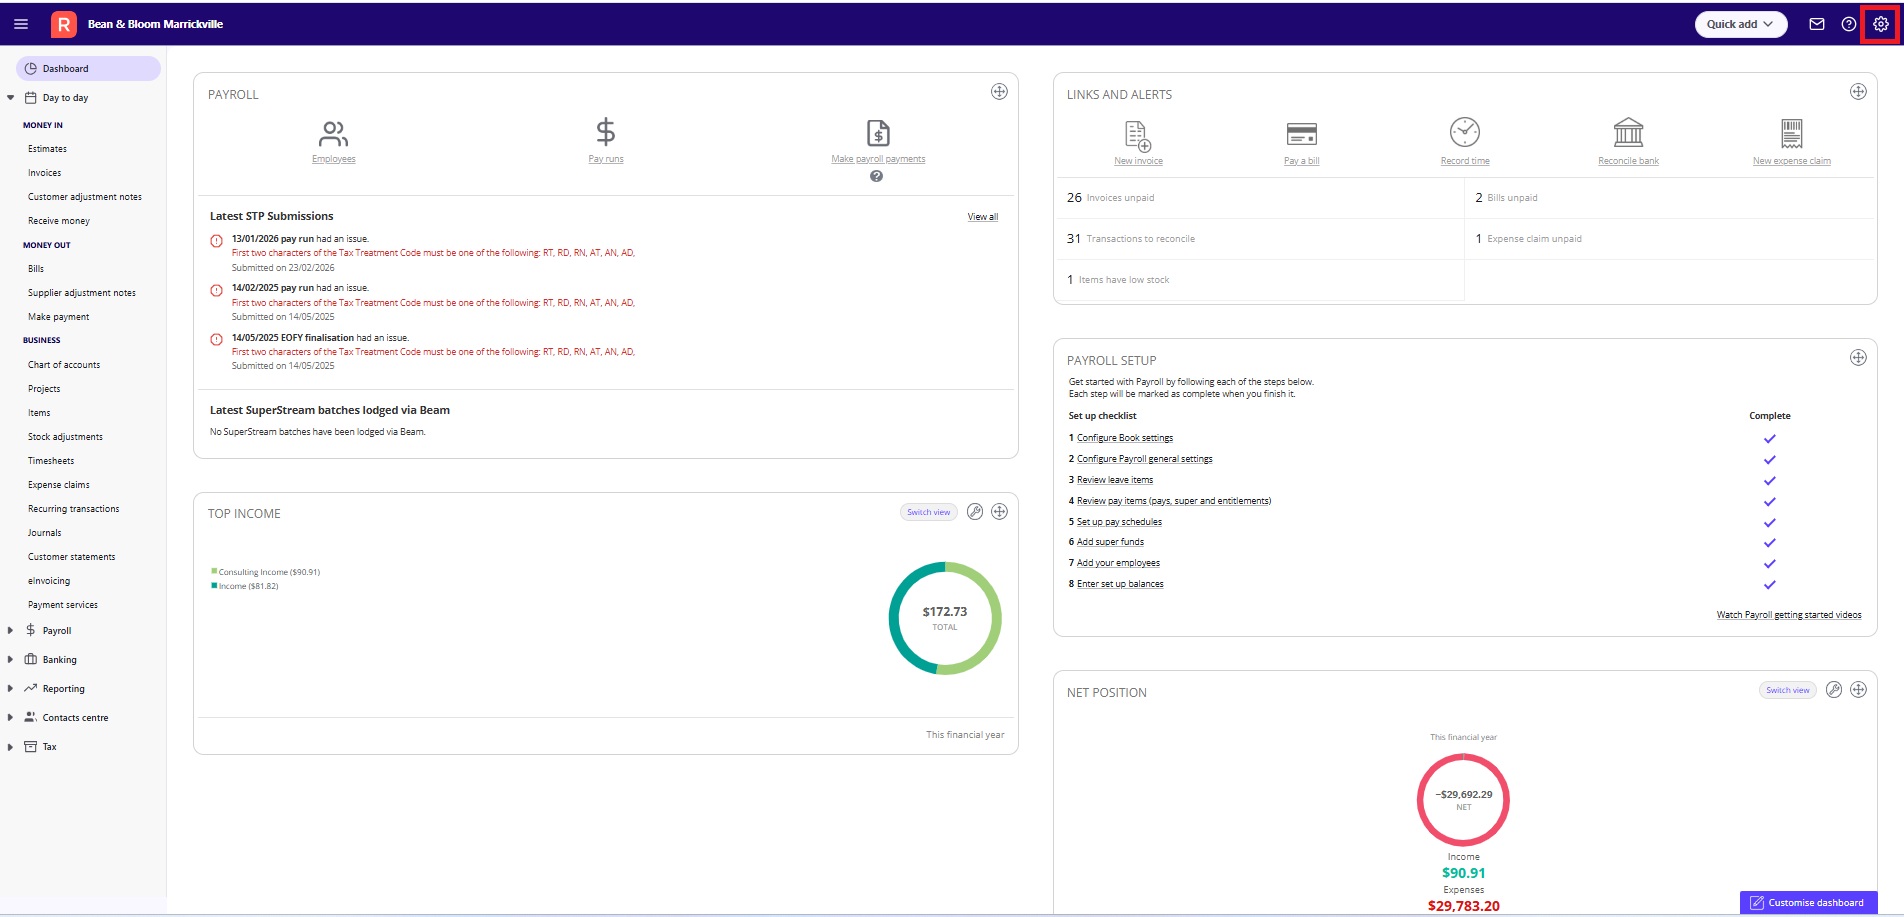
Day to Day menu
The Day to day menu is broken into 3 parts:
- Money in - for recording customer transactions such as estimates, invoices, and receipts.
- Money out - for recording supplier transactions such as bills and payments.
- Business - for functions related to the day to day running of your business, including:
- chart of accounts
- journals
- projects
- timesheets
- items
- expense claims
- recurring transactions, such as recurring invoices
- customer statements.
Payroll menu
In the Payroll menu, you can:
- add and manage employees
- add super funds
- pay employees
- finalise payroll end of year
- make single touch payroll submissions
- download SAFF files for SuperStream, or lodge SuperStream batches via Beam (once you've set it up as your SuperStream service).
Banking menu
In the Banking menu, you can:
- Add and edit bank accounts
- Add and manage bank feeds
- Import bank statements
- Create ABA files
Reporting menu
Contacts centre menu
Settings menu
The Settings section isn't accessed via the side menu. It's accessed via the cogwheel icon in the top right of your Reckon One book.
The Settings section is where you can customise your book:
- Update your company information in book settings
- Manage templates for invoices, bills and other documents
- Manage user roles and permissions
- Set preferences for how your book handles accounting, tax, banking, payroll, items, bills, and more.
Quick find a feature
Looking for a specific thing? Try our alphabetical list:
Feature (as it's called in Reckon Accounts Hosted or Desktop) | Where to find it in Reckon One |
ABA file (create) | In the Banking menu, click on Bank payments |
Bank account (add, edit) | In the Banking menu, click on Bank accounts |
BAS (simplified BAS) | In the Tax menu, click on BAS |
Bills (enter, pay) | In the Day to day menu, Money out section, click on Bills |
Chart of accounts | In the Day to day menu, Business section, click on Chart of accounts. If you want to add or edit a bank account, see Bank account in this list. |
Company information | Click on the cogwheel in the top right of your Reckon One book, then click on Settings. In the General section, click on Book settings |
Company preferences | Click on the cogwheel in the top right of your Reckon One book, then click on Settings. Click a menu item to set your preferences. |
Customers (create, edit) | In the Contacts centre menu, click on Customers |
Customer adjustment notes (refunds) | In the Day to day menu, Money in section, click on Customer adjustment notes |
Credit note | In the Day to day menu, Money out section, click on Supplier adjustment note |
Employees (add, edit) | If using payroll, in the Payroll menu, click on Employees. If not using payroll, you can add employees by going to Contacts Centre, then clicking on Employees. |
Fast coding | In the Banking menu, click on Fast coding. |
General journal entries | In the Day to day menu, Business section, click on Journals |
Import bank statements | In the Banking menu, click on Bank transactions, select your bank account, then click on Manual upload |
Items (create) | In the Day to day menu, Business section, click on Items |
Items (view list) | In the Reporting menu, click on Reports. You'll find the Items list in the Customers and money in category. |
Lists | In the Reporting menu, click on Reports. You'll find lists in the category they relate to. |
Pay employees | In the Payroll menu, click on Pay runs. |
Payroll items | In the Payroll menu, click on Payroll settings. Then click on Pay items. |
Process Single Touch Payroll | In the Payroll menu, click on STP if you wish to make a pay event such as an update event, and click on EOFY if you wish to finalise payroll end of year. |
Receive payments | In the Day to day menu, Money in section, click on Receive money |
Statements (create statements) | In the Day to day menu, Business section, click on Customer statements |
Super data export/export SAFF | In the Payroll menu, click SuperStream. |
Super funds (add, edit) | In the Payroll menu, click on Payroll settings. Then click on Superannuation funds. |
Suppliers (add, edit) | In the Contacts centre menu, click on Suppliers. If the supplier is a super fund and you're using payroll, you should instead create them in the Payroll menu. For more guidance, on where to do this, see Super funds in this list. |
Templates | Click on the cogwheel in the top right of your Reckon One book, then click on Settings. Templates are split into categories: Customer related templates - click on Money in in the Day to day section. Customer statements - click on Statements in the Day to day section. Supplier related templates - click on Money out in the Day to day section. |
Time | In the Day to day menu, Business section, click on Timesheets |
Transfer funds | In the Banking menu, click on Transfer money |
Users (set up users and roles, view users) | Click on the cogwheel in the top right of your Reckon One book, then click on Settings. To edit or add roles, click on Roles in the General section. To add or remove users, click on Users in the General section. |
Read more
- Learn how to log in to Reckon One after you've migrated